
Are you ready to elevate your online learning platform to new heights? If you’re using Eduma for your educational website, you’re already on the right track. But what if we told you that there’s a way to make your site even more engaging and user-friendly? Enter the Custom Layout Menu! This powerful feature allows you to design a navigation experience that not only aligns with your brand but also enhances user engagement. In this step-by-step guide, we’ll walk you through everything you need to know about utilizing the Custom Layout Menu in Eduma. Whether you’re a seasoned techie or just getting started, we’ll break it down in a conversational and straightforward way, ensuring you feel confident every step of the way. Let’s dive in and transform your Eduma site into a captivating learning hub that keeps your visitors coming back for more!
Understanding the Benefits of Custom Layout Menus in Eduma
Custom layout menus in Eduma empower educators and administrators to tailor the user experience to their specific needs. By utilizing these versatile menus, you can enhance navigation, making it more intuitive for students and staff alike. This personalized approach ensures that users can easily find vital resources, courses, and information, thus improving overall engagement and satisfaction.
One of the standout benefits is the ability to showcase important content right at the forefront. Whether it’s featured courses, announcements, or special events, custom layout menus allow you to highlight what matters most. This strategic placement not only draws attention but also encourages users to interact with the highlighted sections, ultimately driving more traffic to your key offerings.
Moreover, custom menus can significantly improve the mobile experience. With a growing number of users accessing educational platforms via smartphones and tablets, having a menu that adapts to different screen sizes is crucial. A well-designed custom menu ensures that all users, regardless of their device, have seamless access to the information they need without endless scrolling or searching.
Another compelling advantage is the ability to create a sense of hierarchy within the content. By organizing your menu items into clear categories, you can guide users through your site effortlessly. This not only helps in decluttering the interface but also allows users to process information quickly, making their navigation experience more pleasant.
custom layout menus foster a unique brand identity. By implementing your own designs, colors, and styles, you can create a consistent visual representation of your institution. This strengthens brand recognition and cultivates trust among users, as they associate the customized layout with the quality and reliability of the educational experience you provide.
| Benefit | Description |
|---|---|
| Enhanced Navigation | Improves user experience by making resources easily accessible. |
| Content Highlighting | Prominently displays important courses and announcements. |
| Responsive Design | Optimizes user experience across various devices. |
| Better Organization | Creates a clear structure for easier information retrieval. |
| Brand Identity | Establishes a unique visual presence that resonates with users. |
Getting Started with Your Eduma Custom Layout Menu
is as easy as pie! The first step is to navigate to the WordPress Dashboard. From there, head over to the Appearance section and select Menus. This is where the magic begins! You can create a new menu or edit an existing one that fits your needs. Just click on the Create a new menu button, give it a name, and you’re good to go!
Next, it’s time to add items to your menu. You can choose from Pages, Posts, Categories, and even Custom Links. Simply select the items you want from the left sidebar and click Add to Menu. Drag and drop them to arrange them in your preferred order. Don’t forget to save your changes regularly to avoid losing any of your hard work!
Once your menu items are sorted, you can customize their appearance. Eduma allows you to add custom classes to each menu item, giving you greater control over styling. To add a custom class, click on the arrow next to the menu item and enter your class name in the CSS Classes (optional) field. This will enable you to apply specific CSS styles from your theme or custom styles you may have created.
If you’re looking to enhance functionality further, consider using the Eduma theme’s built-in features to create dropdown menus. To create a submenu, simply drag a menu item slightly to the right beneath the main menu item. This hierarchy will help your users navigate through your site seamlessly while providing a polished look.
| Feature | Description |
|---|---|
| Drag and Drop | Easily rearrange your menu items with a simple drag. |
| Custom Links | Add any URL to your menu for quick access. |
| CSS Classes | Style your menu items individually with custom classes. |
don’t underestimate the power of previewing your menu before it goes live. Use the Preview option to see how your layout looks in real-time. This step is crucial for making adjustments and ensuring everything aligns perfectly with your site’s aesthetic. Once you’re satisfied, click Save Menu, and watch as your custom layout comes to life!
Exploring the User-Friendly Interface for Easy Navigation
One of the standout features of the Custom Layout Menu in Eduma is its intuitive design. The layout is crafted with the user in mind, ensuring that even those who are not tech-savvy can navigate through the interface with ease. You will find that the main menu is neatly organized, allowing you to access different sections of your website without unnecessary clicks. This streamlined approach not only saves time but also enhances the overall user experience.
When you first explore the interface, you’ll notice the visually appealing icons accompanying each menu item. These icons serve as quick visual references, making it easy to identify sections such as Courses, Events, and Blog Posts at a glance. This design choice not only improves navigation but also adds a splash of personality to your site, making it more engaging for users.
Furthermore, the Custom Layout Menu allows for personalization. You can easily rearrange menu items to suit your needs, enabling you to highlight the most important sections for your visitors. This flexibility ensures that your site remains dynamic and relevant, helping you to maintain user interest and encourage exploration.
For those looking to enhance their site’s functionality, the menu also integrates seamlessly with various plugins, increasing its versatility. With just a few clicks, you can implement features like dropdown menus to group related items together, keeping your layout clean and uncluttered. This feature is particularly useful for educational sites, where you may want to display categories such as different courses or learning resources without overwhelming visitors.
To summarize, the Custom Layout Menu in Eduma is designed with the user experience in mind. Its combination of a clean aesthetic, intuitive navigation, and customizable options ensures that users can easily find what they are looking for. By leveraging these features, you can create a website that not only looks great but also functions seamlessly for your audience.
Step-by-Step Setup: Creating Your First Custom Layout Menu
Create Your First Custom Layout Menu
Getting started with your custom layout menu is easier than you might think. Follow these simple steps to create a menu that not only looks great but also enhances user navigation on your site. Let’s dive in!
Step 1: Access the Menu Settings
First, log in to your WordPress dashboard and navigate to the Appearance section. Here, you will find the Menus option. Click on it to access the menu management area where all the magic begins.
Step 2: Create a New Menu
Once in the Menus section, you’ll see an option to create a new menu. Give your menu a memorable name that reflects its purpose, such as Main Navigation or Footer Links. Then, click the Create Menu button.
Step 3: Add Items to Your Menu
It’s time to populate your new menu with items. From the left sidebar, you can select pages, posts, categories, or custom links to include. Simply check the boxes next to the items you want and click Add to Menu. You can rearrange the order by dragging and dropping the items into your preferred sequence.
Step 4: Configure Menu Settings
To ensure your menu displays correctly, scroll down to the Menu Settings section. Here, you can choose where to display your menu on the site, such as the primary or footer area. Check the appropriate box and save your changes.
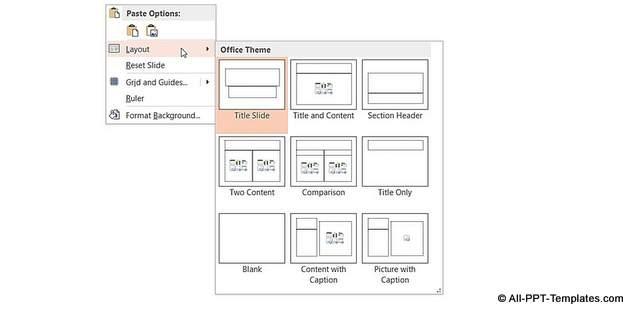
Step 5: Customize Your Menu’s Appearance
To make your custom layout menu visually appealing, go to the Customizer under Appearance. Experiment with colors, fonts, and layout options to match your site’s branding. This step is crucial to ensure that your menu stands out while remaining user-friendly.
Step 6: Preview and Publish
before you hit publish, use the Preview function to see how your menu looks on the site. Make any necessary adjustments, and once you’re happy with the outcome, click Publish to make your custom layout menu live!
Design Tips to Make Your Menu Stand Out
Your menu is often the first impression visitors have of your site, so making it visually appealing is crucial. Consider using a combination of colors, fonts, and spacing to create a layout that not only draws attention but also enhances readability. Here are some tips to elevate your menu’s design:
- Choose a Color Scheme: Select colors that align with your brand identity. High contrast between text and background can improve visibility.
- Utilize Custom Fonts: Fonts can convey personality. Choose a typeface that reflects your theme while ensuring it remains legible across devices.
- Incorporate Icons: Adding icons next to menu items can help visually categorize options and make navigation more intuitive.
- Implement Hover Effects: Subtle effects can create a dynamic experience. Consider changing colors or adding animations when users hover over menu items.
Additionally, consider the structure of your menu. A well-organized menu can significantly enhance user experience. Here’s a simple approach to categorizing your menu:
| Category | Examples |
|---|---|
| Services | Web Design, SEO, Content Writing |
| Portfolio | Recent Projects, Case Studies, Testimonials |
| Blog | Latest Articles, Tutorials, Industry News |
Lastly, don’t forget about responsive design. A responsive menu adapts seamlessly to different screen sizes, ensuring that mobile users have the same intuitive experience as desktop users. This can involve:
- Collapsible Menus: For smaller screens, consider using a hamburger icon to save space while maintaining access to all menu items.
- Adjustable Font Sizes: Fonts should scale appropriately based on the device, ensuring readability without overscaling.
- Testing Across Devices: Regularly test your menu on various devices to ensure functionality and aesthetics remain intact.
Integrating Essential Links for Optimal User Experience
Creating a seamless navigation experience for your users is paramount when utilizing the Custom Layout Menu in Eduma. One of the most effective ways to enhance user engagement is by strategically integrating essential links throughout your layout. Here’s how you can do it:
- Highlight Key Pages: Make sure that critical sections like the Homepage, Courses, and Contact Us are easy to find. Use clear labels and intuitive icons to guide users effortlessly.
- Utilize Dropdown Menus: Organizing subcategories under main headers can declutter your menu, making it easier for users to explore without feeling overwhelmed.
- Incorporate Call-to-Actions: Encourage user interaction by including buttons for Sign Up or Download. These should be prominently placed and visually distinct within your menu.
Moreover, using a well-structured table can help clarify the relationships between different sections of your site. Here’s a simple example:
| Menu Item | Link Destination |
|---|---|
| Courses | /courses |
| About Us | /about |
| Blog | /blog |
| Support | /support |
When you prioritize user-centric design in your menu layout, you not only improve the navigation experience but also foster trust and credibility. Ensure your links are functional and direct users to the intended pages without causing frustration or confusion.
don’t forget to test your layout on various devices. Mobile responsiveness is key to providing an optimal user experience. A responsive menu adapts to different screen sizes, allowing users to access essential links no matter where they are. After all, a happy user is likely to return!
Testing Your Custom Layout Menu for Functionality
Once you’ve crafted your custom layout menu in Eduma, it’s essential to ensure everything operates smoothly. Testing your menu for functionality not only enhances user experience but also builds confidence in your design. Here’s how to effectively go about it:
- Preview Your Changes: Start by utilizing the preview feature in your WordPress dashboard. This allows you to see how your menu looks and behaves without making it live. Check for visual alignment, spacing, and overall aesthetics.
- Check All Links: Click on each menu item to verify that all links lead to the correct pages. It’s crucial that users can navigate seamlessly from one section to another. Broken links can diminish credibility.
- Responsive Design Testing: Use different devices and screen sizes to test your menu. With more users accessing sites from mobile devices, ensure your custom layout adjusts properly and remains user-friendly across various platforms.
As you’re testing, pay attention to the functionality of dropdowns and any hover effects. Users appreciate interactive elements that enhance navigation. If any submenu items are not displaying correctly, revisit your layout settings to adjust their visibility and placement.
Consider gathering feedback from a few users. They can provide insights into usability that you might overlook. Ask specific questions about ease of navigation and if any menu items were confusing or difficult to access.
| Menu Item | Status | Notes |
|---|---|---|
| Home | Working | Directs to the homepage smoothly. |
| Courses | Broken | Need to fix link in settings. |
| Contact | Working | Form loads correctly. |
once you have addressed any issues, don’t forget to monitor the menu’s performance after going live. Regular checks will help you keep the user experience top-notch and allow you to make adjustments as needed.
Troubleshooting Common Issues with Custom Layout Menus
When working with custom layout menus, users may encounter a few common issues that can disrupt the design and functionality of their website. By addressing these problems proactively, you can enhance the user experience and streamline your workflow. Here are some effective troubleshooting tips to consider:
- Menu Responsiveness: If your custom layout menu doesn’t display correctly on mobile devices, ensure that the CSS media queries are appropriately configured. Testing the layout on various screen sizes can help identify any discrepancies.
- Link Malfunctions: If menu links lead to unexpected pages or show 404 errors, double-check the URL settings in the menu configuration. It’s crucial to ensure that each link is pointing to the correct page or resource.
- Styling Conflicts: Sometimes, custom styles may conflict with existing theme styles. Inspect the menu element using developer tools in your browser to spot any overriding styles that need adjustment.
Another common issue is the menu item hierarchy. If the order of menu items appears incorrect or nested items are not displaying as intended, revisit the menu settings in the WordPress dashboard. Verify the drag-and-drop arrangement of items and ensure that parent and child items are structured correctly.
| Issue | Possible Solution |
|---|---|
| Menu Not Appearing | Check if the menu is assigned to the appropriate theme location. |
| Duplicated Menu Items | Ensure you haven’t added the same item multiple times in the menu settings. |
| Unresponsive Dropdowns | Inspect for JavaScript errors that might be affecting the dropdown functionality. |
Lastly, if you face issues related to updates and compatibility, ensure that the Eduma theme and all associated plugins are updated to their latest versions. This can prevent compatibility issues that may arise from outdated software. Additionally, consider disabling plugins one by one to identify any that may be causing conflicts with your custom layout menus.
Enhancing User Engagement with Dynamic Menu Features
Creating a dynamic menu can transform the way users interact with your website. With the Eduma theme, you can easily craft a custom layout menu that not only enhances navigation but also boosts user engagement. Here’s how you can make the most of this feature.
- Personalization: Tailor your menu options to match the interests of your target audience. By analyzing user behavior, you can adjust menu items to include popular courses, recent blog posts, or important announcements.
- Dropdowns for Clarity: Utilize dropdown menus to organize content neatly. This helps users find what they need without feeling overwhelmed. Consider categorizing sections like “Courses,” “Events,” and “Resources” to facilitate easier navigation.
- Mobile Responsiveness: Ensure your dynamic menu is fully responsive. A majority of users access websites via mobile devices, so adapting your menu for smaller screens is crucial. Test the layout on various devices for optimal performance.
Incorporating icons can also enhance user interaction. Visual elements draw attention and can communicate information quickly. Pairing icons with text in your menu can make it more engaging and user-friendly. For instance, using a icon next to the “Courses” option immediately indicates its purpose.
To further enhance the user experience, consider implementing hover effects or animations for your menu items. Subtle changes like color shifts or underlining can make interactions feel more dynamic. This not only captures attention but also encourages users to explore more content.
| Menu Feature | Benefit |
|---|---|
| Custom Links | Direct users to specific content quickly |
| Search Bar | Allows instant access to information |
| Social Media Icons | Encourages sharing and engagement on other platforms |
| Call-to-Action Buttons | Promotes immediate user action (e.g., sign up, buy now) |
By using these strategies within the Eduma theme, you can create a dynamic menu that not only enhances user engagement but also encourages a seamless browsing experience. The right menu structure can lead to higher retention rates and an increase in user satisfaction, ultimately benefiting your online educational platform.
Final Touches: Maintaining and Updating Your Custom Layout Menu
Once you’ve successfully set up your custom layout menu with Eduma, the next crucial step is ensuring its longevity and relevance. Regular maintenance and updates are key to keeping your menu functional and appealing to your users. Here are some effective strategies to help you manage your custom layout menu efficiently.
- Regularly Review Your Menu Items: Consistently check the items in your menu to ensure they reflect your current offerings. As your website evolves, so should its navigation. Remove outdated links and add new ones that serve your audience better.
- Utilize Analytics: Leverage tools like Google Analytics to track how users interact with your menu. If certain sections see little to no clicks, consider revising or reorganizing those items to enhance user experience.
- Test Responsiveness: As mobile usage continues to grow, it’s important to test your custom layout menu across various devices. Ensure that your menu remains accessible and user-friendly on smartphones and tablets.
- Solicit Feedback: Don’t hesitate to ask your audience for their input. Conduct surveys or create feedback forms to gather user experiences and suggestions for improvement. This can provide valuable insights into what works and what doesn’t.
In addition to these tips, establishing a routine for updates can simplify the process. Consider setting a schedule for menu reviews—whether it’s quarterly or bi-annually. This proactive approach will help you stay ahead of any necessary changes and keep your site fresh.
| Maintenance Activity | Frequency | Responsible |
|---|---|---|
| Review Menu Items | Every 3 months | Content Manager |
| Check Analytics | Monthly | Web Analyst |
| Test on Devices | Every 6 months | QA Team |
| Gather User Feedback | Quarterly | Marketing Team |
Lastly, don’t forget to keep up with Eduma updates. The developers may release new features or enhancements that could improve your menu’s functionality. Staying informed about these updates ensures your website remains competitive and aligns with the latest best practices.
Frequently Asked Questions (FAQ)
Q&A: How To Use Custom Layout Menu Eduma: Step-by-step Guide
Q: What is Eduma, and why should I consider using it?
A: Eduma is a powerful WordPress theme specifically designed for educational institutions, e-learning platforms, and online courses. It’s user-friendly, feature-rich, and allows you to create stunning websites without needing extensive coding knowledge. If you want to elevate your online presence while providing a seamless learning experience, Eduma is the way to go!
Q: What are custom layout menus, and how do they enhance my Eduma site?
A: Custom layout menus offer you the flexibility to design your navigation exactly how you want it. With Eduma, you can create menus that reflect your brand and improve user experience. This means your visitors can easily find what they’re looking for, whether it’s courses, testimonials, or contact information, ultimately boosting engagement and conversion rates.
Q: Is it difficult to create a custom layout menu with Eduma?
A: Not at all! Eduma comes with an intuitive interface that makes the process straightforward. With our step-by-step guide, you’ll find that creating a custom layout menu is as easy as pie. Even if you’re a beginner, you’ll be able to follow along and set up a professional-looking menu in no time.
Q: What will I need before I start?
A: Before diving into the customization, make sure you have the Eduma theme installed and activated on your WordPress site. Also, gather a list of the pages or links you want to include in your menu. This prep work will make the customization process smoother.
Q: Can I customize the layout menu to match my branding?
A: Absolutely! Eduma allows you to tweak colors, fonts, and styles to ensure that your menu aligns perfectly with your brand identity. Whether you prefer a minimalist look or something more vibrant, the customization options are extensive.
Q: What if I run into issues while creating my custom layout menu?
A: Don’t worry! Eduma offers extensive documentation and support. If you face any challenges, you can also reach out to the community forums or customer support for assistance. You’re never alone when using Eduma.
Q: How will a custom layout menu improve my website’s navigation?
A: A well-designed custom layout menu simplifies navigation, making it easier for users to find the information they need quickly. This not only enhances user satisfaction but also encourages visitors to explore more of your content, potentially increasing enrollment in your courses.
Q: Are there any tips for designing an effective custom layout menu?
A: Yes! Keep it simple and intuitive. Limit the number of menu items to avoid overwhelming visitors. Use descriptive labels for your links and consider organizing them into categories. This will help users navigate your site effortlessly.
Q: Can I preview my custom layout menu before publishing it?
A: Definitely! Eduma allows you to preview changes in real-time. This feature enables you to make adjustments on the fly, ensuring that your final product is just as you envisioned it.
Q: How often should I update my custom layout menu?
A: Regular updates are essential, especially as you add new courses or content. Consider revisiting your menu every few months to ensure that it remains relevant and user-friendly. This keeps your site dynamic and engaging!
Q: Where can I find the step-by-step guide for using the custom layout menu in Eduma?
A: You can find the complete step-by-step guide on the Eduma documentation page or on our blog. We’ve made it easy to follow, so you can start creating your custom layout menu today!
By following this Q&A, readers will feel informed, excited, and ready to explore the custom layout menu features of the Eduma theme, leading to greater satisfaction and success with their educational websites.
Concluding Remarks
Outro
And there you have it! You’re now equipped with the knowledge to effectively utilize the Custom Layout Menu in Eduma. By following these simple steps, you can enhance your website’s navigation, making it not only more user-friendly but also visually appealing. Remember, a well-organized menu can significantly improve user experience and keep your visitors coming back for more.
So why wait? Dive in and start customizing your layout today! Whether you’re showcasing courses, highlighting testimonials, or simply enhancing your site’s overall aesthetic, the possibilities are endless. If you have any questions or need further assistance, don’t hesitate to reach out—we’re here to help you succeed. Happy customizing!