
Are you struggling with sluggish performance on your WordPress site? If you’re facing issues like slow loading times, error messages, or even a blank screen, the culprit might be the memory limit set for your WordPress installation. Don’t fret! Increasing your WordPress memory limit is easier than you think, and can make a world of difference in your site’s performance. In this article, we’ll walk you through four expert-tested methods to boost your memory limit in 2025. Whether you’re a seasoned developer or just starting your blogging journey, these simple yet effective strategies will help you unlock the full potential of your website. Say goodbye to frustrating glitches and hello to a seamless user experience—let’s dive in!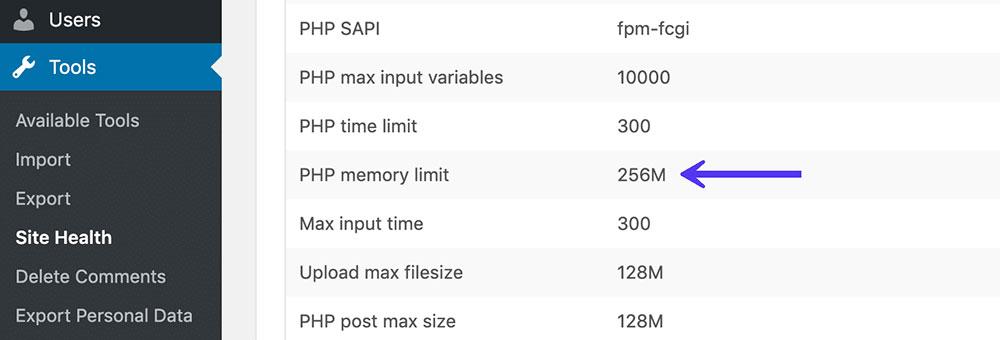
Understanding the Importance of WordPress Memory Limit
The memory limit in WordPress plays a crucial role in how your website performs and responds to user actions. When your site runs out of memory, it can lead to sluggishness, errors, or even crashes, potentially driving users away and impacting your search engine rankings. Understanding this limitation is essential for optimizing your site’s performance and ensuring a smooth experience for your visitors.
Here are a few reasons why the memory limit is important:
- Performance Optimization: Higher memory limits allow WordPress to handle more processes simultaneously, which is vital for websites with numerous plugins or complex themes.
- Error Prevention: Increasing the memory limit can reduce the likelihood of encountering memory-related errors, such as the infamous “White Screen of Death” that can leave your site inaccessible.
- Improved Loading Times: With more memory available, your website can load faster, enhancing user experience and keeping visitors engaged.
- Scalability: As your website grows, so do its memory demands. A higher limit prepares you for future expansions, whether it’s more content, traffic spikes, or additional features.
To put it simply, the memory limit acts as a safety net for your WordPress website. Think of it as the fuel tank of a car; when the tank is full, the car runs smoothly and efficiently. However, when the fuel runs low, the car may stutter or stop altogether. By increasing the memory limit, you ensure your site has enough “fuel” to operate effectively, particularly during high traffic times or when executing resource-intensive tasks.
Many hosting providers set a default memory limit that may not be sufficient for all users. Therefore, it’s critical to assess your specific needs and adjust accordingly. If you’re running an e-commerce site or a platform that relies heavily on user interaction, for instance, you’ll likely need a higher limit compared to a simple blog.
understanding and managing your WordPress memory limit is not just a technical concern—it’s a fundamental aspect of maintaining a healthy, high-performing website. By taking the necessary steps to increase this limit, you’re investing in your site’s reliability and user satisfaction.

Identifying When You Need a Memory Boost
In the world of WordPress, encountering performance issues can be frustrating, especially when your site doesn’t load as quickly as expected. You might be wondering if it’s time to consider a memory boost. Here are some telltale signs that you could benefit from increasing your memory limit:
- Frequent Error Messages: If you’re seeing error messages like “Allowed memory size exhausted,” it’s a clear indicator that your current memory limit is insufficient.
- Slow Loading Times: A sluggish website can deter visitors. If your pages take too long to load, it may be due to memory constraints.
- Plugin Conflicts: If plugins are malfunctioning or crashing, it could stem from inadequate memory resources, especially when running multiple plugins simultaneously.
- Difficulty Updating Themes or Plugins: Inability to update or install new themes and plugins can signal that your site lacks the necessary memory to accommodate these changes.
- High Traffic Levels: If you’re experiencing a surge in traffic, your existing memory limits may not support the increased demand, leading to performance dips.
Monitoring your memory usage is essential. You can use plugins like Query Monitor or WP Memory Usage to keep track of how much memory your site is currently utilizing. This can provide insight into whether you’re reaching your memory limits and if a boost is indeed necessary.
To help visualize your memory needs, consider this simple table that outlines the baseline memory requirements for common WordPress tasks:
| Task | Recommended Memory Limit |
|---|---|
| Standard Blog | 64 MB |
| E-commerce Site | 128 MB |
| Membership Site | 256 MB |
| High-Traffic Site | 512 MB+ |
If you’re experiencing any of these issues, addressing your memory limit should be a priority. Making these adjustments not only improves site performance, but it also enhances the overall user experience. By recognizing these signs early, you can take proactive steps to ensure your WordPress site runs smoothly and efficiently.
Exploring the PHP Configuration File Method
If you’re looking to increase the memory limit of your WordPress site, adjusting the PHP configuration file can be an effective method. The PHP configuration file, commonly known as php.ini, plays a crucial role in determining the resources allocated to your website. By following a few simple steps, you can modify this file to enhance your site’s performance dramatically.
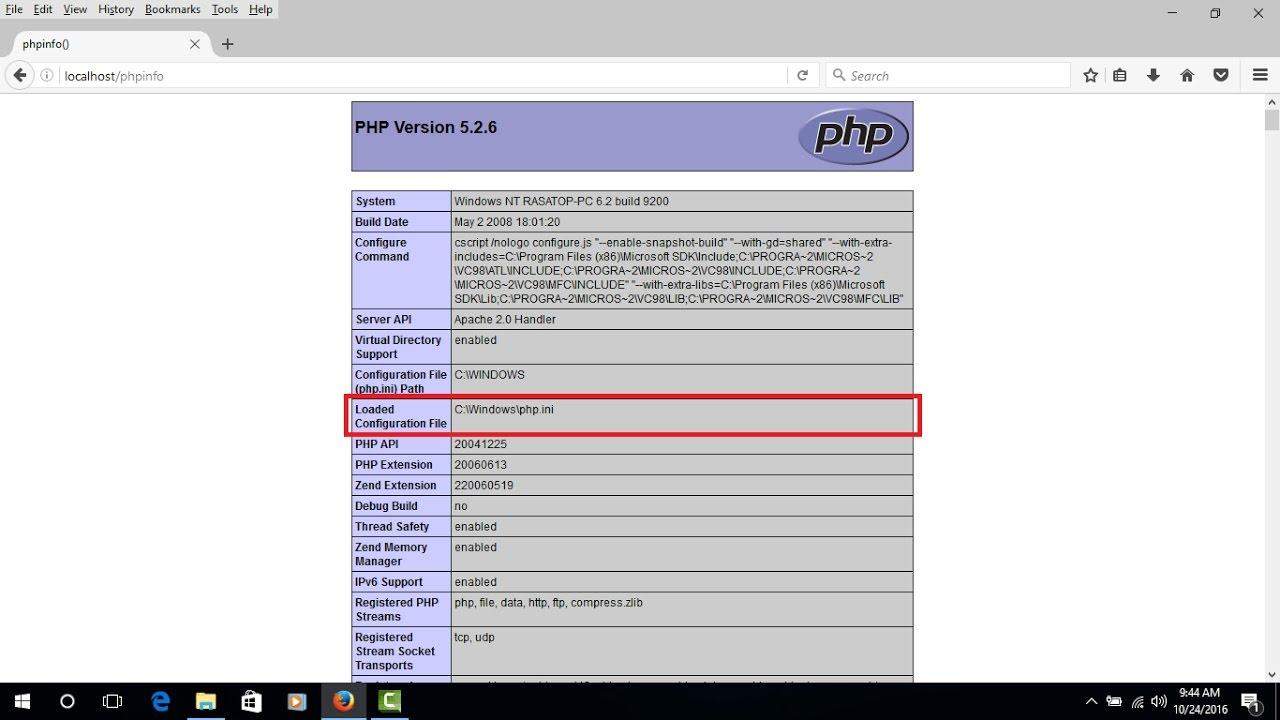
First, you’ll need to locate your php.ini file. This file is usually found in the root directory of your server or within a specific folder related to your PHP installation. If you’re unsure where to find it, you can create a PHP file with the following code:
Upload this file to your server, navigate to it via your web browser, and search for “Loaded Configuration File”. This will show you the exact path to your php.ini file. Once you have located it, you can proceed to edit it.
To increase the memory limit, you’ll want to modify the settings within the file. Look for a line that reads something like:
memorylimit = 128M
If you find this line, simply change the value to a higher limit, such as 256M or 512M, depending on your needs. If the line doesn’t exist, you can add it yourself, like so:
memorylimit = 256M
After making your changes, save the file and restart your web server to apply the new settings. It’s advisable to check if the new memory limit has taken effect by running the same PHP info file you created earlier. Look for the updated memory limit in the output to confirm your change was successful.
Adjusting Memory Limit via wp-config.php
If you’re experiencing slow performance or memory-related errors on your WordPress site, adjusting the memory limit through wp-config.php can make a significant difference. This file is the backbone of your WordPress installation and allows you to customize various settings, including memory limits.
To increase the memory limit, follow these simple steps:
- Access your WordPress root directory via FTP or your hosting provider’s file manager.
- Locate the
wp-config.phpfile and create a backup before making any changes. - Open the file in a text editor.
Once you have the file open, insert the following line of code just before the line that says /* That's all, stop editing! Happy blogging. */:
define('WP_MEMORY_LIMIT', '256M');This snippet sets the memory limit to 256MB, which is generally sufficient for most themes and plugins. If you require more memory due to resource-intensive plugins or themes, you can replace 256M with a higher value, such as 512M.
It’s essential to know that your hosting provider must support the memory limit you set. Here’s a quick reference table to help you decide on an appropriate limit:
| Usage Scenario | Recommended Memory Limit |
|---|---|
| Basic WordPress sites | 64M |
| Medium traffic sites with some plugins | 128M |
| High traffic sites or resource-intensive plugins | 256M or higher |
After saving your changes, be sure to test your site for performance improvements. If you continue to face memory issues, consider consulting your hosting provider, as they may need to increase the limit on their end.
Utilizing the .htaccess File for Memory Enhancement
Many WordPress users may overlook the power of the .htaccess file, but it can be a game-changer when it comes to enhancing memory limits. This hidden gem allows you to modify server configurations directly, promoting better performance and management of memory resources. By making a simple addition to your .htaccess file, you can help ensure that your WordPress site runs smoothly, even during peak traffic periods.
To increase the memory limit using the .htaccess file, follow these straightforward steps:
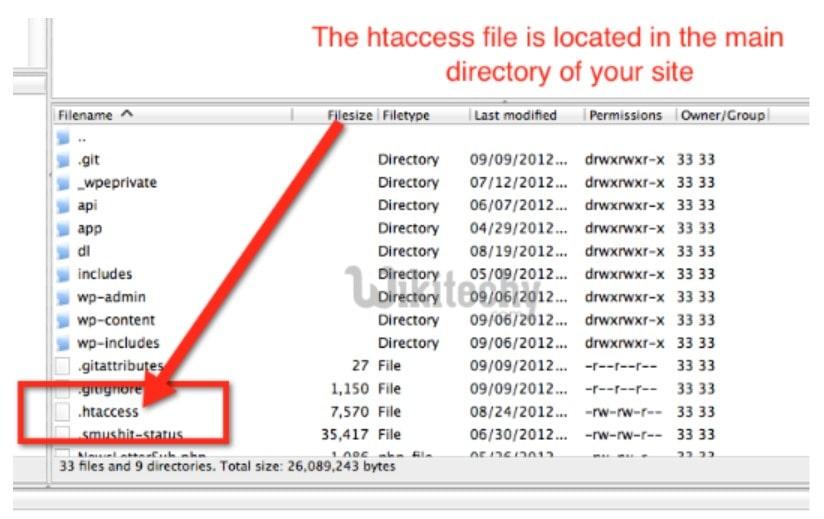
- Access Your File Manager: Use your hosting provider’s file manager or an FTP client to locate the
.htaccessfile in your WordPress root directory. - Backup Your File: Before making changes, it’s always wise to create a backup of your
.htaccessfile. This way, you can restore it if anything goes wrong. - Add Memory Limit Code: Open the
.htaccessfile and insert the following line at the end of the file:
php_value memory_limit 256MBy inserting this line, you are instructing the server to allocate 256MB of memory to your WordPress installation. You can adjust this value according to your needs, but remember to stay within the limits set by your hosting provider.
Additionally, if you encounter any issues after making this change, it may be due to server restrictions. In that case, consider consulting your hosting support, as they can help you fine-tune memory settings tailored to your server environment.
utilizing the .htaccess file for memory enhancement is a straightforward yet effective solution for WordPress users. By following these simple steps, you can ensure that your site remains responsive and efficient, paving the way for a better user experience.
Assessing the Role of Your Hosting Provider
Choosing the right hosting provider is crucial for your WordPress site’s performance, especially when it comes to memory limits. Your hosting environment can significantly influence how well your website runs, affecting everything from loading speeds to the ability to handle high traffic volumes. Therefore, it’s essential to evaluate the characteristics of your provider that impact your site’s memory allocation.
Here are some key factors to consider:
- Memory Allocation: Different hosting plans offer varying levels of memory allocation. Make sure your provider can support the memory limits you need, particularly if you’re running resource-intensive plugins or themes.
- Server Type: VPS or dedicated servers usually provide greater flexibility and resources compared to shared hosting. If you’re serious about performance, consider upgrading to a more robust server type.
- Customer Support: A responsive support team can help you quickly resolve any memory-related issues. Look for a hosting provider that offers 24/7 support, as you’ll want help when problems arise.
- Scalability: As your site grows, your memory needs may change. Choose a host that allows you to easily scale up your resources without causing downtime or complications.
To further illustrate the importance of a quality hosting provider, here’s a simple comparison of common hosting types:
| Hosting Type | Memory Limit | Performance | Best For |
|---|---|---|---|
| Shared Hosting | Low to Moderate | Good for basic sites | Personal blogs, small businesses |
| VPS Hosting | Moderate to High | Better performance | Growing businesses, eCommerce |
| Dedicated Hosting | High | Top-notch performance | Large enterprises, high-traffic sites |
don’t underestimate the impact of your hosting provider on your website’s overall health. Regularly assess your current plan to ensure it aligns with your site’s demands. Investing in a provider that meets your memory needs can lead to smoother operation and a better user experience, ultimately helping you achieve your online goals.
Leveraging Plugins to Increase Memory Limit
If you’re looking to boost your WordPress site’s performance without diving deep into coding, plugins are your best friends. With just a few clicks, you can leverage the power of these tools to increase your memory limit and enhance your site’s efficiency. Here’s how you can tap into the potential of plugins to get that extra memory you need.
Several plugins are specifically designed to help manage and optimize memory usage. By choosing the right ones, you’ll not only increase the memory limit but also improve your site’s overall speed and responsiveness. Here are some popular options:
- WP Memory Limit Booster: This plugin allows you to set custom memory limits directly from your WordPress dashboard.
- WP Optimize: While primarily focused on cleaning up your database, it also provides options to manage memory more effectively.
- WP Super Cache: A fantastic caching plugin that can help reduce memory usage by serving static HTML files instead of executing PHP scripts each time a page is loaded.
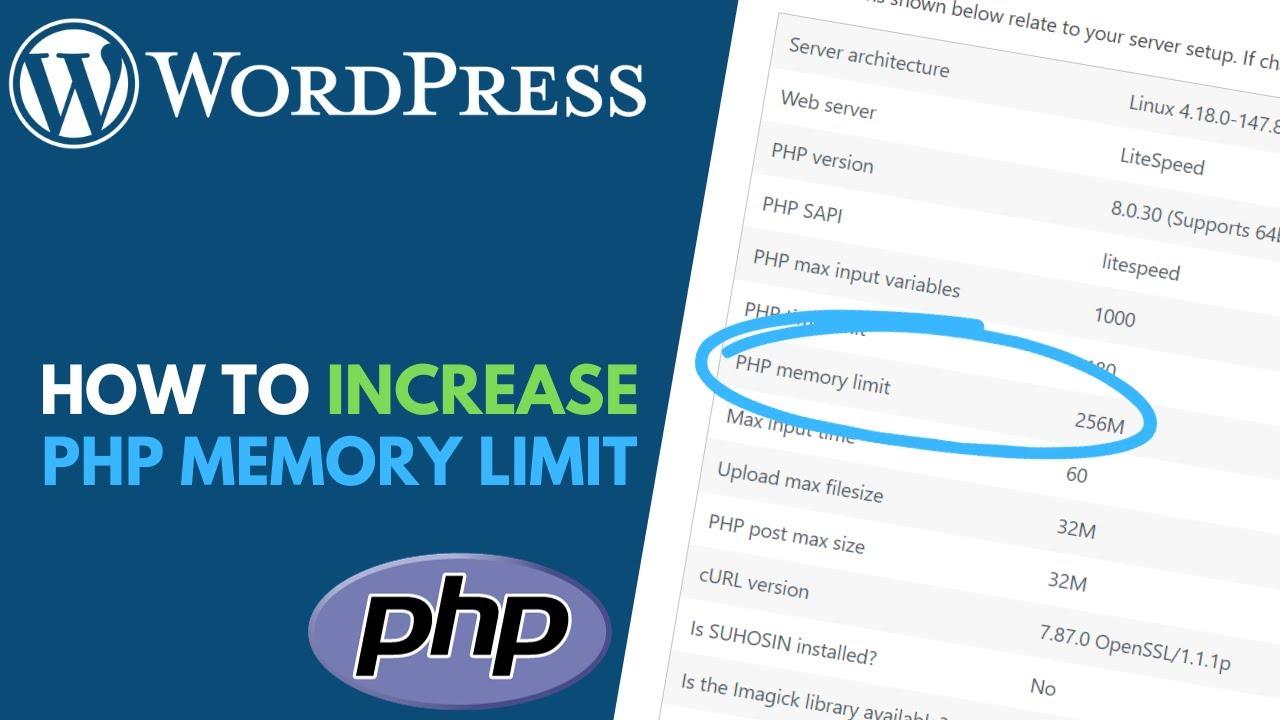
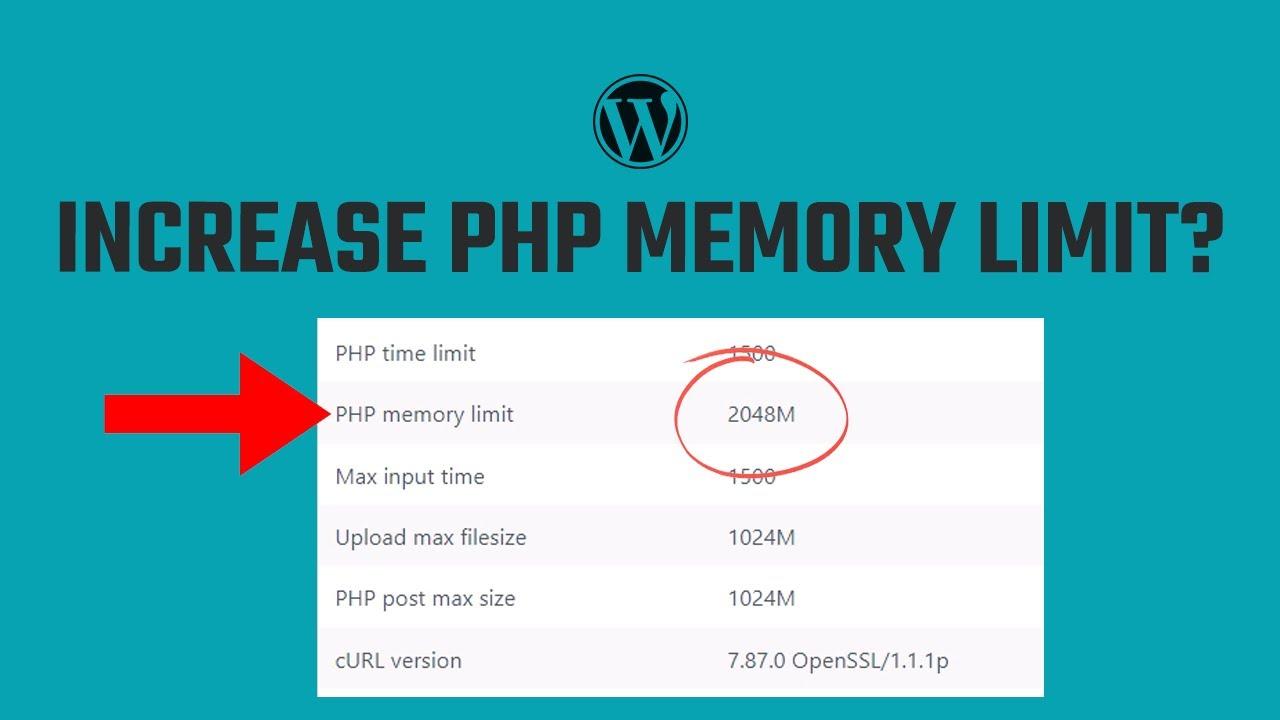
Using these plugins is straightforward. After installing and activating the plugin of your choice, navigate to the settings area. There, you can adjust memory limits according to your hosting provider’s specifications. Be sure to check your current memory limit first, which can usually be found in the Site Health section under Tools in the WordPress admin dashboard.
To give you an idea of how these plugins can impact your site, consider the following table that summarizes their features:
| Plugin Name | Memory Limit Control | Additional Features |
|---|---|---|
| WP Memory Limit Booster | Yes | User-friendly interface |
| WP Optimize | No | Database cleanup, caching options |
| WP Super Cache | No | Static caching for speed |
However, be cautious not to set the memory limit too high. Each hosting provider has its own maximum limits, and exceeding them can lead to performance issues or even crashes. Always refer to your hosting documentation for the recommended memory limits. By carefully selecting and configuring the right plugins, you can enjoy a smoother, faster WordPress experience without any heavy lifting.
Verifying Your Changes: How to Check Memory Limit Success
After increasing your WordPress memory limit, it’s crucial to confirm that your changes have taken effect. Verifying that your adjustments were successful can help prevent unexpected performance issues and ensure your site runs smoothly. Here are some simple ways to check if the new memory limit is in play:
- Check the Site Health Status: WordPress has a built-in Site Health tool that can provide insights into your site’s performance. Navigate to
Tools > Site Healthin your dashboard, and look for any issues related to memory limits. - Create a PHP Info File: A straightforward method to verify your memory limit is to create a PHP info file. Simply create a new file named
phpinfo.phpand add the following code:
Upload this file to your server, and access it via your browser (e.g., yourdomain.com/phpinfo.php). Look for the memory_limit directive to see the active limit. Remember to delete this file afterward for security reasons.
- Use a Memory Limit Checker Plugin: Various plugins can help you check and manage your memory limits easily. Install a reliable plugin like WP Maximum Memory Limit to display the current memory limit and verify your adjustments.
- Check Error Logs: If your site is still facing issues, check the error logs. They often indicate memory exhaustion errors if the limit has not been increased properly. Access your logs through your hosting provider’s dashboard or via FTP.
Once you’ve confirmed the new memory limit, it’s a good practice to monitor your site’s performance regularly. Keeping an eye on memory usage can help you identify potential issues before they affect your visitors.
Troubleshooting Common Issues After Adjusting Memory Limit
After increasing the memory limit in your WordPress setup, you might still encounter some issues that can be frustrating. Whether it’s sluggish performance, error messages, or plugins not functioning as expected, troubleshooting these problems is essential for a smooth experience. Here are some common issues you may face and how to resolve them.
Unexpected Error Messages
After making changes to the memory limit, you might see errors like Allowed memory size exhausted. This typically means that the new limit isn’t being recognized. Here are some steps to troubleshoot this:
- Double-check your
wp-config.phpfile to ensure the memory limit is set correctly. - Verify that your server settings match the new memory limit.
- If using a caching plugin, clear the cache to ensure the new settings are applied.
Plugins Not Working Properly
Sometimes, plugins may not respond as expected after the memory limit adjustment. Here’s how to tackle this:
- Deactivate all plugins and reactivate them one by one to identify if a specific plugin is causing issues.
- Check for plugin updates; outdated plugins might not be compatible with your memory settings.
- Consult the plugin’s support forum for any known issues with memory limits.
Slow Performance
If your site is still running slowly despite increasing the memory limit, consider the following:
- Inspect your hosting plan; it might be time to upgrade to a higher tier that provides more resources.
- Utilize performance optimization plugins to enhance site speed further.
- Review your theme’s code; poorly coded themes can be a bottleneck.
Table of Quick Fixes
| Issue | Quick Fix |
|---|---|
| Memory Limit Not Recognized | Check wp-config.php settings |
| Plugins Malfunctioning | Deactivate and reactivate plugins |
| Website Speed Issues | Optimize database and images |
By following these troubleshooting steps, you can resolve common issues that arise after adjusting the memory limit. Remember, ensuring that your WordPress site runs smoothly is key to providing a great user experience.
Tips for Maintaining Optimal Performance in WordPress
To ensure your WordPress site runs smoothly, it’s essential to regularly assess and optimize its performance. Here are some expert-tested strategies to keep your site in peak condition:
- Update Regularly: Make it a habit to keep WordPress, themes, and plugins up-to-date. New versions often include performance improvements and security patches that can enhance your site’s overall functionality.
- Optimize Your Database: Periodically clean up your database by removing unnecessary data, such as post revisions and spam comments. This not only reduces the size of your database but also speeds up query times.
- Utilize Caching: Implement caching solutions to store static versions of your site. Plugins like WP Super Cache or W3 Total Cache can significantly reduce load times by serving cached pages to users, minimizing server load.
- Choose a Reliable Hosting Provider: The foundation of your site’s performance often lies in your hosting. Opt for a provider known for speed and reliability to ensure your site can handle traffic efficiently.
Additionally, keep an eye on your site’s performance metrics. Use tools like Google PageSpeed Insights or GTmetrix to analyze load times and identify areas for improvement. Regular monitoring helps you catch potential issues before they become problematic.
Lastly, consider using a Content Delivery Network (CDN). A CDN stores cached versions of your site in multiple locations around the globe, allowing users to load your site from the nearest server. This drastically improves load times and enhances user experience.
Frequently Asked Questions (FAQ)
Q&A: How to Increase WordPress Memory Limit: 4 Easy Methods (Expert-Tested for 2025)
Q1: What is the WordPress memory limit, and why does it matter?
A1: The WordPress memory limit is the maximum amount of memory that PHP can allocate to your WordPress site. Think of it as the amount of workspace available for your website to run smoothly. If your site runs out of memory, you could face frustrating errors, slow performance, or even crashes. By increasing the memory limit, you’re ensuring that your website can handle more complex themes, plugins, and traffic without hiccups. Trust us, a little extra memory can go a long way!
Q2: What are the signs that I need to increase my WordPress memory limit?
A2: Great question! You might notice several indicators that it’s time for an upgrade. Common signs include the dreaded “Allowed memory size exhausted” error, slow loading times, or issues with plugin functionality. If your site feels sluggish or throws up errors, it’s a clear signal that more memory could benefit you. Don’t wait for a crisis—proactive measures can save you a lot of headaches!
Q3: What are the four expert-tested methods to increase the WordPress memory limit?
A3: Absolutely, here’s a sneak peek at the four methods we cover:
- Editing the wp-config.php File: This method is straightforward and can be done directly within your file manager or FTP client. Just add a simple line of code, and you’re on your way!
- Modifying the .htaccess File: If you’re comfortable tinkering with your server settings, this method will also help boost your memory limit. It’s quick and effective!
- Updating the PHP.ini File: For those with access to their PHP settings, this method allows you to allocate even more memory. It’s perfect for advanced users looking to optimize their site further.
- Consulting Your Hosting Provider: Sometimes, the easiest solution is to ask for help. Your hosting provider can often increase the memory limit on their end, so don’t hesitate to reach out!
Each method is simple, and we guide you through every step!
Q4: Are there any risks involved in increasing the memory limit?
A4: Generally, increasing the memory limit is safe and can dramatically improve your site’s performance. However, if you allocate too much memory, it can lead to server instability, particularly if you’re on shared hosting. It’s essential to find a balance that works for your specific hosting environment. Always back up your site before making changes—better safe than sorry!
Q5: Will increasing the memory limit solve all my WordPress issues?
A5: Not necessarily! While increasing the memory limit can resolve specific performance issues and prevent errors, it’s just one piece of the puzzle. Ensure your site is optimized overall—this includes using well-coded themes and plugins, regular updates, and good hosting. Think of it as building a robust foundation for your website; memory is just one part of a much larger structure.
Q6: How do I know if my changes have worked?
A6: After implementing any of the methods, you can check your memory limit in your WordPress dashboard. Simply navigate to “Tools” > “Site Health” > “Info” and look under “Server.” If you see an increase in the memory limit, congratulations! You’re on your way to a faster, more efficient website.
Q7: Where can I find more detailed instructions on each of these methods?
A7: You’re in luck! Our article provides detailed, step-by-step instructions for each method, complete with screenshots and helpful tips. Whether you’re a beginner or a seasoned pro, we’ve got you covered. Check it out and empower yourself to enhance your WordPress experience!
With these insights, you’re now well-equipped to tackle the WordPress memory limit challenge. Don’t let memory constraints hold your site back—take action today and watch your website thrive!
Final Thoughts
boosting your WordPress memory limit doesn’t have to be a daunting task. With these four expert-tested methods, you’re now equipped to enhance your site’s performance effortlessly. Whether you choose to tweak your wp-config.php file, adjust your .htaccess, make changes via your hosting control panel, or even utilize a plugin, each method provides a pathway to a more efficient and faster website.
Remember, a well-optimized site not only improves user experience but also positively impacts your SEO and overall site health. So why wait? Take action today and give your WordPress site the boost it deserves.
If you found this guide helpful, don’t hesitate to share it with fellow WordPress users or leave a comment below with your own tips and experiences. Here’s to a faster, more powerful WordPress experience in 2025 and beyond! Happy blogging!