Are you ready to take your WordPress site to the next level? Whether you’re looking to enhance functionality, improve user experience, or even boost your website’s SEO, installing a WordPress plugin is one of the simplest and most effective ways to achieve your goals. But if you’re a beginner, the thought of adding plugins might seem a bit daunting. Fear not! This guide is here to walk you through the process step-by-step, demystifying the installation and helping you unlock the full potential of your website. By the end of this article, you’ll not only feel confident about installing plugins but also excited to explore the myriad of possibilities they offer. So, let’s roll up our sleeves and dive into the world of WordPress plugins—your site will thank you!
Understanding the Importance of WordPress Plugins for Your Site
WordPress plugins are essential tools that can significantly enhance the functionality of your website. They allow you to customize your site to meet specific needs, whether you want to improve SEO, increase security, or add e-commerce capabilities. By leveraging plugins, you can transform a basic WordPress installation into a fully-featured online presence without the need for extensive coding knowledge.
One of the most exciting aspects of plugins is their versatility. Here are some key benefits:
- Ease of Use: Most plugins can be installed with just a few clicks, making it accessible even for beginners.
- Enhanced Functionality: Plugins can add features such as contact forms, sliders, and galleries, enriching user experience.
- SEO Optimization: Many plugins offer tools to help you improve your site’s visibility on search engines, boosting your traffic.
- Security Measures: Some plugins provide essential security features to protect your site from threats and vulnerabilities.
- Performance Boost: Optimization plugins can help speed up your site, improving loading times and user satisfaction.
Furthermore, the variety of plugins available allows you to tailor your site to the industry you are in. For instance, if you run a blog, you might want to use plugins that facilitate social sharing. On the other hand, e-commerce sites may benefit from plugins designed to streamline payments and manage inventory. The possibilities are endless and can significantly impact your site’s success.
| Type of Plugin | Purpose |
|---|---|
| SEO Plugins | Enhance search engine visibility |
| Security Plugins | Protect your site from threats |
| Backup Plugins | Create backups to prevent data loss |
| Performance Plugins | Optimize loading speeds |
understanding the importance of WordPress plugins is crucial for anyone looking to develop a successful website. By strategically selecting and utilizing plugins, you can significantly elevate your site’s functionality and user engagement, ultimately leading to a more robust online presence.

Choosing the Right Plugin for Your Needs
When diving into the vast ocean of WordPress plugins, it’s essential to identify what suits your specific needs. With thousands of plugins available, each designed to enhance various aspects of your site, the right choice can significantly impact your website’s performance and user experience.
Start by asking yourself a few key questions:
- What functionality do you need? Are you looking to improve SEO, enhance security, or perhaps add a contact form?
- Is it user-friendly? Opt for plugins with intuitive interfaces that make it easy to manage settings without technical expertise.
- How reliable is the plugin? Check for regular updates and read user reviews to gauge its reliability and support.
Another important factor is compatibility with your current theme and other plugins. A great way to ensure smooth operation is to look for plugins that are frequently updated and have a solid history of compatibility. This avoids conflicts that could disrupt your site’s functionality.
To help in your decision-making, here’s a simple table illustrating popular plugin categories along with a few recommended options:
| Plugin Category | Recommended Plugins |
|---|---|
| SEO | Yoast SEO, All in One SEO Pack |
| Security | Wordfence, Sucuri Security |
| Performance | WP Rocket, W3 Total Cache |
| Contact Forms | Contact Form 7, WPForms |
Lastly, always consider the plugin’s support and documentation. A plugin with excellent support can save you time and frustration down the line. Look for options that provide comprehensive guides, active forums, or responsive customer service. Making an informed choice will lead to a smoother experience as you enhance your WordPress site.
Preparing Your WordPress Site for Plugin Installation
Before diving into the exciting world of plugin installation, it’s crucial to ensure your WordPress site is primed for the new additions. A well-prepared site not only enhances the installation process but also contributes to a smoother functioning of your website. Here’s how you can set the stage for a successful plugin experience.
Back Up Your Site:
- Creating a backup of your WordPress site is essential. This way, if anything goes awry during the installation, you can easily restore your site to its previous state.
- Consider using reliable backup plugins like UpdraftPlus or BackupBuddy for hassle-free backups.
Check Your Current Plugins:
- Review the plugins you currently have. Deactivate any that you no longer use.
- Ensure that your existing plugins are updated to their latest versions to avoid compatibility issues.
Update WordPress Core:
Before adding new functionality, make sure your WordPress core is up to date. An outdated version can lead to compatibility problems with new plugins. To check for updates:
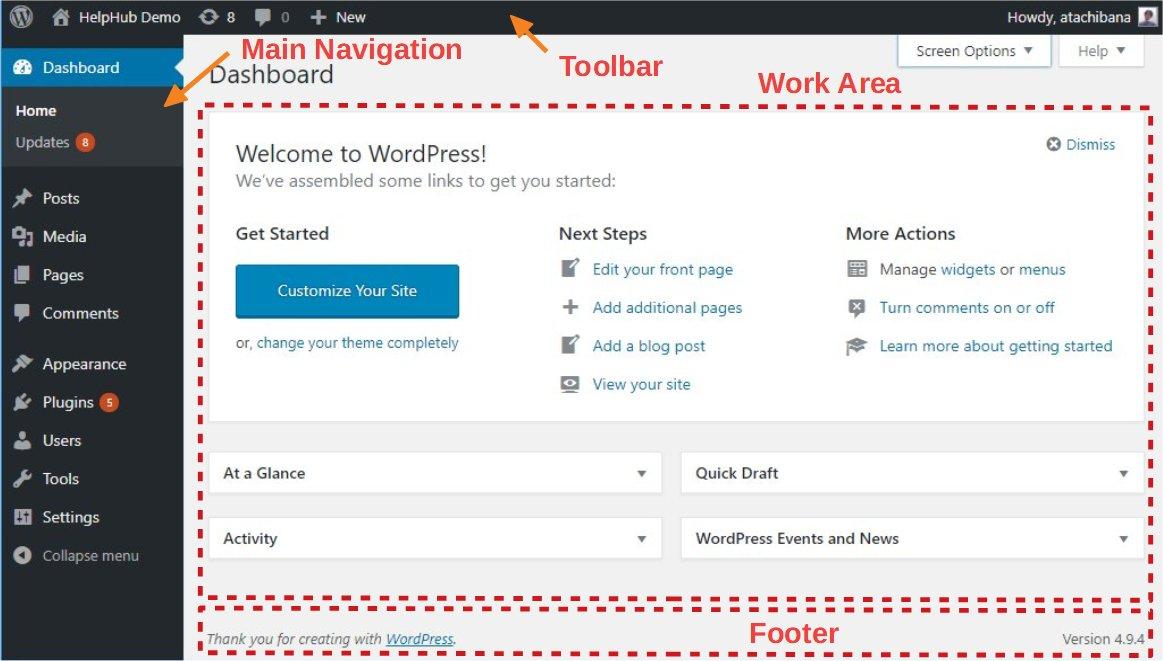
- Navigate to Dashboard > Updates.
- Follow the prompts to install any available updates.
Assess Compatibility and Reviews:
Not all plugins work well together, so it’s wise to research the ones you plan to install. Look for:
- Compatibility with your current WordPress version.
- User reviews and ratings to gauge reliability and performance.
| Plugin Name | Compatibility | User Rating |
|---|---|---|
| Yoast SEO | 5.8+ | 4.9/5 |
| WooCommerce | 5.8+ | 4.6/5 |
| Contact Form 7 | 5.8+ | 4.5/5 |
Once you’ve completed these preparatory steps, you can confidently move forward with your plugin installation. A well-prepared site not only enhances user experience but also safeguards your content and features from potential disruptions.

Step-by-Step Guide to Installing a Plugin from the WordPress Repository
Installing a plugin from the WordPress repository is a straightforward process that can greatly enhance your site’s functionality. Follow these simple steps to get started:
Access Your WordPress Dashboard
First things first, you need to log in to your WordPress admin panel. This is typically done by visiting www.yoursite.com/wp-admin. Enter your credentials, and you’ll be greeted with the dashboard, your command center for managing your website.
Navigate to the Plugins Section
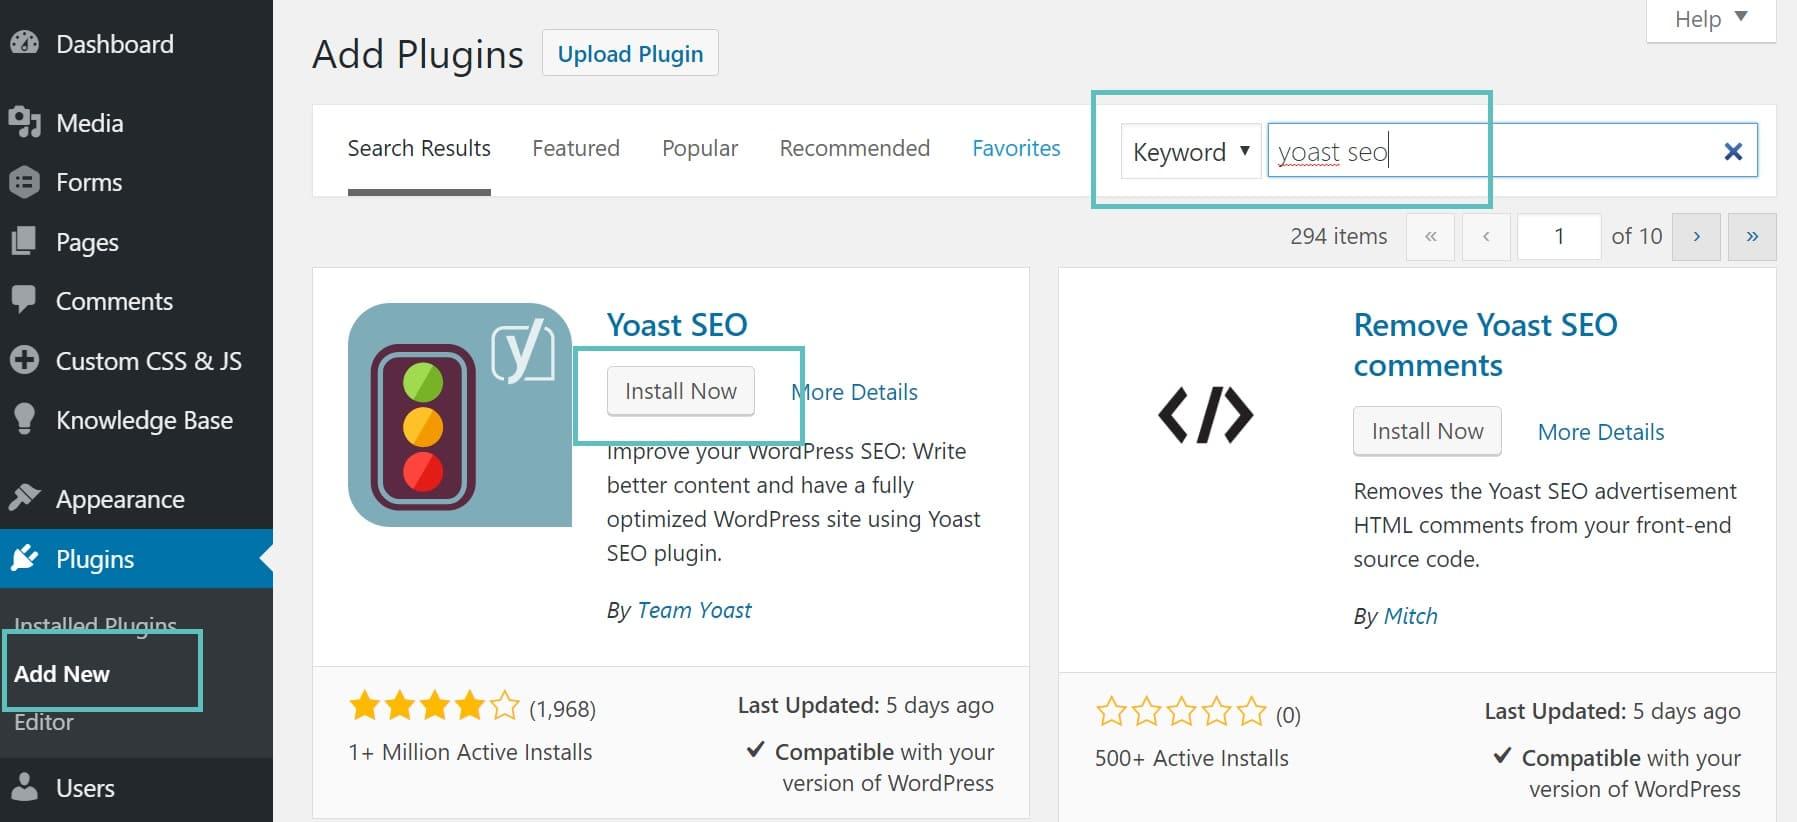
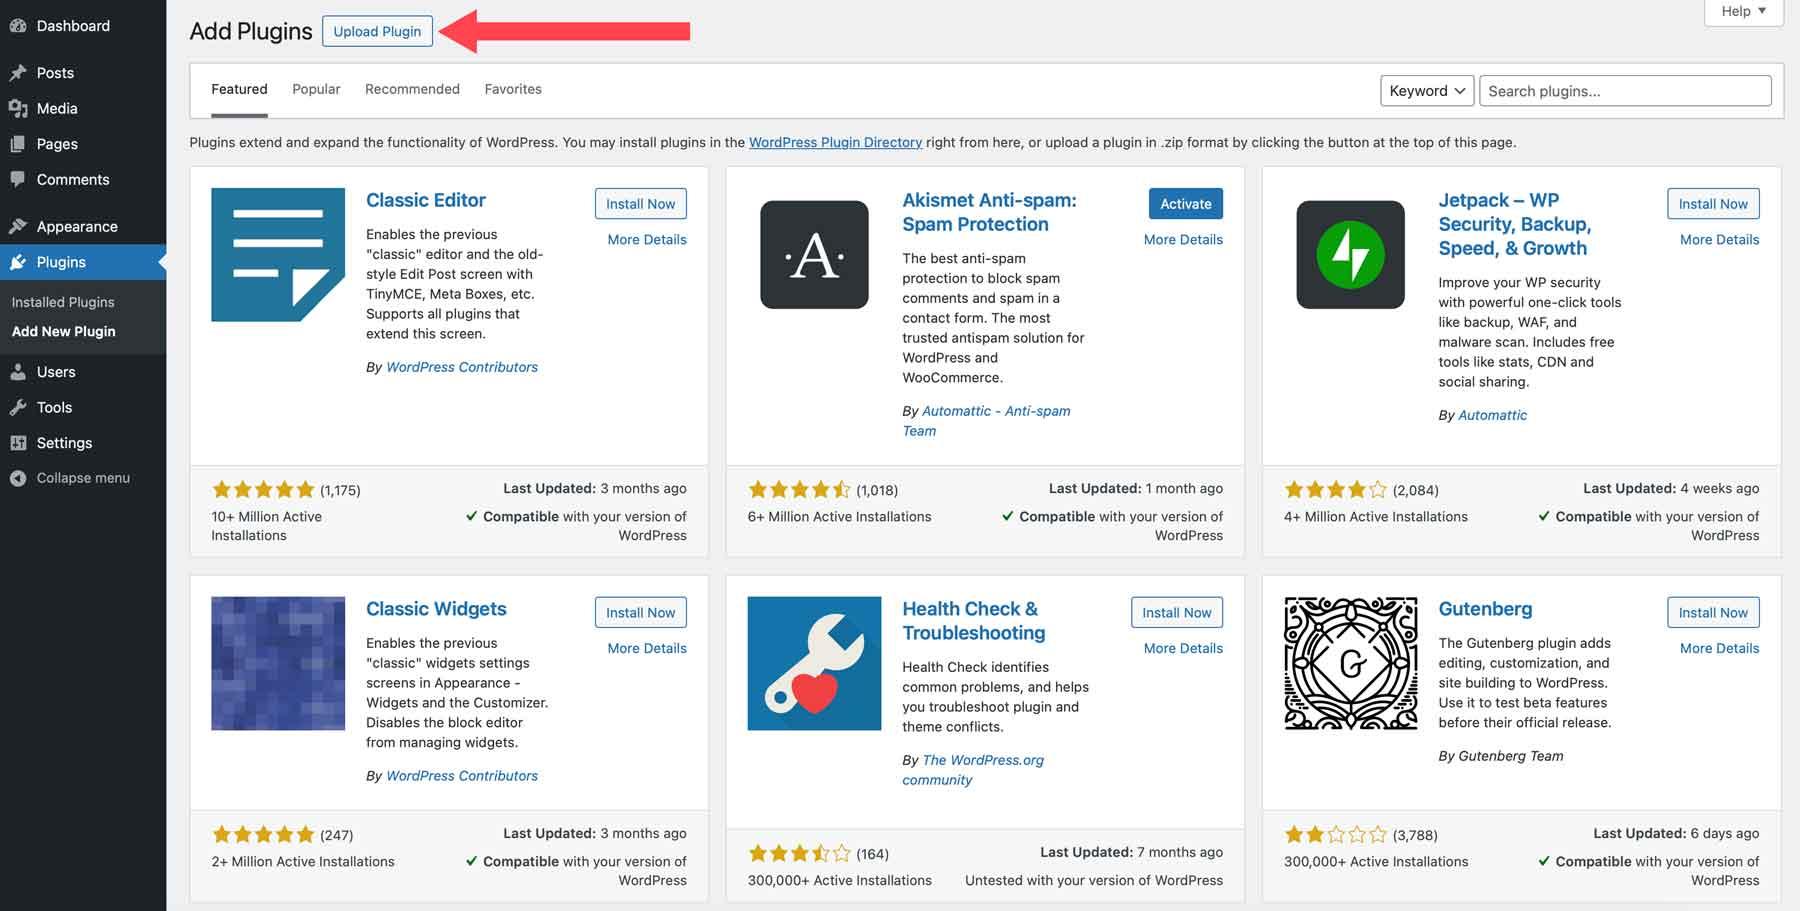
Once you’re in the dashboard, look on the left sidebar for the Plugins menu. Click on it, and then select Add New. This will take you to the WordPress Plugin Repository, where you can browse thousands of plugins to find the perfect one for your needs.
Searching for a Plugin
In the Add Plugins section, you can use the search bar in the top right corner to find a specific plugin. Simply type in the name or functionality you’re looking for, and hit Enter. You’ll see a list of plugins that match your search criteria.
Install the Plugin
Once you find the plugin you want, click the Install Now button. WordPress will automatically download and install the plugin for you. You’ll see a progress bar indicating the installation status. Once completed, the button will change to Activate.
Activate and Configure the Plugin
After installation, click on the Activate button. This action will enable the plugin on your site. Many plugins will add their own settings page, which can typically be found under the Settings menu or the main plugins menu. Make sure to explore these settings to optimize the plugin according to your preferences.
Check for Compatibility and Updates
It’s important to regularly check for updates to your plugins to ensure compatibility with your WordPress version and to keep your site secure. You can do this by navigating back to the Plugins menu, where you’ll see notifications for any available updates.
How to Upload and Install a Plugin Manually
Uploading and installing a plugin manually on your WordPress site can seem daunting at first, but it’s a straightforward process once you get the hang of it. Whether you’re working with a plugin that’s not available in the WordPress repository or you’ve downloaded a premium plugin directly from a developer, following these steps will help you get it up and running in no time.
First, you’ll need to prepare the plugin file. Most plugins will be downloaded as a ZIP file. If you’ve already done this, great! If not, visit the plugin’s official site and download the ZIP version. Once the file is ready, you’re all set to proceed with the upload.
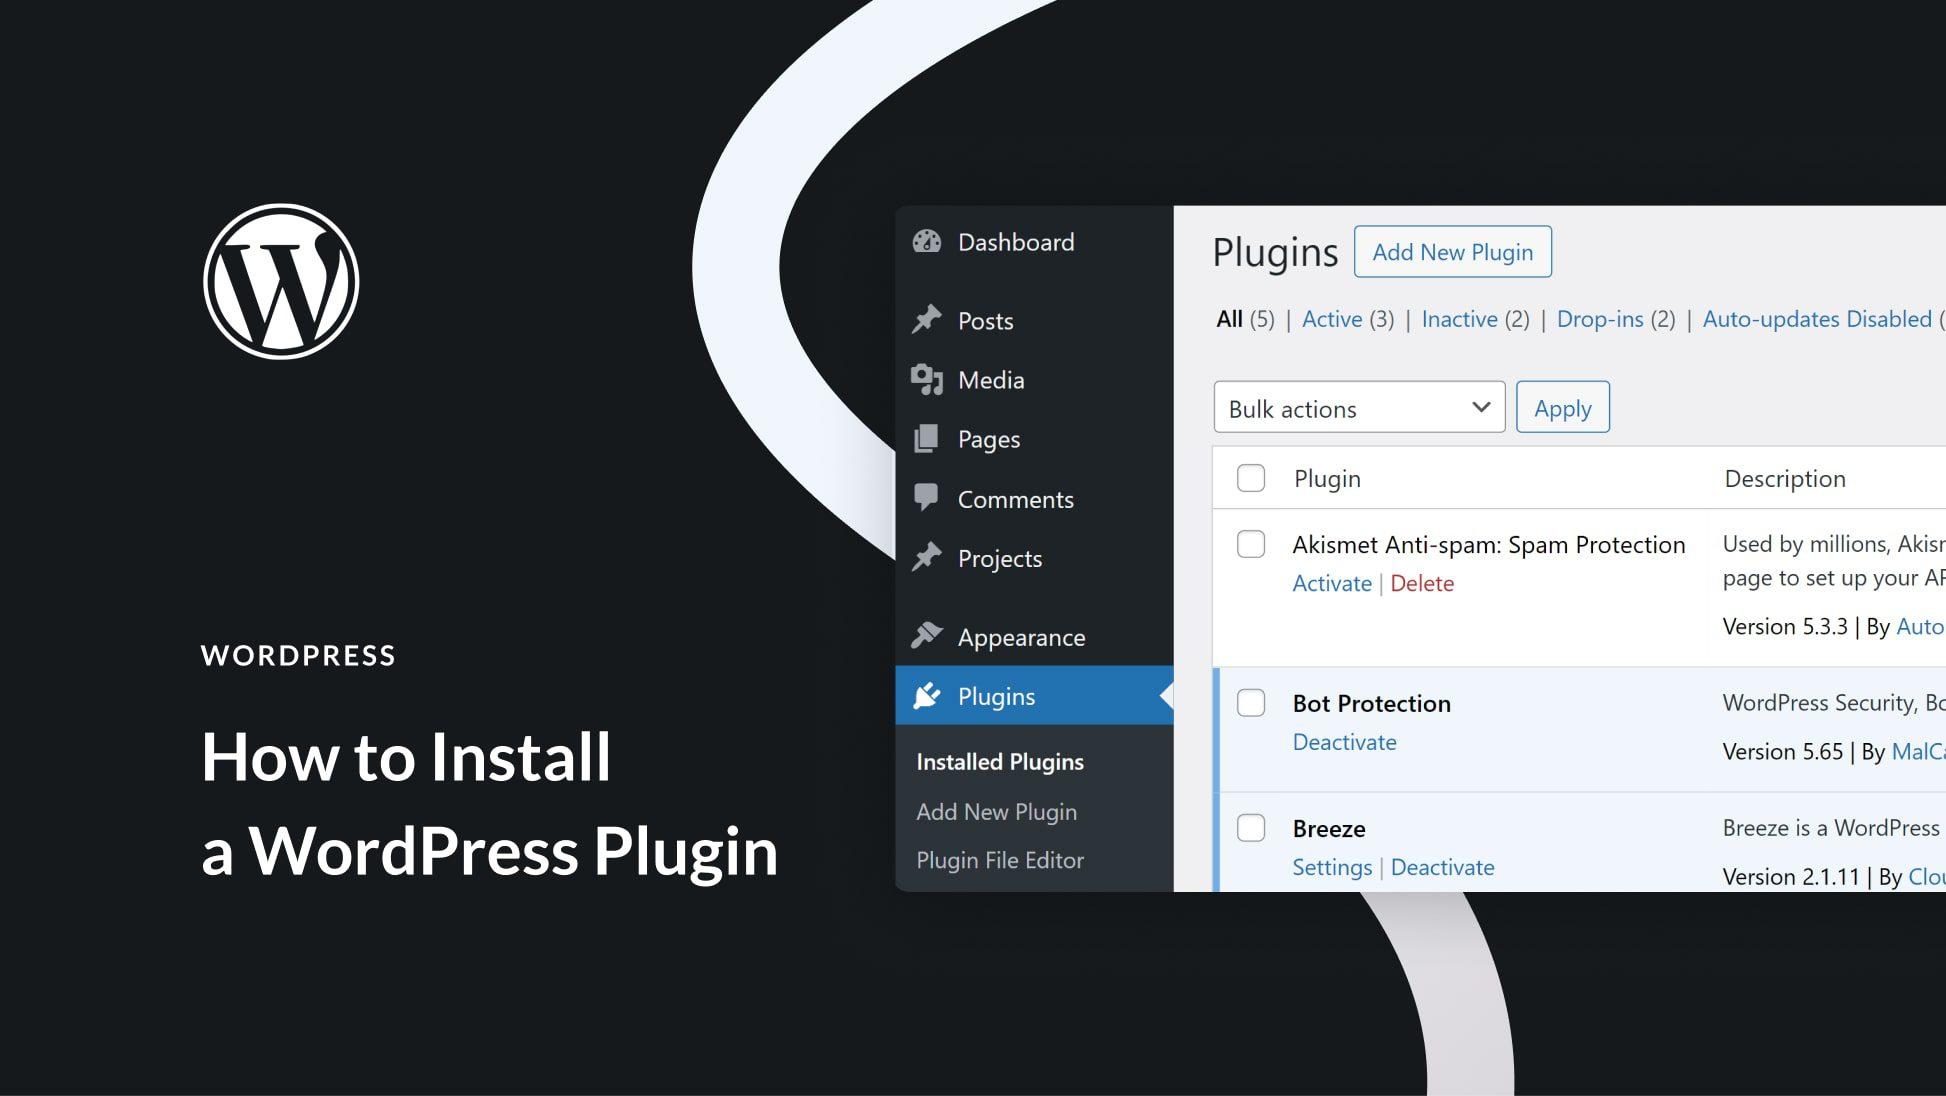
Next, log in to your WordPress dashboard and navigate to the Plugins section. From there, click on Add New. You’ll see an Upload Plugin option at the top of the page. Click this button to open the upload interface.
Now, click on Choose File, find the ZIP file you downloaded, and select it. After you’ve selected the file, click on the Install Now button. WordPress will process the upload, and if everything goes smoothly, you’ll see a success message along with an option to activate the plugin immediately.
If you encounter any issues during installation, double-check that the ZIP file is complete and contains the required plugin files. Most plugins will include a folder with the plugin name and .php files inside it. If the upload fails, it could be due to file size restrictions set by your hosting provider. In such a case, consider increasing your maximum upload size in your hosting settings or asking your provider for help.
Once your plugin is activated, you can start configuring its settings to suit your needs. Each plugin will have its own settings page, usually found under the Settings menu or listed directly in the sidebar. Take a moment to explore the new features and functionalities that your plugin brings to your site!
Activating Your Plugin and Exploring Its Features
Once you’ve successfully installed your plugin, the next step is to activate it. This is a simple yet crucial action that brings the plugin to life on your WordPress site. To activate your newly installed plugin, navigate to the Plugins section in your WordPress dashboard. Find the plugin you installed and click on the Activate link right below its name. A quick click, and your plugin is ready to go!
Now that your plugin is activated, it’s time to explore its features. Most plugins will add their own menu item in the dashboard, making it easy to access and configure their settings. Here are some features you might encounter:
- Settings Page: This is where you can tweak the plugin’s functionality to suit your needs.
- Customization Options: Many plugins allow you to customize various aspects, so you can tailor them to match your site’s aesthetic.
- Widgets and Shortcodes: These tools help you display plugin features anywhere on your site, enhancing user experience.
Understanding the features of your plugin will help you maximize its potential. It’s a good idea to check the documentation provided by the plugin developer as it often contains valuable insights and tips. You can typically find this documentation directly on the plugin’s page in the WordPress Plugin Directory or on the developer’s website.
| Feature | Description |
|---|---|
| SEO Optimization | Enhances your site’s visibility on search engines. |
| Performance Tracking | Monitors your site’s performance and speed. |
| Social Media Integration | Links your site with social platforms for better engagement. |
Make sure to test out the various options and settings your plugin offers. Don’t hesitate to experiment; after all, that’s how you’ll discover how to best utilize the plugin for your website’s needs. By engaging with your plugin’s features, you’ll be equipped to create a more dynamic and user-friendly experience for your visitors.
Troubleshooting Common Plugin Installation Issues
Installing a WordPress plugin should be a straightforward process, but occasionally you might encounter some hiccups. Here’s how to troubleshoot the most common issues you might face during installation.
Incompatible WordPress Version: One of the most frequent problems arises when the plugin you’re trying to install isn’t compatible with your current version of WordPress. To resolve this:
- Check the plugin details for the required WordPress version.
- Consider updating your WordPress installation to the latest version.
- Alternatively, look for a previous version of the plugin that is compatible with your site.
Memory Limit Exceeded: If you receive an error stating that you have exceeded your memory limit, it means your hosting setup is running short on resources. Here’s how to fix it:
- Contact your hosting provider to increase your PHP memory limit.
- Modify the
wp-config.phpfile by adding the linedefine('WP_MEMORY_LIMIT', '256M');.
File Permissions Issues: Sometimes, incorrect file permissions can prevent successful plugin installations. To adjust your permissions:
- Access your website via FTP or File Manager.
- Navigate to the
wp-content/pluginsdirectory. - Ensure the folder permissions are set to 755 and files to 644.
Conflicting Plugins: Occasionally, another plugin may conflict with your installation process. If you suspect this might be the case:
- Temporarily deactivate all other plugins and try installing again.
- If successful, reactivate the plugins one by one to identify the culprit.
| Issue | Solution |
|---|---|
| Incompatible Version | Update WordPress or use compatible plugin version |
| Memory Limit | Increase memory limit through hosting or wp-config.php |
| File Permissions | Set permissions to 755 for folders and 644 for files |
| Plugin Conflicts | Deactivate other plugins to identify conflicts |
By following these troubleshooting tips, you can ensure a smoother plugin installation process. If problems persist, reaching out to plugin support or your hosting provider can provide further assistance!
Best Practices for Managing Your WordPress Plugins
Effectively managing your WordPress plugins is crucial for maintaining a healthy and efficient website. Here are some key strategies to keep in mind:
- Regular Updates: Always keep your plugins updated to the latest version. This ensures you benefit from new features, security patches, and performance improvements.
- Quality Over Quantity: Limit the number of plugins to only those that are essential for your site’s functionality. Too many plugins can slow down your site and create conflicts.
- Compatibility Checks: Before installing a new plugin, check its compatibility with your current WordPress version and other installed plugins to avoid potential issues.
Another important aspect of plugin management is monitoring their performance. You can use tools like Google PageSpeed Insights or GTmetrix to assess how plugins impact your site’s speed. If a plugin significantly slows down your website, consider looking for an alternative or removing it altogether.
For better organization, consider creating a staging site where you can test new plugins or updates before applying them to your live website. This allows you to catch any potential conflicts or issues without affecting your visitors.
| Plugin Type | Recommended Count |
|---|---|
| SEO Plugins | 1-2 |
| Security Plugins | 1 |
| Backup Plugins | 1 |
| Performance Plugins | 1-2 |
Lastly, regularly audit your plugins to identify any that you no longer use or that have become obsolete. Deactivating and deleting unused plugins reduces clutter and minimizes security risks. By adhering to these best practices, you can ensure that your WordPress site remains robust, fast, and secure.
Keeping Your Plugins Updated for Optimal Performance
Keeping your plugins updated is crucial for the seamless functioning of your WordPress site. Outdated plugins can lead to performance issues, security vulnerabilities, and compatibility problems with themes or other plugins. Regular updates not only ensure that you benefit from the latest features but also maintain the overall health of your website.
Here are some key reasons to prioritize plugin updates:
- Security Enhancements: Developers frequently release updates to patch security loopholes. By ignoring these updates, you expose your site to potential attacks.
- Bug Fixes: Updates often address bugs that may hinder your site’s performance, ensuring a smoother user experience.
- New Features: Keeping plugins updated allows you to take advantage of new functionalities that can enhance your site’s capabilities.
- Compatibility: As WordPress evolves, updates ensure that your plugins remain compatible with the latest version of the platform.
To keep your plugins up to date, consider setting a regular schedule for checking and updating them. You can also enable automatic updates for certain plugins, allowing you to relax, knowing that your site is maintained without constant manual intervention.
Quick Tip: Always back up your website before updating plugins to prevent data loss in case an update causes any unforeseen issues.
For easy tracking, use tools like the table below to monitor your plugin status:
| Plugin Name | Current Version | Update Available | Last Updated |
|---|---|---|---|
| Yoast SEO | 17.5 | Yes | 2023-10-01 |
| WooCommerce | 7.6 | No | 2023-09-15 |
| Contact Form 7 | 5.7 | Yes | 2023-09-30 |
Exploring Must-Have Plugins for Every WordPress Site
When it comes to enhancing the functionality of your WordPress site, plugins are where the magic happens. They can turn your website from a simple blog into a powerful platform tailored to your specific needs. Whether you’re looking to boost SEO, improve security, or streamline your content management, there are essential plugins that can elevate your site’s performance.
Here are some must-have plugins that every WordPress site should consider:
- Yoast SEO: Optimize your content for search engines with this user-friendly plugin that guides you through best practices.
- Wordfence Security: Protect your site from hacks and malware with a comprehensive security solution that offers firewall protection and malware scanning.
- WooCommerce: If you’re planning to run an online store, this plugin provides everything you need to sell products and manage inventory seamlessly.
- Elementor: Transform your site’s design effortlessly with this drag-and-drop page builder that enables you to create visually stunning layouts without any coding.
- Akismet: Keep your comments section clean and spam-free with this plugin that automatically filters out unwanted spam comments.
Each of these plugins serves a unique purpose, but together, they create a robust foundation for a functional and professional-looking website. For instance, using Yoast SEO in conjunction with Akismet not only helps you improve your site’s visibility but also maintains a positive user experience by keeping unwanted spam at bay.
| Plugin Name | Primary Function | Key Benefit |
|---|---|---|
| Yoast SEO | SEO Optimization | Increases organic traffic |
| Wordfence Security | Security Protection | Safeguards against attacks |
| WooCommerce | E-commerce | Facilitates online sales |
| Elementor | Page Building | Simplifies design processes |
| Akismet | Spam Filtering | Keeps comments clean |
Installing these plugins is straightforward, and they come with extensive documentation to help you every step of the way. As you explore these options, think about the needs of your site and your audience. A few well-chosen plugins can significantly enhance your site’s usability and performance, making it a more engaging experience for your visitors.
Frequently Asked Questions (FAQ)
Q&A: How to Install a WordPress Plugin (Beginner’s Guide)
Q1: What exactly is a WordPress plugin?
A1: Great question! A WordPress plugin is like an app for your website. It adds specific features or functionalities, helping you customize your site without needing to code. Whether you want to improve SEO, enhance security, or integrate social media, there’s likely a plugin that can help!
Q2: Why should I bother installing plugins?
A2: Imagine trying to build a house without any tools—frustrating, right? Plugins are your tools for building a powerful and functional website. They allow you to enhance your site’s performance and user experience easily. Plus, with thousands of plugins available, you can tailor your site to meet your unique needs. Why not make your website work harder for you?
Q3: Is installing a plugin really that simple?
A3: Absolutely! Installing a WordPress plugin is incredibly straightforward—almost as easy as clicking a button. Even if you’re a total beginner, you’ll find that the WordPress dashboard is user-friendly. Trust me, once you see how simple it is, you’ll wonder why you didn’t start using plugins sooner!
Q4: What steps do I need to follow to install a plugin?
A4: You’ve got this! Here’s a quick rundown:
- Log into your WordPress dashboard.
- Navigate to “Plugins” and click “Add New.”
- Search for the plugin you want to install.
- Click “Install Now” and then “Activate.”
- Configure the plugin settings as needed.
Voilà! Just like that, you’ve enhanced your site. Isn’t that empowering?
Q5: Are there any risks involved in installing plugins?
A5: It’s wise to be cautious. While most plugins are safe, some can conflict with your theme or other plugins. Always check reviews and ensure the plugin is regularly updated. And remember, it’s a good idea to back up your site before installing anything new—better safe than sorry!
Q6: How do I know which plugins are best for my site?
A6: Start with what you need! Identify the features you want to add—maybe you’re looking for SEO tools, contact forms, or social media sharing options. Research highly-rated plugins that fulfill those needs. And don’t hesitate to ask fellow WordPress users for recommendations. The community is incredibly helpful!
Q7: Can I uninstall a plugin if I don’t like it?
A7: Absolutely! Uninstalling a plugin is just as easy as installing one. Simply go back to your dashboard, navigate to Plugins, find the one you want to remove, and click “Deactivate,” followed by “Delete.” No strings attached! If it doesn’t work for you, just swap it out for something that does.
Q8: What’s the takeaway for a beginner like me?
A8: The world of WordPress plugins is your oyster! Don’t hesitate to explore and experiment. Take the plunge and start enhancing your website today—it’s easier than you think! With just a few clicks, you can unlock a whole new realm of possibilities for your site. Ready to get started? The digital world is waiting for you!
To Wrap It Up
Conclusion: Unlock the Full Potential of Your WordPress Site!
Congratulations! You’ve just taken a crucial step toward enhancing your WordPress site by learning how to install plugins. Whether you’re looking to improve functionality, boost performance, or simply add a touch of creativity, plugins are your best friends in the digital world. Remember, the right plugin can transform your website, making it more user-friendly and engaging.
As you explore the vast ocean of available plugins, don’t hesitate to experiment! There’s a plugin out there for just about every need, and with a little trial and error, you’ll discover the perfect tools to elevate your site. Always prioritize quality and compatibility to ensure a smooth experience.
Now that you’re equipped with the know-how, it’s time to get started! Dive in, install those plugins, and watch your website flourish. If you have questions or run into issues, don’t hesitate to reach out to the community or revisit this guide. Happy WordPressing! Your journey toward a more dynamic and powerful website starts here!

