
Are you ready to turn your online dreams into reality? Whether you’re a budding blogger, a small business owner, or simply someone with a passion to share, installing WordPress is your gateway to creating a stunning website with ease. But let’s face it—navigating the technical landscape can feel daunting, especially if you’re not a tech wizard. Fear not! In this article, we’re diving into two straightforward methods to install WordPress that will have you up and running in no time. With step-by-step guidance and helpful tips along the way, you’ll see just how simple it can be to set up your very own site. So, grab a cup of coffee, and let’s get started on the exciting journey of building your online presence!
Understanding the Benefits of Installing WordPress Yourself
Installing WordPress yourself can be a game-changer for both beginners and seasoned web developers. One of the primary advantages of this approach is the complete control it grants you over your website. When you opt for a manual installation, you can customize every aspect of the setup to suit your specific needs. This level of flexibility ensures that your site is not only unique but also optimized for your goals.
Another significant benefit is the opportunity to learn and grow. By walking through the installation process, you’ll gain invaluable insights into how WordPress operates. Understanding the underlying architecture can empower you to troubleshoot issues more effectively in the future. Plus, acquiring technical skills can boost your confidence, making you less reliant on third-party services for basic tasks.
Cost savings is also a compelling reason to install WordPress yourself. Many hosting providers offer one-click installations, but they often come with a premium price tag. By taking the DIY route, you can bypass these fees and invest your resources where they matter most—like premium themes or plugins that enhance your site’s functionality. It’s a practical choice that can lead to significant savings over time.
Moreover, handling your own installation allows for enhanced security. When you’re in charge, you can implement best practices right from the start, such as using strong passwords, choosing secure hosting, and configuring necessary settings. This proactive approach minimizes vulnerabilities and helps protect your site from potential threats.
| Benefits | Description |
|---|---|
| Control | Complete customization and configuration of your site. |
| Learning | Gain insights and skills for better troubleshooting. |
| Cost Savings | Avoid extra fees by handling the installation yourself. |
| Security | Implement strong security measures from the outset. |
Ultimately, installing WordPress by yourself isn’t just about the immediate benefits; it’s about laying a strong foundation for your website’s future. By taking this step, you are investing in your own knowledge and capabilities, ensuring that you can adapt and grow your online presence as needed. Embrace the journey, and watch your website flourish!
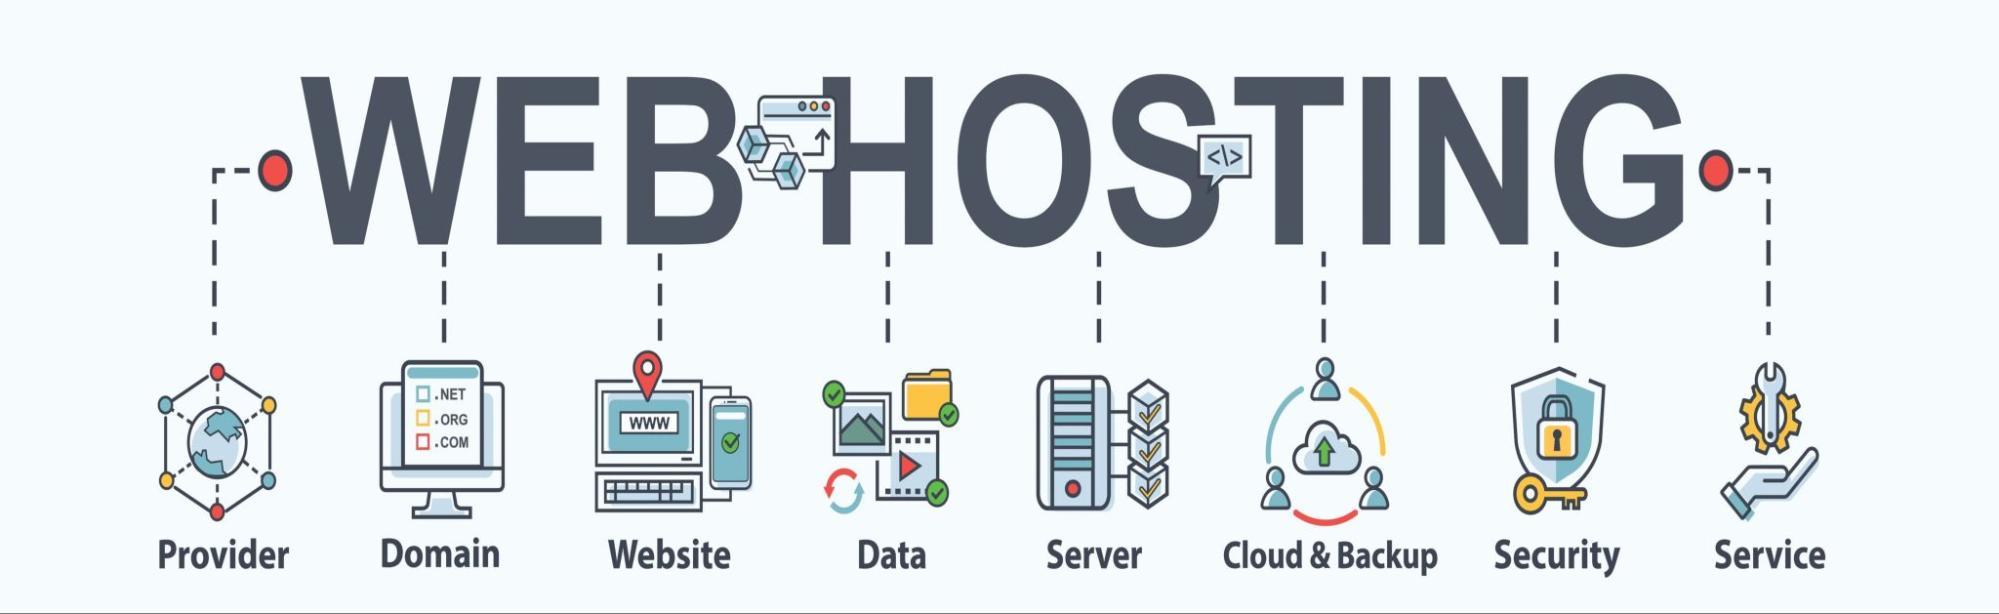
Choosing the Right Hosting Provider for Your WordPress Site
When it comes to setting up your WordPress site, selecting the right hosting provider can significantly impact your site’s performance, security, and overall user experience. With so many options available, it’s crucial to evaluate what features fit your specific needs.
Here are some key factors to consider:
- Performance: Look for a host that offers high uptime rates and fast loading speeds. A host with SSD storage and optimized servers can make a noticeable difference.
- Support: Quality customer service is essential. Opt for a provider that offers 24/7 support via multiple channels, including live chat, phone, and email.
- Scalability: Choose a hosting plan that allows you to easily upgrade as your site grows. You don’t want to be stuck with a plan that can’t accommodate increased traffic.
- Security: Ensure your host provides robust security features, such as SSL certificates, malware scanning, and regular backups to protect your site from threats.
- Pricing: While cost shouldn’t be the only factor, it’s important to find a provider that offers competitive pricing without sacrificing essential features.
Comparison Table of Popular WordPress Hosting Providers:
| Provider | Uptime Guarantee | Support | Starting Price |
|---|---|---|---|
| Bluehost | 99.9% | 24/7 Chat, Phone | $2.95/month |
| SiteGround | 99.99% | 24/7 Support | $3.99/month |
| A2 Hosting | 99.9% | Anytime Support | $2.99/month |
| DreamHost | 100% | 24/7 Support | $2.59/month |
Ultimately, the best hosting provider for your WordPress site depends on your specific needs and goals. Take the time to research and compare different providers to ensure you’re making an informed decision that will support the growth and success of your online presence.
Exploring the One-Click Installation Method for Quick Setup
One-click installation has revolutionized the way users set up WordPress sites. This method is designed for both novices and seasoned developers, enabling a hassle-free setup that eliminates the complexities typically associated with website creation. With just a click, you can bypass the tedious manual installation processes, allowing you to focus more on crafting your content and less on the technical details.
Most web hosting providers now offer one-click installation options as part of their service. This feature is often integrated into your hosting dashboard and can be accessed easily. Here’s why this method stands out:
- Simplicity: Forget about FTP and database configurations. The one-click method handles everything for you.
- Speed: Set up your site in minutes rather than hours. Enjoy your website sooner!
- Updates: Many hosts will also provide automatic updates for your WordPress installation, keeping your site secure and running smoothly.
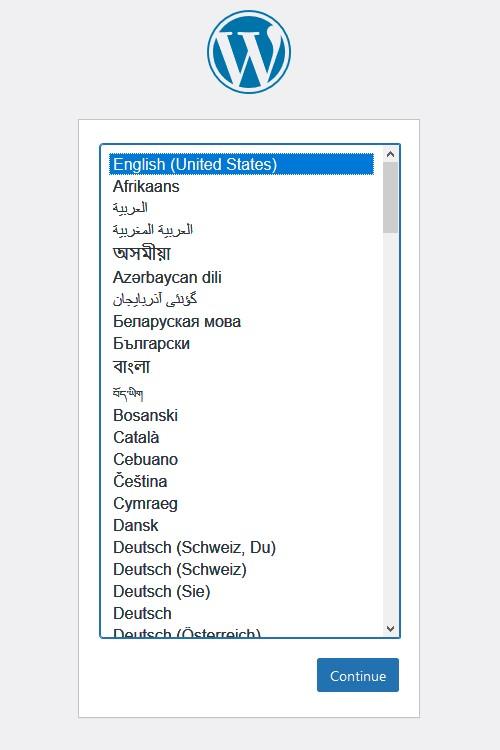
To get started with a one-click installation, follow these general steps, which may slightly vary depending on your hosting provider:
- Log into your hosting account.
- Locate the WordPress installer tool in your control panel.
- Choose the domain where you want to install WordPress.
- Click the install button and fill in the required details, such as site name and admin account.
- Wait for the installation to finish, then log in to your new WordPress site!
The simplicity and efficiency of one-click installation make it a preferred option for many users. However, it’s essential to choose a reputable hosting provider that offers reliable support and maintenance. Below is a comparison of some popular hosting providers and their one-click installation features:
| Hosting Provider | One-Click Install | Support |
|---|---|---|
| Bluehost | Yes | 24/7 Live Chat |
| SiteGround | Yes | Phone & Email |
| DreamHost | Yes | Knowledge Base |
the one-click installation method is an ideal solution for anyone looking to set up a WordPress site quickly and with minimal fuss. Embrace this technology and watch your ideas come to life online with ease.
Mastering the Manual Installation Process for Full Control
Embarking on the journey of manual WordPress installation grants you the power to customize and optimize your setup from the ground up. While it might seem daunting at first, breaking it down into manageable steps will empower you to take full control. This method not only enhances your understanding of the platform but also allows for greater flexibility in tailoring your site’s configuration to meet your specific needs.
To start the installation, you’ll need to prepare your environment. Here’s what you’ll need:
- A web hosting account with PHP and MySQL support
- Access to your domain name settings to point to your hosting server
- The latest version of WordPress, which you can download from the official website
- An FTP client such as FileZilla to upload files
- phpMyAdmin or a similar tool to manage your database
Once you have everything ready, follow these steps:
- Upload the WordPress files to your web server using your FTP client.
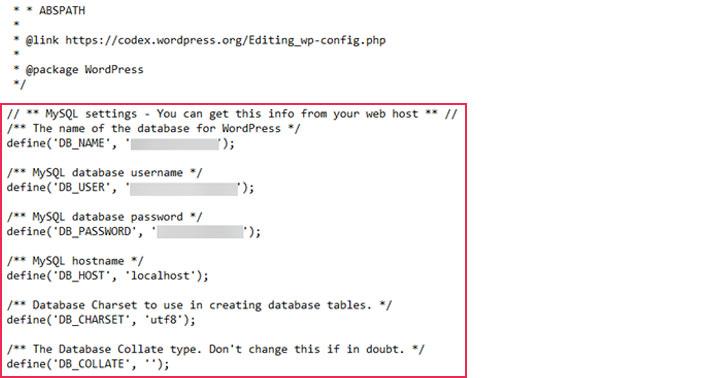
- Create a MySQL database and user through your hosting control panel, ensuring you note the username and password for later use.
- Edit the
wp-config-sample.phpfile, replacing the placeholder values with your database details, and rename it towp-config.php. - Access your website URL, and WordPress will guide you through the setup through a user-friendly interface.
For those who want a clearer view of the process, here’s a quick comparison of manual and automated installation methods:
| Feature | Manual Installation | Automated Installation |
|---|---|---|
| Control over Installation | Full control | Limited control |
| Learning Opportunity | High | Low |
| Setup Time | Longer | Quick |
| Customization | Extensive | Basic |
Mastering the manual installation process not only equips you with the knowledge to troubleshoot issues that may arise but also lays the foundation for a deeper mastery of WordPress. As you proceed, remember that each step is an opportunity to learn more about how WordPress operates, enabling you to harness its full potential. Embrace the adventure of manual installation, and watch your site transform into a powerful online presence.
Essential WordPress Configuration Steps After Installation
Once your WordPress installation is complete, the real fun begins! Configuring your site properly is crucial for performance, security, and usability. Here are the key settings you should focus on:
General Settings
Navigate to Settings > General to fine-tune your site’s identity. Here, you can adjust vital information:
- Site Title – Make sure this reflects your brand or purpose.
- Tagline – A brief description that adds context to your site.
- Timezone – Set this to your local time for accurate scheduling.
Permalink Structure
One of the first things to configure is your permalink settings. Go to Settings > Permalinks and select a structure that best suits your content. A popular option is:
| Permalink Option | Benefits |
|---|---|
| Post Name | SEO-friendly and easy to read |
| Custom Structure | Highly customizable for unique needs |
Security Measures
Don’t forget to secure your WordPress site! Here’s a quick checklist to keep your site protected:
- Change the default username (admin) to something unique.
- Use a strong password and consider implementing two-factor authentication.
- Install a security plugin like Wordfence or Sucuri.
Theme and Plugin Setup
Choosing the right theme and essential plugins can significantly enhance your site’s functionality. Look for themes that are:
- Responsive – Ensures compatibility with mobile devices.
- Optimized for SEO – Helps improve your search engine ranking.
As for plugins, start with:
- Yoast SEO – For optimizing your content.
- Elementor – A user-friendly page builder.
- Akismet – Keeps spam comments at bay.
Final Touches
customize your site’s appearance through the Customizing tool under Appearance > Customize. Here, you can:
- Upload a logo
- Select a color scheme
- Set your homepage layout
Getting your WordPress site configured correctly sets the stage for a successful online presence. Dive into these configurations, and you’ll be on your way to creating an engaging platform that reflects your vision!

Enhancing Security and Performance Post-Installation
Once you’ve successfully installed WordPress, the next crucial step is to enhance your site’s security and performance. A well-protected and speedy site not only improves user experience but also boosts your search engine rankings. Here’s how you can achieve that:
Strengthen Your Login Security
- Change the default username from “admin” to something unique.
- Implement two-factor authentication (2FA) for an extra layer of security.
- Limit login attempts to prevent brute force attacks.
Optimize Site Speed
- Choose a reliable hosting provider that offers optimized WordPress hosting.
- Utilize a caching plugin such as WP Super Cache or W3 Total Cache to reduce loading times.
- Optimize images by compressing them without sacrificing quality, using tools like Smush or ShortPixel.
Regular Backups
Maintaining a consistent backup schedule is essential. Use plugins like UpdraftPlus or BackupBuddy to automate your backups. You can store backups in multiple locations (cloud storage, FTP, etc.) to ensure data safety. Here’s a quick view of backup frequency:
| Backup Frequency | Recommended For |
|---|---|
| Daily | High-traffic sites, frequent updates |
| Weekly | Medium traffic, regular content updates |
| Monthly | Low traffic, infrequent changes |
Update Regularly
Stay current by regularly updating WordPress core, themes, and plugins. Outdated software is one of the primary vulnerabilities. Enable automatic updates where possible, or establish a routine for manual updates to keep your site secure.
Install a Security Plugin
Consider installing a comprehensive security plugin like Wordfence or Sucuri. These tools offer features such as firewall protection, malware scanning, and real-time traffic monitoring, making them indispensable for maintaining your site’s integrity.
Customizing Your WordPress Site with Themes and Plugins
Customizing your WordPress site is essential to reflect your unique style and meet your specific needs. With thousands of themes and plugins at your fingertips, you can transform a standard installation into a stunning, functional website tailored just for you. Here’s how to effectively use themes and plugins to enhance your WordPress experience.
Choosing the Right Theme
Selecting a theme is more than just picking a pretty design. A well-chosen theme impacts your site’s usability, SEO, and overall performance. Consider the following when selecting a theme:
- Responsiveness: Ensure your theme looks great on all devices, from desktops to smartphones.
- Customization Options: Look for themes that allow you to easily change colors, fonts, and layouts without needing to code.
- Support and Updates: Choose themes from reputable sources that offer regular updates and customer support.
Exploring Plugins
Plugins are the powerhouse of WordPress, enabling you to add new features and functionalities to your site. Here are some must-have plugins to consider:
- SEO Optimization: Use plugins like Yoast SEO to improve your site’s visibility on search engines.
- Security: Protect your site from threats with security plugins like Wordfence or Sucuri.
- Performance: Speed up your site with caching plugins such as WP Super Cache or W3 Total Cache.
Combining Themes and Plugins
The real magic happens when you combine the right theme with essential plugins. For instance, a visually appealing theme paired with an SEO plugin can significantly boost your site’s performance. To help you visualize this, here’s a quick comparison table of some popular themes and their compatible plugins:
| Theme | Compatible Plugins |
|---|---|
| Astra | Elementor, Yoast SEO |
| Divi | Bloom, Monarch |
| OceanWP | WPForms, WooCommerce |
Final Tips for Customization
As you dive into customizing your site, keep these tips in mind:
- Backup Your Site: Always backup your site before making significant changes, especially when installing new plugins and themes.
- Test for Compatibility: After installation, check how your theme and plugins work together to avoid conflicts.
- Stay Updated: Regularly update your themes and plugins to ensure security and compatibility with the latest WordPress versions.

Troubleshooting Common Installation Issues Like a Pro
Installing WordPress can be a smooth process, but sometimes you may run into a few bumps along the way. Whether you’re a novice or a seasoned developer, knowing how to troubleshoot common installation issues is essential for a successful setup. Here are some common problems and their solutions that will have you back on track in no time.
1. Database Connection Errors
If you encounter a database connection error during installation, it typically means that your WordPress installation cannot communicate with your database. Here’s what to check:
- Database Credentials: Verify that the database name, username, password, and host in the
wp-config.phpfile are correct. - Database Server: Ensure your database server is running. For local environments, this might be a service like MySQL.
- Privileges: Make sure the database user has the appropriate privileges to access the database.
2. Permission Issues
Another common hiccup is incorrect file permissions. If you are unable to upload files or see a “403 Forbidden” error, try adjusting your file permissions:
- Directories: Set permissions to
755. - Files: Set permissions to
644. - Owner: Ensure that the files are owned by the user that runs the web server.
3. Memory Limit Exhausted
If you run into a memory limit error message, this can typically be solved by increasing the memory limit in your wp-config.php file:
define('WP_MEMORY_LIMIT', '256M');This change can help your site handle more processes, especially if you’re using resource-intensive plugins.
| Error Type | Common Causes | Quick Fix |
|---|---|---|
| Database Connection Error | Incorrect credentials | Check wp-config.php |
| 403 Forbidden | Incorrect permissions | Set permissions to 755 and 644 |
| Memory Limit Exhausted | High resource usage | Increase memory limit in wp-config.php |
By following these troubleshooting tips, you can resolve common installation issues quickly and efficiently, allowing you to focus on creating and managing your site without unnecessary stress. Remember, each problem has a solution, so keep this guide handy for any future installations!
Keeping Your WordPress Site Updated and Secure Over Time
Regular updates are essential for maintaining both the performance and security of your WordPress site. Keeping your WordPress installation, themes, and plugins up to date can help protect your site from vulnerabilities that hackers exploit. Here are some key practices to ensure your website remains secure and performs optimally:
- Enable Automatic Updates: WordPress automatically updates minor releases, but you can enable automatic updates for major releases, themes, and plugins through your dashboard or by adding a few lines of code to your
wp-config.phpfile. - Backup Regularly: Regular backups are crucial. Use reliable plugins like UpdraftPlus or BackupBuddy to create automatic backups of your site’s content and database.
- Use Security Plugins: Consider installing security plugins such as Wordfence or Sucuri to monitor your site for malware and vulnerabilities. These plugins often include firewall protection and malware scanning features.
It’s also important to regularly review the themes and plugins you have installed. Deactivate and delete any that are unused or no longer maintained, as these can be points of vulnerability. The WordPress community is vast, and there are many reputable alternatives available. Always opt for well-reviewed and regularly updated options.
For your workflow, create a schedule to check for updates. You might set a recurring reminder every month to ensure all components of your site are current. Additionally, stay informed about the latest security practices by following reputable WordPress blogs and forums.
Here’s a quick reference table summarizing best practices for updating and securing your WordPress site:
| Practice | Frequency | Tools/Suggestions |
|---|---|---|
| WordPress Core Updates | As Released | Automatic Updates |
| Theme & Plugin Updates | Weekly | Dashboard Notifications |
| Website Backups | Daily or Weekly | UpdraftPlus, BackupBuddy |
| Security Scans | Monthly | Wordfence, Sucuri |
By implementing these strategies, you not only enhance your site’s security and performance but also provide a better experience for your visitors. Remember, maintaining a secure website is an ongoing process, and staying proactive is your best defense against potential threats.
Frequently Asked Questions (FAQ)
Step-by-Step Guide: How to Install WordPress (2 Methods)
Q&A
Q1: Why should I choose WordPress for my website?
A: Great question! WordPress powers over 40% of all websites on the internet, which speaks volumes about its functionality and reliability. It’s user-friendly, highly customizable, and offers thousands of themes and plugins to give your site a unique look and feel. Plus, you don’t need to be a tech whiz to get started!
Q2: What are the two methods to install WordPress?
A: You have two fantastic options: the One-Click Installation Method provided by most hosting providers and the Manual Installation Method if you prefer a hands-on approach. Both methods are straightforward and will get you up and running in no time!
Q3: What’s the easiest way to install WordPress?
A: If you’re looking for simplicity, the One-Click Installation Method is your best bet! Most hosting services like Bluehost, SiteGround, or DreamHost offer this feature. Just log into your hosting account, find the WordPress installer, and click “Install.” It’s as easy as pie!
Q4: What if I want more control over the installation process?
A: If you’re a bit more adventurous or want to learn how things work behind the scenes, the Manual Installation Method is for you. This approach allows you to upload WordPress files to your server, create a database, and configure your settings manually. While it may take a little longer, it’s a great way to understand the platform better.
Q5: Do I need to buy a domain and hosting to install WordPress?
A: Yes! Before you can install WordPress, you need a domain name (your website’s address) and a hosting service (the space where your website lives online). Many hosting companies offer packages that include both domain registration and hosting, making the process seamless.
Q6: How long does it take to install WordPress?
A: With the One-Click Installation Method, you can have WordPress installed in as little as 5 minutes! The Manual Installation Method might take a bit longer—around 15-30 minutes—depending on your familiarity with the process. But don’t worry; the time spent is worth it for the flexibility you gain!
Q7: What should I do after installing WordPress?
A: Once you’ve got WordPress up and running, it’s time to customize! Choose a theme that reflects your brand, install essential plugins for added functionality, and start creating content. Don’t forget to set up your site’s settings and backups to keep everything secure.
Q8: Can I change my WordPress theme later?
A: Absolutely! One of the best things about WordPress is its flexibility. You can change your theme at any time without losing your content. Just head to the Appearance section in your dashboard, and you’re good to go.
Q9: What if I run into issues during installation?
A: No worries! Both installation methods have robust support communities. WordPress forums, your hosting provider’s support, and countless online tutorials are just a search away. You’re never alone in this!
Q10: Is WordPress really the best choice for my website?
A: If you’re looking for a powerful, flexible, and easy-to-use platform, then yes! WordPress is perfect for blogs, business sites, portfolios, and online stores. With the right tools and a little creativity, the possibilities are endless!
Ready to dive in? Follow our step-by-step guide and take the leap into the world of WordPress. Your online adventure awaits!
The Conclusion
And there you have it! You’ve just unlocked the knowledge to install WordPress using two straightforward methods. Whether you chose the manual installation route for that hands-on experience or the one-click option for its simplicity, you’re now ready to take your online presence to the next level.
Remember, the beauty of WordPress lies not just in its installation but in the endless possibilities it offers once you’re set up. From stunning themes to powerful plugins, your website can become anything you envision. So, don’t hesitate to dive deeper and explore all that WordPress has to offer.
If you found this guide helpful, share it with friends who might be looking to create their own websites. And don’t forget to return here for more tips, tricks, and insights into the world of WordPress. Happy blogging! Your journey has just begun, and we can’t wait to see what you create!