Are you ready to transform your WordPress site into a stunning online presence? If so, you’re in for a treat! The WordPress Customizer is your secret weapon for tweaking everything from colors and fonts to layouts and menus, all in real-time. Whether you’re a novice stumbling through your first website or a seasoned pro looking to streamline your workflow, this complete guide will walk you through every nook and cranny of the Customizer. Imagine effortlessly adjusting your site’s appearance and instantly seeing the changes—it’s like having a magic wand for your website! So grab a cup of coffee, settle in, and let’s dive into the world of the WordPress Customizer. Your website’s makeover starts now!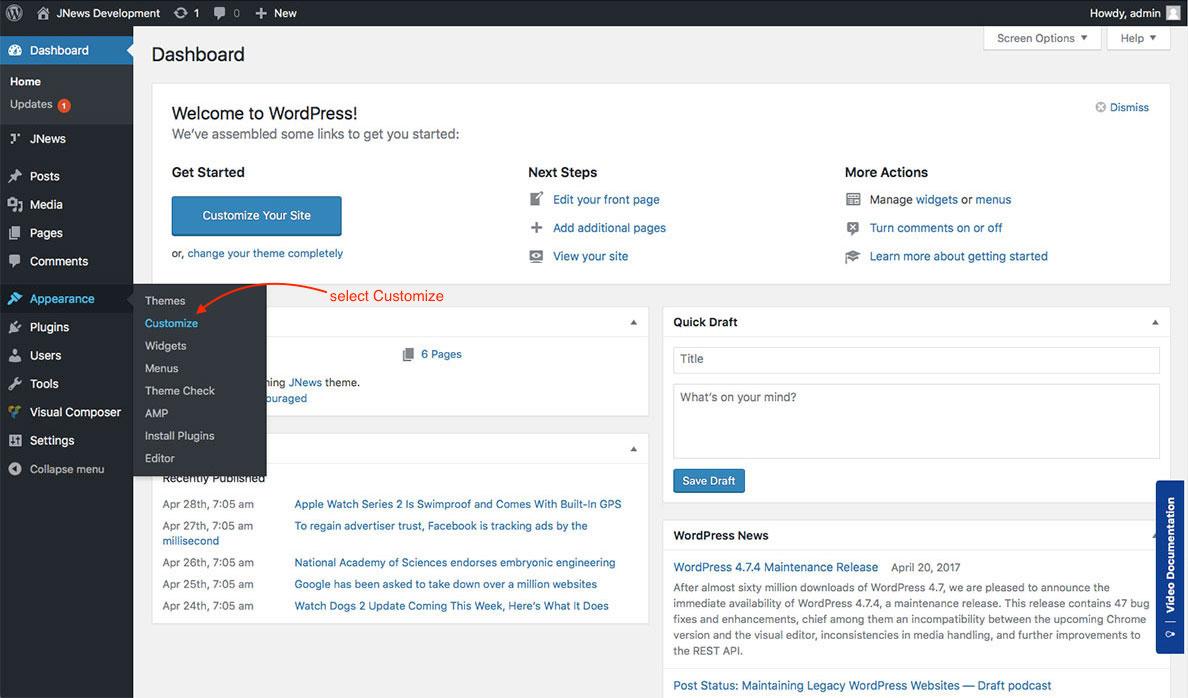
Understanding the WordPress Customizer Interface
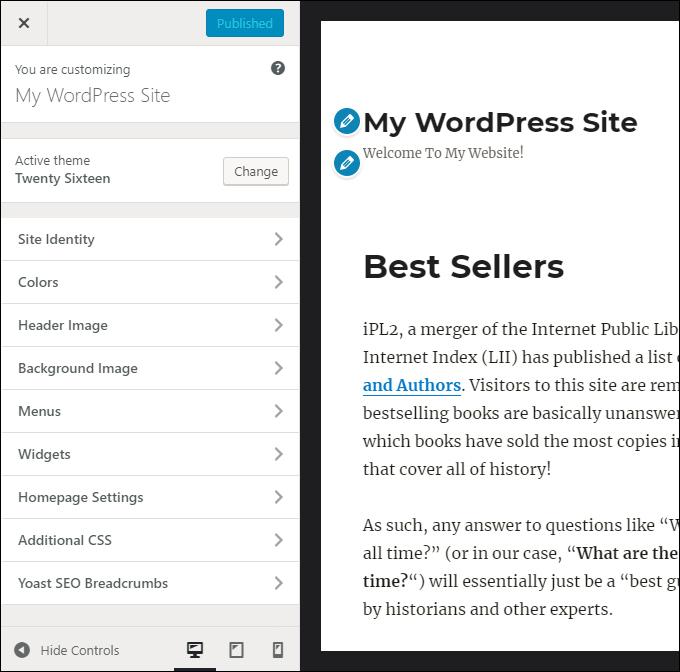
The WordPress Customizer is an intuitive tool that allows you to modify your site’s appearance and settings in real-time. This interface is not only user-friendly but also powerful—enabling you to see changes as you make them without the need to refresh the page. When you launch the Customizer, you’ll encounter a sidebar filled with options that can transform your website’s look and feel.
One of the first things you’ll notice is the live preview of your website on the right side of the screen. As you navigate through the options on the left, the changes you make will instantly reflect on this preview. This feature is particularly useful as it allows you to experiment with different designs, colors, and layouts without any commitment. Here’s what you can typically find in the Customizer:
- Site Identity: Customize your site title, tagline, and logo.
- Colors: Change the color scheme of your site, including background and text colors.
- Menus: Create and manage your navigation menus to enhance user experience.
- Widgets: Add and arrange widgets in various areas of your site, like sidebars and footers.
- Homepage Settings: Choose what your homepage displays—whether it’s your latest posts or a static page.
In addition to these core options, many themes come with their own specific settings that can be adjusted within the Customizer. This may include typography settings, header images, and custom CSS. The beauty of this is that it offers a tailored experience, allowing you to align your website’s design closely with your brand identity. If you’re unsure about a particular setting, hovering over it often reveals helpful tooltips that guide you through each option.
Another notable feature is the Publish button at the top of the sidebar. This lets you save all the changes you’ve made and make them live with just one click. If you’re not ready to publish, you can simply navigate away, and your changes will remain in draft mode until you decide to finalize them. This flexibility encourages exploration and creativity without the fear of losing previous configurations.
remember to explore the Additional CSS section, where you can add custom styles to further enhance your site’s design. This is an excellent way for users with some coding knowledge to personalize their site even more. The Customizer provides a platform for both beginners and advanced users to create a visually appealing website that truly represents their vision.
Unlocking the Power of Site Identity Settings
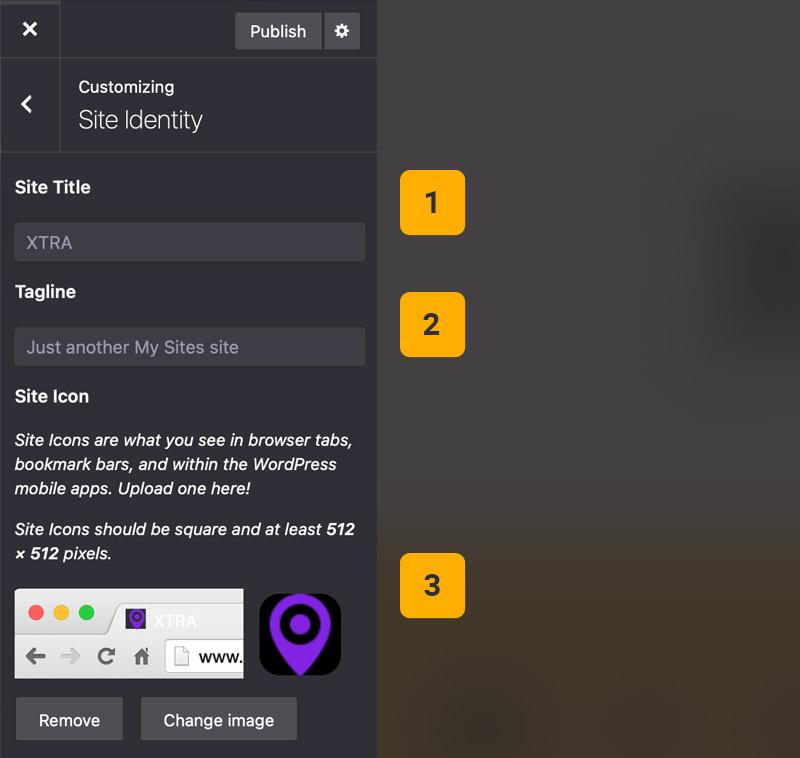
One of the most powerful features of the WordPress Customizer is the Site Identity settings. This section allows you to establish a strong brand presence right from the start. Your website’s identity is more than just a logo or a title; it’s the first impression your visitors will have. So why not make it count?
In this section, you can:
- Add your site title: This will be prominently displayed on your website and is crucial for SEO and brand recognition.
- Upload a logo: A well-designed logo can convey your brand’s personality and values, making your site more memorable.
- Set a tagline: A catchy tagline can provide your visitors with a quick insight into what your site offers.
- Select a site icon: Also known as a favicon, this small image appears in the browser tab, helping users easily identify your site.
When it comes to branding, consistency is key. Ensure that your chosen logo, title, and tagline align with your overall theme and color scheme. This visual coherence helps build trust and recognition among your audience. Remember, a well-branded site can enhance user experience and keep visitors engaged.
| Element | Importance |
|---|---|
| Site Title | Critical for SEO and brand identity |
| Logo | Visual representation of your brand |
| Tagline | Quick insight into site purpose |
| Site Icon | Enhances site identification in browser tabs |
Experiment with different elements in the Site Identity settings to see what resonates best with your audience. The Customizer allows you to preview changes in real-time, making it easy to tweak your settings until you achieve the perfect look. Don’t hesitate to seek feedback from friends or colleagues to refine your branding further. The right adjustments can significantly boost your site’s appeal and professionalism.
Transforming Your Website with Colors and Backgrounds
Choosing the right colors for your website can create an inviting atmosphere that resonates with your audience. The WordPress Customizer enables you to easily manipulate your site’s color scheme to align with your brand identity. Start by accessing the Customizer in your WordPress dashboard, then navigate to the Colors section.
Here, you can experiment with various color palettes. Consider the following tips for selecting your website colors:
- Understand color psychology: Colors evoke emotions. Choose hues that reflect your brand’s message.
- Use contrast effectively: Ensure text is easily readable against the background. Dark text on a light background or vice versa works wonderfully.
- Limit your palette: Stick to a primary color and one or two accent colors to maintain a cohesive look.
Once you’ve selected your primary colors, move on to backgrounds. You can choose a solid color, a gradient, or even an image background. Each option has its own set of advantages:
- Solid Colors: Simple and effective, allowing for clear focus on content.
- Gradients: Add depth and intrigue, making your site visually appealing.
- Image Backgrounds: Use sparingly; ensure they don’t overwhelm your text and consider opacity for readability.
To see how your changes look in real-time, utilize the live preview feature in the Customizer. You can also play around with the Additional CSS section for precise adjustments. For instance:
        .site-background {
            background-color: #f0f0f0;
            background-image: url('your-image-url.jpg');
            background-size: cover;
        }
Don’t forget to save your settings. A well-thought-out color scheme and background can significantly enhance user experience, leading to longer site visits and increased engagement. By utilizing the Customizer, you’re not just making your site beautiful—you’re creating an environment that encourages visitors to connect with your content.
Mastering Menu Management for Easy Navigation
One of the most powerful features of the WordPress Customizer is its ability to simplify menu management, enhancing user experience through effective navigation. A well-structured menu not only guides visitors through your website but also serves as a roadmap to your content. By utilizing the Customizer, you can effortlessly create, customize, and manage your menus in a few easy steps.
To start, navigate to the Menus section within the Customizer. Here, you can create new menus or modify existing ones. Consider the following tips to ensure your menu is user-friendly:
- Prioritize Key Pages: Identify the most important pages of your site and feature them prominently in your menu.
- Use Clear Labels: Choose simple, descriptive names for each menu item to help users understand what they’ll find.
- Limit Menu Items: Try to keep the number of items manageable to avoid overwhelming visitors. A concise menu can improve navigation.
Once you’ve set up your menu structure, you can easily add items from different content types, such as pages, posts, categories, and custom links. This flexibility allows you to tailor your menu to meet the needs of your audience. For instance, if you have a blog, adding a link to popular posts can draw attention to your best content.
Additionally, consider creating dropdown menus for sub-items. This can help declutter your main navigation while still providing easy access to deeper content. To achieve this, simply drag and drop items under their parent categories in the Customizer. It’s a straightforward way to create a logical hierarchy without sacrificing usability.
Lastly, once you’re satisfied with your menu setup, don’t forget to preview the changes in real-time. This is one of the standout features of the WordPress Customizer, allowing you to visualize how your menu will look on various devices. Always ensure that your navigation is responsive, as an increasing number of users access websites via mobile. A well-optimized menu can significantly boost user engagement and retention.
Enhancing User Experience with Widgets and Sidebars
Widgets and sidebars are powerful tools in the WordPress ecosystem that can significantly enhance the user experience on your website. By strategically placing relevant content, you not only engage your visitors but also guide them through their journey on your site. With the WordPress Customizer, you can easily manage and customize these elements without needing to dive deep into coding.
To make the most of widgets and sidebars, consider implementing the following:
- Contextual Content: Use widgets that relate directly to the content of the page. For example, if a visitor is reading about gardening, a sidebar widget featuring seasonal tips or recent blog posts on gardening can keep them engaged.
- Search Functionality: Including a search bar in your sidebar helps users find content quickly, reducing frustration and improving site navigation.
- Call-to-Action (CTA): Strategically place CTAs in your sidebar, such as newsletter sign-ups or promotional offers, to increase conversions.
Another effective way to enhance user experience is by customizing your sidebar layout. The WordPress Customizer allows you to adjust the position and style of your sidebar, giving you control over how it appears across different devices. For example, you might choose a collapsible sidebar for mobile users to maximize screen space.
Here’s a brief overview of popular sidebar widget options you can consider:
| Widget Type | Description |
|---|---|
| Recent Posts | Displays the latest blog entries to keep visitors informed and encourage them to read more. |
| Categories | Helps users navigate through different topics and find related content easily. |
| Social Media Links | Connects your audience to your social profiles, facilitating broader engagement. |
| Testimonials | Showcases customer reviews to build trust and credibility with new visitors. |
Ultimately, the goal of utilizing widgets and sidebars effectively is to create a seamless browsing experience that keeps users on your site longer. By integrating thoughtful content and interactive elements, you not only enhance the aesthetic appeal of your pages but also cater to the needs of your audience. With the WordPress Customizer, customization is at your fingertips, making it easier than ever to adapt your sidebar to meet your unique goals.
Fine-Tuning Your Homepage Settings for Impact
Customize Your Homepage for Maximum Engagement
Your homepage serves as the first impression for visitors; it’s crucial to make it count! Using the WordPress Customizer, you can easily modify various elements to enhance user experience and drive engagement. Here are some key settings to focus on:
- Site Identity: A strong logo and tagline can convey your brand’s essence. Make sure these elements are clear and visually appealing.
- Header Image: A captivating header image can capture attention instantly. Choose an image that resonates with your brand and purpose.
- Menus: Organize your navigation menus for easy access to important content. A well-structured menu enhances usability and encourages exploration.
- Widgets: Leverage widgets to display key information, such as recent posts, popular articles, or social media links. This can drive interaction and keep your content fresh.
Furthermore, consider the layout of your homepage. The WordPress Customizer gives you options to choose from various layouts, whether it’s a traditional blog view or a grid-style gallery. Here’s a simple table to help you decide which layout might work best for your site:
| Layout Type | Best For | Features |
|---|---|---|
| Blog View | Bloggers & Writers | Chronological posts, easy readability |
| Grid Layout | Portfolio & Photography | Visual appeal, image-centric display |
| One Page | Businesses & Services | Concise information, easy navigation |
don’t overlook the importance of responsive design. With a variety of devices accessing your site, ensure that your homepage looks great on both desktop and mobile. The Customizer allows you to preview changes in real-time for different screen sizes, making it easier to fine-tune your design for all users.
By carefully adjusting these settings, your homepage can transform from a simple landing page into a powerful tool for engagement and conversion. So dive into the WordPress Customizer and start customizing your homepage to reflect your brand’s personality and mission!
Previewing Changes in Real Time for Confidence
One of the most powerful features of the WordPress Customizer is its ability to provide real-time previews of your site changes. This functionality allows you to see how your modifications will look on the front end without having to refresh the page or navigate away from your current view. Imagine tweaking your site’s colors, fonts, and layouts while instantly observing the results—you can experiment freely and avoid the uncertainty often associated with web design.
When you open the Customizer, any adjustments you make will be reflected immediately in the preview panel. This means you can:
- Test different color schemes to find the perfect match for your branding.
- Switch between fonts until you discover the right style that resonates with your audience.
- Adjust layout settings to improve user experience and navigation flow.
This real-time feedback not only boosts your confidence in the changes you’re making but also significantly enhances your workflow. Without the need for tedious back-and-forth adjustments, you can iterate quickly and efficiently. You’ll notice that small tweaks can lead to significant improvements, helping you achieve a polished, professional look.
Moreover, the Customizer allows you to preview your changes on different devices, ensuring that your website looks great on desktops, tablets, and smartphones. This feature is invaluable as it helps you maintain a consistent user experience across all platforms. Consider the following:
| Device Type | Key Considerations |
|---|---|
| Desktop | Focus on layout and spacing, ensuring easy navigation |
| Tablet | Adjust touch targets for better usability |
| Mobile | Optimize for speed and readability, prioritize essential content |
Ultimately, the real-time preview feature encourages you to explore your creative ideas without the fear of making irreversible mistakes. By allowing you to visualize your changes immediately, it empowers you to create a stunning, user-friendly website that reflects your vision and connects with your audience.
Extending Functionality with Additional Customizer Options
Troubleshooting Common Customizer Issues
Encountering issues with the WordPress Customizer can be frustrating, but many common problems have straightforward solutions. Here are some tips to help you navigate these challenges effectively.
- Customizer Not Loading: If the Customizer fails to load, try clearing your browser cache or switching to a different browser. Additionally, disable any conflicting plugins temporarily to pinpoint the issue.
- Changes Not Saved: If you’re experiencing issues with saving changes, ensure that your WordPress installation and theme are up-to-date. Sometimes, server settings can prevent changes from being saved, so check with your hosting provider if the problem persists.
- CSS Issues: Custom CSS may not apply as expected. Check for syntax errors, and remember that changes might not reflect on the front end due to caching. Clear your site and browser cache to view the latest updates.
To give you an overview of potential conflicts, consider the following table that summarizes common issues and their resolutions:
| Issue | Possible Cause | Resolution |
|---|---|---|
| Customizer won’t load | Plugin conflict or script error | Disable plugins one by one |
| Changes lost on refresh | Server settings or memory limits | Increase PHP memory limit |
| Preview not updating | Cached resources | Clear browser and site cache |
Additionally, if you find that the live preview is not updating, consider the following troubleshooting steps:
- Check for JavaScript errors in your browser’s console. Errors can disrupt the Customizer’s functionality.
- Inspect your theme’s functions.php file. Sometimes, modifications here can create conflicts.
- If you’re using a child theme, ensure the parent theme is correctly configured, as issues in the parent theme can affect the child theme’s functionality.
By following these steps and staying proactive about potential conflicts, you can resolve many common issues associated with the WordPress Customizer. Remember, a little troubleshooting goes a long way in enhancing your website’s appearance and functionality!
Tips for Making the Most of Your Customizer Experience
Using the WordPress Customizer effectively can significantly enhance your website’s appearance and functionality. Here are some tips to help you navigate this powerful tool with ease:
- Experiment Freely: The Customizer allows you to make changes in real-time. Don’t be afraid to experiment with different settings, colors, and layouts. Your changes won’t go live until you hit the “Publish” button, so feel free to play around!
- Utilize the Preview Feature: Always keep an eye on the preview window. This feature gives you a clear view of how your changes will look across devices. Make adjustments to ensure your site is responsive and visually appealing on mobile, tablet, and desktop.
- Organize Your Widgets: Widgets are key to enhancing your site’s functionality. Use the Customizer to drag and drop widgets into various areas. Take the time to organize them logically to improve user experience.
- Take Advantage of the Typography Settings: Fonts can greatly affect your site’s mood and readability. Explore the typography options available in the Customizer to find the perfect font pairing that reflects your brand’s personality.
- Use Custom CSS Wisely: If you’re comfortable with CSS, you can use the Custom CSS section to tweak specific design elements. This capability allows for personalized touches that can set your site apart from others.
For a quick reference, here’s a simple table summarizing some of the key features of the Customizer and their purposes:
| Feature | Description |
|---|---|
| Site Identity | Manage your site title, tagline, and logo. |
| Colors | Change the color scheme of your site. |
| Menus | Create and manage your site’s navigation menus. |
| Widgets | Add and arrange widgets in various areas of your site. |
| Homepage Settings | Select what your homepage displays (latest posts or static page). |
don’t forget to take notes of the changes you make. Keeping a record will help you remember what works well and what doesn’t, allowing you to refine your design over time. The Customizer is not just a tool – it’s your creative playground. So dive in, explore, and let your imagination lead the way!
Frequently Asked Questions (FAQ)
Q&A for “How to Use the WordPress Customizer: A Complete Guide”
Q1: What is the WordPress Customizer, and why should I use it?
A1: Great question! The WordPress Customizer is a powerful tool that allows you to tweak your site’s appearance in real-time. Think of it as your visual design dashboard – you can change colors, fonts, layouts, and more without needing to dive into any code. It’s user-friendly, making it perfect for both beginners and seasoned webmasters. By using the Customizer, you can create a stunning site that truly reflects your brand and engages your audience without the hassle of complex coding.
Q2: Can I see my changes before publishing them?
A2: Absolutely! One of the best features of the WordPress Customizer is the live preview functionality. As you make changes, you can see how they affect your site in real time. This allows you to experiment with different styles and layouts until you find the perfect look for your site. You won’t have to guess how your changes will look; you’ll see them instantly!
Q3: What kinds of changes can I make using the Customizer?
A3: The possibilities are nearly endless! You can customize site identity (like your logo and site title), adjust colors and typography, modify header and footer settings, manage menus, and even set background images. Additionally, many themes and plugins add their own options to the Customizer, giving you even more control over your site’s appearance. It’s like having a design studio right at your fingertips!
Q4: Is it complicated to use the WordPress Customizer?
A4: Not at all! The Customizer is designed to be intuitive. Even if you’re a complete beginner, you’ll find that navigating its options is straightforward. Each section is clearly labeled, and many settings offer helpful tooltips to guide you. Plus, if you ever feel stuck, there’s a wealth of tutorials and community support to help you out. So, dive in! You’ll be customizing like a pro in no time.
Q5: Can I revert my changes if I don’t like them?
A5: Yes, you can! The Customizer makes it easy to experiment with different looks without worrying about permanently affecting your site. You can simply discard any changes you don’t like before hitting the “Publish” button. This means you can test out different designs and styles until you find the one that feels just right for your site.
Q6: Will using the Customizer impact my site’s performance?
A6: Not at all! Using the WordPress Customizer is a safe and efficient way to make changes to your site. It doesn’t slow down your website or compromise its performance. In fact, by allowing you to easily manage your design elements, it can help streamline your site’s overall appearance and functionality. A well-designed site can actually improve user experience, leading to increased engagement and better performance.
Q7: How can I get started with the WordPress Customizer right now?
A7: Getting started is easy! Simply log in to your WordPress dashboard, navigate to “Appearance,” and select “Customize.” You’ll be greeted by the Customizer interface, where you can start exploring the options available to you. Don’t be afraid to click around and try things out! Remember, this is your space to unleash your creativity. Grab your favorite beverage, dive in, and enjoy the process of making your site shine!
Using the WordPress Customizer is not just about changing how your site looks; it’s about enhancing your brand’s identity and creating a memorable experience for your visitors. So why wait? Start customizing today and take your website to the next level!
The Way Forward
As we wrap up our journey through the WordPress Customizer, we hope you feel empowered and inspired to take your website’s appearance to the next level. Remember, the Customizer isn’t just a tool; it’s your canvas. You have the power to create a site that truly reflects your brand and engages your audience.
So why wait? Dive in, experiment with the various options, and watch your vision come to life. Whether you’re a seasoned pro or just starting out, the WordPress Customizer offers something for everyone. And the best part? You can make changes in real time, so you’ll always know exactly how your site looks before going live.
If you found this guide helpful, share it with fellow WordPress users looking to enhance their sites! And don’t hesitate to revisit as you continue to explore all that the Customizer has to offer. Happy customizing, and may your website shine bright in the digital landscape!

