Are you tired of sifting through an endless sea of images, videos, and documents in your WordPress media library? If so, you’re not alone! Many WordPress users struggle with the clutter that comes with storing countless media files in one place. Fortunately, there’s a solution that can help you regain control and streamline your creative process: organizing your media files into folders. In this article, we’ll explore the benefits of adding media folders to your WordPress site and guide you through the simple steps to get started. Say goodbye to disorganization and hello to a more efficient, user-friendly media library that enhances your workflow and saves you time. Let’s dive in and transform the way you manage your media!
Understanding the Importance of Organizing Your Media Library
In the digital age, where content is king, managing your media library effectively is essential for any WordPress user. A well-organized media library not only saves you time but also enhances your workflow. Imagine being able to find that perfect image or video without sifting through endless files. By utilizing folders, you can streamline your media management process, making it easier to locate and utilize your assets.
When your media library is cluttered, it can lead to a few common pitfalls:
- Time Wastage: Spending valuable minutes searching for files can significantly slow down your productivity.
- Increased Errors: A disorganized library increases the chances of using the wrong media or duplicating efforts.
- Professional Image: A clean, organized library reflects a professional approach, enhancing your brand’s reputation.
Implementing a folder structure within your media library allows you to categorize files by project, type, or date. For example, you could create folders labeled:
- Social Media: For images and videos used in your campaigns.
- Blog Posts: To store relevant visuals for specific articles.
- Product Images: For e-commerce sites, keeping product visuals in one place is vital.
Here’s a quick reference table showing the benefits of organizing your media library:
| Benefit | Description |
|---|---|
| Efficiency | Easily locate files, reducing downtime. |
| Collaboration | Streamlined access for team members enhances collaboration. |
| SEO Improvement | Organized media can improve SEO through better image management. |
By taking the time to organize your media library, you’re not just simplifying your life; you’re also setting up a system that can grow with your needs. As your website evolves, so too will your media assets, and maintaining a structured library makes it easier to adapt. The initial effort you invest will pay off manifold in efficiency and effectiveness, allowing you to focus on what truly matters—creating great content.
Choosing the Right Plugin for Media Folders
When it comes to enhancing your WordPress media library, selecting the right plugin for organizing media folders is crucial. The right plugin not only simplifies your workflow but also improves your website’s efficiency. With numerous options available, it’s essential to consider your specific needs and how a plugin can address them.
Here are some key features to look for in a media folder plugin:
- Drag and Drop Support: A user-friendly interface allows you to easily organize files without the hassle of complicated processes.
- Folder Structure: Look for plugins that enable a clear folder hierarchy, making it easier to locate and manage your media.
- Search Capability: Advanced search features can save time, especially when dealing with a large media library.
- Compatibility: Ensure the plugin integrates well with your existing themes and other plugins to avoid conflicts.
It’s also wise to consider the pricing structure of the plugins. Some may offer a free version with basic features, while others require a premium subscription for full access. Here’s a simple comparison of common pricing models:
| Plugin Name | Free Version | Premium Features | Price |
|---|---|---|---|
| Plugin A | Yes | Advanced sorting, cloud storage | $29/year |
| Plugin B | No | Unlimited folders, premium support | $49/year |
| Plugin C | Yes | SEO tools, bulk upload | $19/year |
don’t overlook user reviews and ratings. They can provide valuable insights into how well a plugin performs in real-world scenarios. Look for feedback on reliability, customer support, and ease of use. A plugin with a strong community and regular updates can make a significant difference in your experience.
Choosing the right media folder plugin can transform how you manage your media assets, boosting both efficiency and organization. Take the time to evaluate your options, and soon, your media library will be seamlessly structured, allowing for a more streamlined workflow.
Step-by-Step Guide to Installing and Setting Up Media Folders
Organizing your media library in WordPress can transform the way you manage your content. With a streamlined approach, you’ll save time and enhance your productivity. Here’s a simple, step-by-step guide to help you install and set up media folders effectively.
Installing the Right Plugin
The first step is to choose a reliable media folder plugin. Popular options include:
- FileBird: Offers a user-friendly interface with drag-and-drop capabilities.
- WP Media Folder: Allows you to categorize your media files easily.
- Media Library Organizer: Great for bulk organizing your media.
Once you’ve selected the plugin that suits your needs, installation is straightforward:
- Navigate to your WordPress dashboard.
- Go to Plugins > Add New.
- Search for your chosen plugin, click Install Now, and then Activate.
Setting Up Your Media Folders
After activation, the fun part begins. Most plugins will add a new menu item in your dashboard. Here’s how to set up your folders:
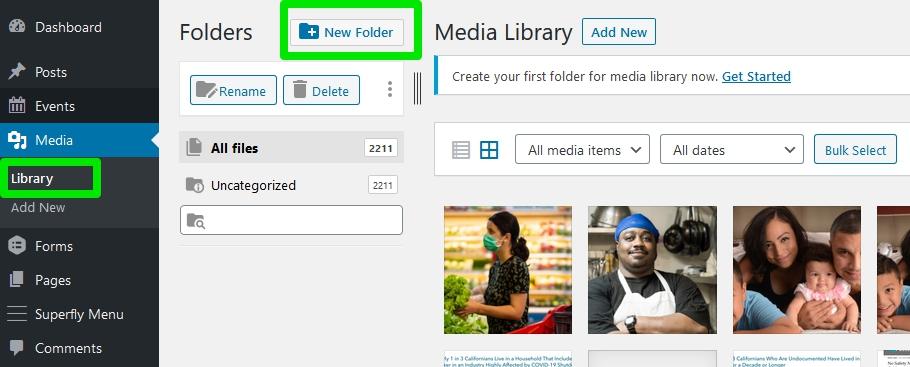
- Click on the newly created media folder menu.
- Create a new folder by clicking the Add New Folder button.
- Label your folder appropriately—consider categories like Images, Videos, and Documents.
For better organization, think about using subfolders. This can help keep related items grouped together, making it easier to find what you need later.
Uploading and Managing Media Files
Now that your folders are set up, it’s time to start organizing your media:
- Drag and drop files directly into their respective folders.
- Use the Bulk Upload feature for efficiency.
- Rename or move files as necessary to maintain organization.
Some plugins also allow you to search for media items within specific folders, which is a great feature for quickly retrieving your files.
Customizing Folder Settings
To enhance functionality, explore the plugin’s settings. Common customization options include:
| Setting | Description |
|---|---|
| Folder Permissions | Control who can access or edit folders. |
| Display Options | Choose how folders are displayed in your media library. |
Making these adjustments can help tailor the media library to fit your specific workflow.
Creating and Managing Folders for Your Uploads
Managing your media library effectively is essential for any WordPress user who wants to maintain a polished and professional website. One of the simplest yet most effective ways to do this is by creating folders for your uploads. This organizational strategy not only enhances your workflow but also makes it easier to locate specific files when you need them. By grouping related media files, you save time and reduce frustration when searching for images, videos, or documents.
To get started, consider implementing a folder structure that makes sense for your website’s content. Here are a few ideas:
- Categories: Organize your media by content type, such as images, videos, and audio files.
- Projects: Create folders for specific projects or campaigns to keep all relevant media in one place.
- Seasons/Events: If your site features seasonal content, consider creating folders for each season or event for easy access.
WordPress doesn’t natively support folder creation in the media library, but with the help of plugins, you can easily set up a structured environment. Some popular plugins include:
| Plugin Name | Description | Rating |
|---|---|---|
| Media Library Organizer | A simple way to create folders and subfolders for your media files. | ★★★★☆ |
| FileBird | Drag and drop interface for organizing your media using folders. | ★★★★★ |
| WP Media Folder | Advanced organization features with integration for galleries. | ★★★★☆ |
Once you’ve chosen a plugin and created your folders, it’s time to start organizing. As you upload new media files, take a moment to categorize them right away. This proactive approach will prevent your media library from becoming chaotic over time. You can also use tags to further enhance your organization, allowing for quick searches and retrieval.
don’t forget to periodically review and update your folder structure. As your website evolves, so too should your media organization. This simple practice ensures that you maintain an efficient and user-friendly media library, allowing you to focus more on creating great content and less on searching for files.
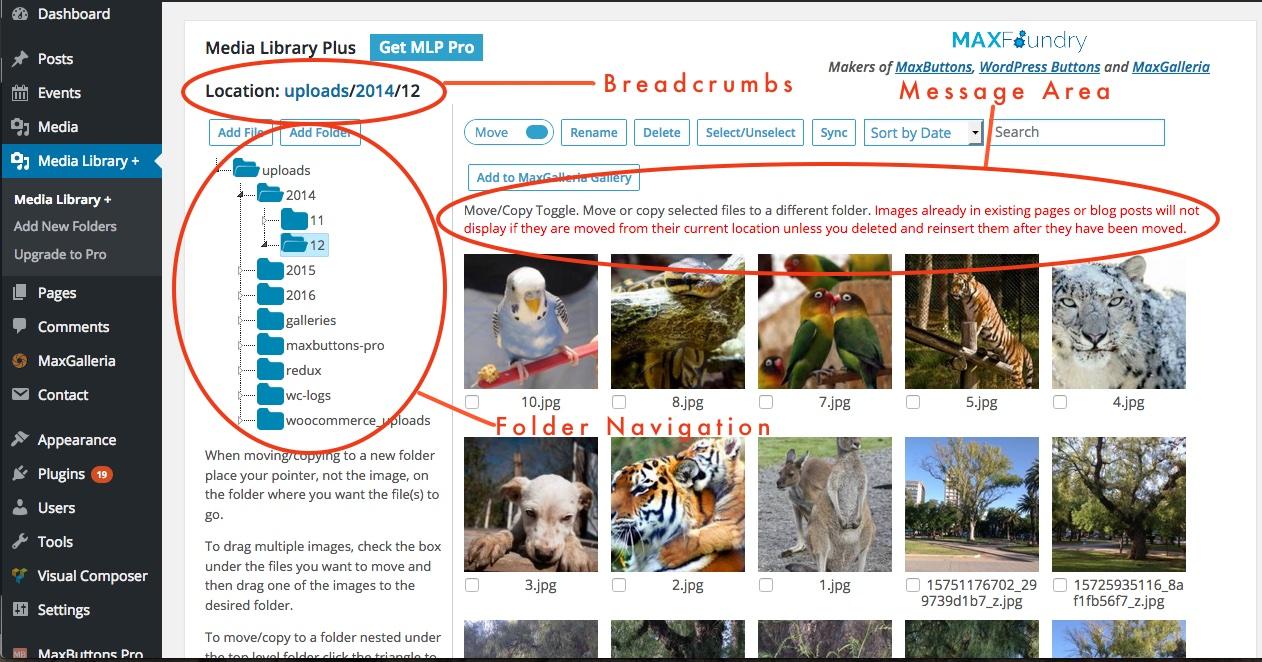
Effortlessly Moving Existing Media into Folders
Organizing your media library is essential for maintaining a streamlined workflow in WordPress. If you’ve been uploading media files without any particular system, the time has come to pay attention to your content organization. Moving existing media into folders can be done effortlessly with just a few clicks, helping you keep your library tidy and manageable.
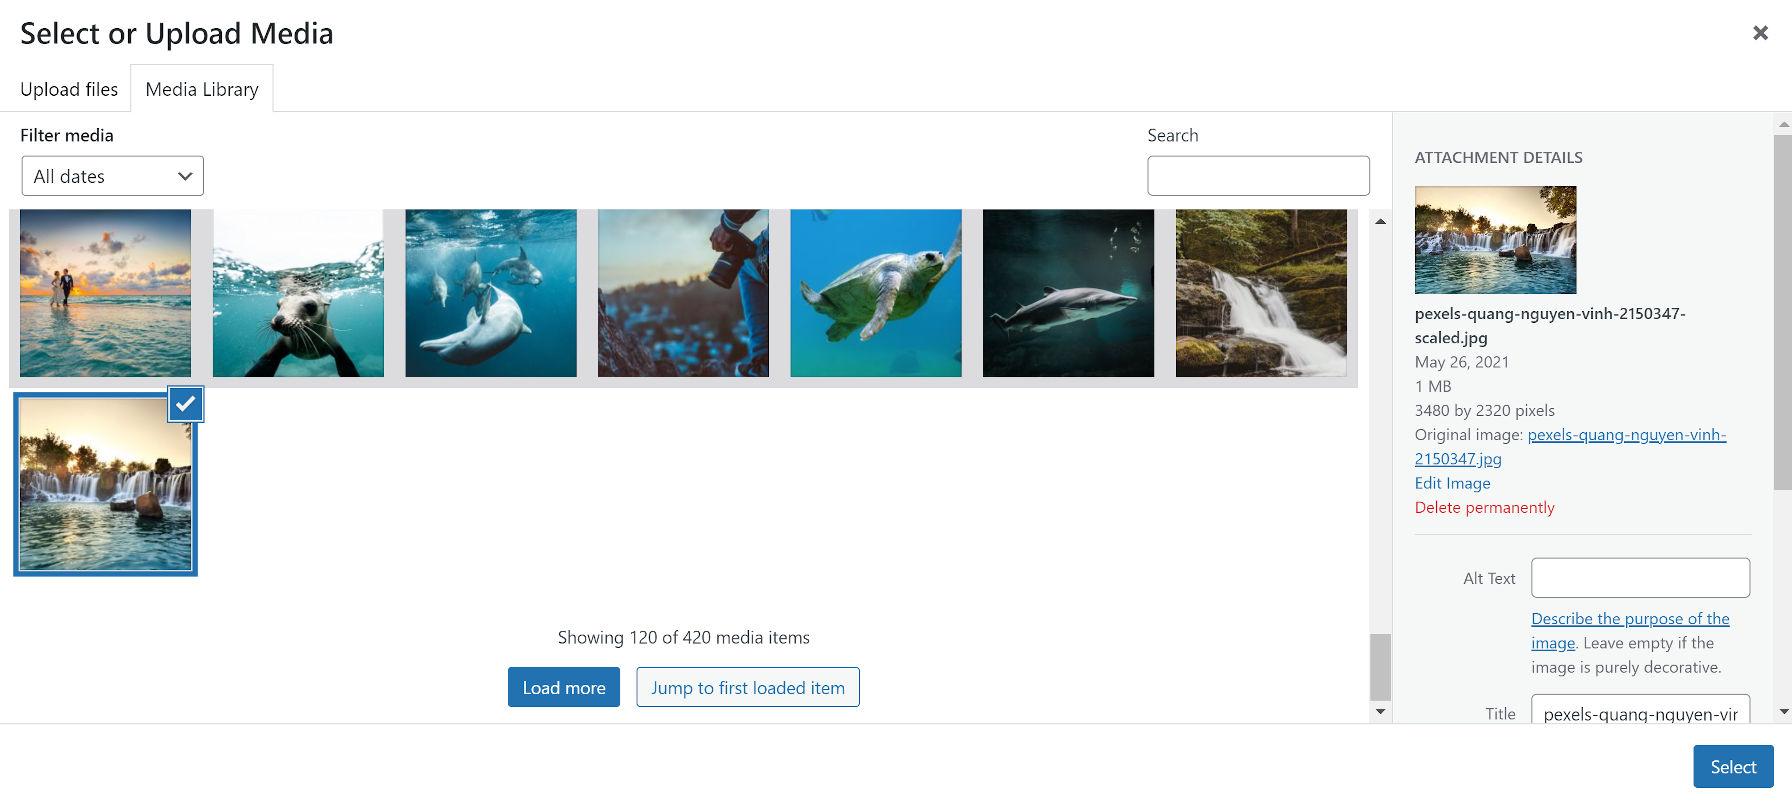
To begin, select the media files you want to relocate. This can be done through the Media Library by clicking the checkbox next to each item. Once you have your selection, look for the option to move to folder. A simple dropdown menu will appear, showcasing the folders you’ve created. Choose the appropriate folder to maintain a well-organized structure.
For those who have a large volume of media, bulk actions can be a real time-saver. Here’s how you can take advantage of this feature:
- Select multiple items: Use the checkboxes to highlight several files at once.
- Choose bulk actions: After selecting the items, you’ll see a bulk action dropdown. Select “Move to Folder.”
- Confirm the move: Click the “Apply” button, and your files will seamlessly transition to their new home.
If you’re dealing with various media types, such as images, videos, or PDFs, consider creating specific folders for each type. This not only enhances organization but also speeds up your retrieval process. Here’s a quick overview of suggested folder categories:
| Folder Type | Examples |
|---|---|
| Images | Blog Posts, Product Photos, Team Headshots |
| Videos | Tutorials, Webinars, Promotional Clips |
| Documents | Ebooks, Whitepapers, Case Studies |
By categorizing your media, you not only enhance your workflow but also make it easier for team members or collaborators to find what they need. The more organized your library, the less time you’ll spend searching for files, allowing you to focus on what truly matters—creating amazing content.
Optimizing Your Media Library for SEO and Performance
Understanding Media Optimization
Optimizing your media library is crucial not just for better organization, but also for enhancing the performance of your website and improving SEO. When images and files are correctly optimized, they load faster and contribute to a better user experience, which can lead to higher search engine rankings.
Key Strategies for SEO and Performance
- Proper File Naming: Use descriptive filenames that include relevant keywords. Instead of ”IMG_1234.jpg,” go with “chocolate-cake-recipe.jpg.” This helps search engines understand the content of the image.
- Alt Text: Always add alt text to your media. This not only aids accessibility but also allows Google to index your images better. Make it descriptive and include keywords where appropriate.
- Image Compression: Large image files can slow down your site. Use tools like TinyPNG or plugins like Smush to compress images without compromising quality.
- Responsive Images: Ensure your images are responsive and adapt to different screen sizes. Utilize WordPress’s built-in responsive features to automatically adjust image sizes.
Utilizing Folders for Better Organization
Creating folders in your media library can significantly enhance your workflow. By organizing your media files into specific categories, you make it easier to locate and manage your assets. Consider the following folder structure:
| Folder Name | Description |
|---|---|
| Images | All graphical content, including photos and illustrations. |
| Videos | Store all video files and tutorials here. |
| Documents | PDFs, eBooks, and other downloadable content. |
| Audio | Podcasts and music files for easy access. |
Performance Monitoring
Keep an eye on your media library’s performance regularly. Use tools like Google PageSpeed Insights or GTmetrix to analyze load times and overall user experience. Identifying images that could benefit from further optimization is crucial in maintaining an efficient site.
Conclusion
By implementing these strategies, you not only enhance the organization of your media library but also improve your website’s performance and SEO efforts. A well-optimized media library can lead to a more engaging visitor experience, boosting both traffic and conversions.
Best Practices for Naming and Categorizing Your Media
When it comes to managing your media library in WordPress, effective naming and categorizing can make a world of difference. First and foremost, consider using descriptive file names that reflect the content of the media itself. Instead of generic names like “image1.jpg,” opt for something more specific, such as “sunset-beach-vacation.jpg.” This practice not only aids in your own searchability but also improves SEO, making it easier for search engines to index your images.
Next, take advantage of categories and tags. Just like you would organize blog posts, categorize your media files to streamline access and enhance organization. Whether it’s by project, event, or type of media, establishing a clear categorization system helps you locate files quickly. Additionally, using relevant tags can enhance the organization even further. Here’s a quick breakdown of how to structure your categories:
| Category | Description |
|---|---|
| Events | Images and videos from specific events. |
| Products | Media related to products or services offered. |
| Team | Photos and bios of team members. |
It’s also wise to implement version control in your naming conventions, especially if you frequently update designs or images. Adding version numbers or the date can help you keep track of changes without cluttering your library. For instance, “logo-v1.png” can evolve into “logo-v2-2023.png,” providing clarity on the most current version.
don’t forget to regularly audit your media library. Remove any duplicate files or outdated media that no longer serve a purpose. This not only frees up storage space but also makes the library easier to navigate. Consider scheduling a quarterly review where you can assess and reorganize as needed, ensuring your media library remains efficient and relevant.
Tips for Maintaining an Organized Media Library Over Time
Keeping your media library organized is not just a one-time task; it requires regular attention and a structured approach. Here are some practical tips to ensure your media stays sorted, making it easier to find what you need when you need it.
- Consistent Naming Conventions: Develop a systematic way of naming your files. For instance, include the date, project name, and type of media in your filenames. This makes it easier to locate files later. A good example would be 2023-10-01_ProjectName_Image.jpg.
- Use Categories and Tags: WordPress allows you to categorize and tag your media. Take full advantage of this feature by creating categories that reflect your content structure—like ‘Images’, ‘Videos’, or ’Audio Clips’. Use tags for more specific identifiers.
- Regular Cleanup Sessions: Schedule regular intervals—monthly or quarterly—to review and clean your media library. Remove duplicates, outdated files, or anything that no longer aligns with your current projects or branding.
Implementing a folder system with subfolders can also be a game changer. For example, you might have main folders for Blog Posts, Social Media, and Marketing Materials, each containing relevant subfolders. This hierarchy helps maintain clarity and prevents clutter.
| Folder Type | Example Subfolders |
|---|---|
| Blog Posts | 2023, 2024, Categories |
| Social Media | Instagram, Facebook, Twitter |
| Marketing Materials | Brochures, Flyers, Banners |
Lastly, utilize plugins that enhance your media library’s functionality. Many WordPress plugins offer features like improved search capabilities, bulk editing, and folder management. By integrating the right tools, you can streamline your workflow and keep your media library tidy.

Troubleshooting Common Issues with Media Folders
When organizing your media library in WordPress, you may encounter a few common issues that can disrupt your workflow. Understanding how to troubleshoot these problems can save you time and frustration, allowing you to maintain a well-structured media library effortlessly.
File Upload Errors are often the first hurdle users face. If you encounter an error when trying to upload media files, check the following:
- File Size: Ensure the file does not exceed the maximum upload size set in your server’s configuration.
- File Type: Verify that the file format is supported by WordPress. Common formats include JPEG, PNG, and GIF.
- Permissions: Check that the folders where your media files are stored have the correct file permissions (usually 755 for folders and 644 for files).
Another issue users may face is Media Not Displaying properly on the site. If your images or videos are not showing up, try these solutions:
- Browser Cache: Clear your browser’s cache to ensure you’re viewing the latest version of your site.
- Theme or Plugin Conflicts: Disable plugins or switch to a default theme temporarily to see if the issue resolves itself.
- Check URLs: Make sure that the media files are linked correctly. Broken links can prevent files from displaying.
If you experience Missing Media Folders after installing a media management plugin, don’t panic. Follow these steps:
- Reindex Media: Some plugins require you to reindex your media library to recognize new folders. Look for this option in the plugin settings.
- Plugin Settings: Review the plugin settings; some may allow you to hide or show specific folders.
- Compatibility: Ensure that your media management plugin is compatible with your current version of WordPress.
Lastly, if you run into Slow Page Loads due to heavy media usage, consider optimizing your images by:
- Compressing Images: Use plugins or online tools to reduce file sizes without sacrificing quality.
- Using a CDN: Implement a Content Delivery Network to speed up media delivery.
- Lazy Loading: Enable lazy loading so that images load as users scroll down the page, improving initial loading times.
Unlocking the Full Potential of Your WordPress Media Library
Managing your media library effectively can transform your WordPress experience. By adding folders to organize your media files, you can save time, reduce frustration, and enhance your workflow. Not only does this help in finding images, videos, and documents quickly, but it also improves your site’s overall efficiency. Imagine navigating through your library with ease, without having to scroll endlessly through countless uploads!
Here are some key benefits of using folders in your WordPress media library:
- Streamlined Navigation: Quickly locate files without hassle.
- Improved Collaboration: If you work with a team, organized folders make it easier for everyone to find and share media.
- Better SEO Management: Clearly labeled folders can boost your site’s SEO by making it easier to manage image metadata.
To get started, consider categorizing your media into specific folders based on themes, projects, or content types. For example, you might create folders like:
- Blog Posts
- Graphics & Logos
- Videos
- Downloads
If you’re worried about the technical aspects, don’t be! Many user-friendly plugins simplify the process of creating and managing folders. Here’s a quick comparison table of some popular options:
| Plugin Name | Features | Pricing |
|---|---|---|
| WP Media Folder | Drag & Drop Interface, Unlimited Folders | Starting at $39/year |
| FileBird | Intuitive UI, Multi-level Folders | Free version available |
| Media Library Organizer | Bulk Move Files, Custom Taxonomies | $49/year |
Taking advantage of these tools not only helps you stay organized but also empowers you to maintain a professional and polished WordPress site. With just a little effort, the chaos of your media library can transform into a well-structured, efficient asset for your website!
Frequently Asked Questions (FAQ)
Q&A: How to Add WordPress Media Folders: Organize Your Media Library Better
Q: Why should I organize my WordPress media library with folders?
A: Great question! Organizing your media library with folders can save you a ton of time and hassle. Imagine trying to find that perfect image buried under hundreds of files! Folders help you categorize your media, making it easier to locate what you need when you need it. This not only streamlines your workflow but keeps your site running smoothly too!
Q: Can’t I just use the search function?
A: While the search function can be handy, it’s not foolproof. It often relies on file names, which may not always be descriptive. Plus, if you have a large library, searching can become tedious. By creating folders, you take control of your organization, allowing for quick access to your media without frustration.
Q: Isn’t WordPress’s default media library enough?
A: The default media library is functional but lacks the organizational tools that folders provide. It’s like trying to navigate a messy closet! By adding folders, you transform your media library into a well-organized space where everything is in its place, making management a breeze.
Q: How can I add folders to my WordPress media library?
A: Adding folders is easier than you might think! You can use a plugin like “WP Media Folder” or “FileBird.” These plugins allow you to create a folder structure, drag and drop files, and manage your media efficiently. With just a few clicks, you can have a neatly organized media library!
Q: Are there any disadvantages to using folders?
A: The main downside might be the extra step of organizing your files initially. However, once you’ve set up your folders, the long-term benefits far outweigh this small investment of time. It keeps your library tidy and functional, making future uploads and searches much simpler.
Q: Can I still access all my media if I use folders?
A: Absolutely! Using folders doesn’t restrict your access to files; it simply organizes them. You can still view all your media in one place, and the folder system enhances your experience by helping you find what you need quickly.
Q: What if I have a lot of files from different projects?
A: That’s even more reason to use folders! You can create project-specific folders or categories (like “Blog Posts,” “Images,” “Videos,” etc.) to keep everything neatly sorted. This way, you’ll not only save time but also maintain a professional appearance on your site.
Q: How does organizing my media improve my site’s performance?
A: An organized media library can lead to better site performance. When you have fewer files cluttering your library, it can speed up the media upload process and improve your overall site management. Additionally, a well-organized library can help you avoid duplicate uploads, which can save storage space.
Q: I’m convinced! What’s my first step?
A: Fantastic! Start by selecting a folder plugin that suits your needs and install it on your WordPress site. From there, it’s all about creating your folder structure and categorizing your media. Dive into your library, get organized, and enjoy a more efficient WordPress experience!
By following these simple tips, you’ll not only enhance your media management skills but also improve your overall WordPress experience. So go ahead, take charge of your media library, and watch your site transform into a well-oiled machine!
The Way Forward
Conclusion: Take Control of Your Media Library Today!
As we wrap up our journey through the world of WordPress media folders, it’s clear that organizing your media library is not just a luxury—it’s a necessity for any serious content creator. By implementing these strategies, you can streamline your workflow, save valuable time, and enhance your overall site performance.
Imagine effortlessly finding that perfect image or video just when you need it, instead of sifting through endless files. With the right organization, your creative process will flourish, and you’ll be able to focus on what you do best—creating amazing content for your audience.
So, why wait? Take the first step towards a clutter-free media library today! Whether you choose to integrate a plugin or utilize built-in options, the benefits are undeniable. Dive in, start organizing, and watch how it transforms your WordPress experience. Remember, a well-organized media library is key to unlocking your full creative potential. Happy organizing!