
In the fast-paced digital world of 2025, ensuring your WordPress site is not only functional but also secure and lightning-fast is more crucial than ever. Enter Cloudflare—a game-changing service that can enhance your site’s performance and protect it from cyber threats. But if the thought of setting it up seems daunting, fear not! In this step-by-step tutorial, we’ll walk you through the process of integrating Cloudflare with your WordPress site, making it a breeze. Whether you’re a seasoned web developer or a beginner just dipping your toes into the vast ocean of website management, this guide will equip you with the knowledge you need to harness the full power of Cloudflare. Get ready to boost your site’s speed, security, and overall performance while providing your visitors with an exceptional browsing experience. Let’s dive in and unlock the potential of your WordPress site together!
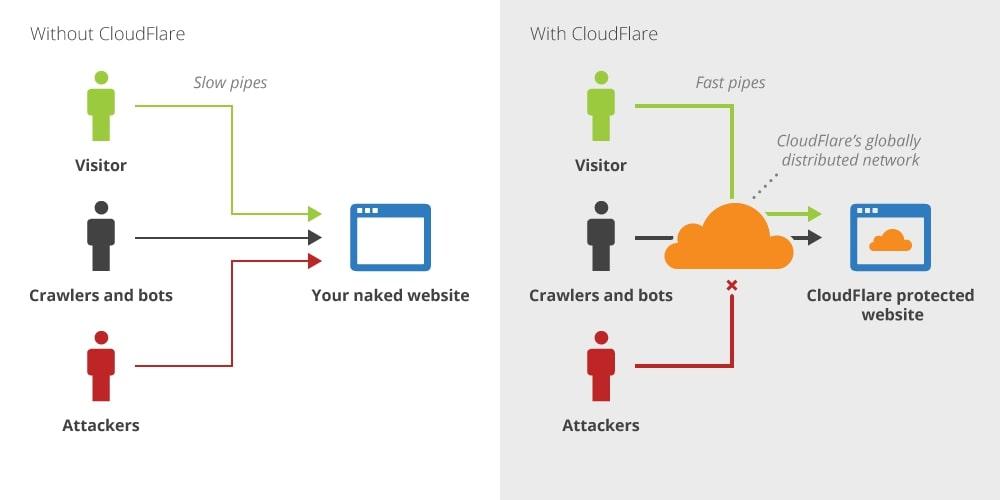
Understanding the Benefits of Cloudflare for Your WordPress Site
When it comes to optimizing your WordPress site, integrating Cloudflare can be a game changer. Not only does it enhance your site’s performance, but it also significantly boosts security, ensuring that your online presence remains robust against various threats. Here are some key benefits that make Cloudflare an essential tool for WordPress users:
- Improved Speed: Cloudflare caches your website content, serving it from the nearest data center to your visitors. This reduces latency and improves load times, crucial for retaining visitors and enhancing SEO.
- Enhanced Security: With features like DDoS protection and a Web Application Firewall (WAF), Cloudflare shields your site from common web threats and vulnerabilities, keeping your data safe.
- Increased Uptime: By distributing your website’s content across multiple servers, Cloudflare helps ensure high availability and reliability, even during traffic spikes.
- SSL Management: Cloudflare offers free SSL certificates, making it easier to secure your WordPress site without any complicated configurations.
- Analytics: Gain insights into your website traffic, security threats, and performance metrics with Cloudflare’s intuitive analytics dashboard, helping you make informed decisions about your site’s strategy.
One of the standout features of Cloudflare is its content delivery network (CDN). By utilizing a global network of servers, your site’s static content—like images, stylesheets, and scripts—gets delivered faster to users, regardless of their geographic location. This not only enhances user experience but also positively impacts your search engine ranking due to improved page speed.
Pricing Flexibility: Cloudflare offers a free plan, making it accessible for all WordPress site owners, from bloggers to large enterprises. As your website grows, you can easily upgrade to a paid plan for additional features and support.
| Plan Type | Key Features | Monthly Cost |
|---|---|---|
| Free | Basic DDoS Protection, Global CDN, Free SSL | $0 |
| Pro | Advanced DDoS Protection, WAF, Image Optimization | $20 |
| Business | Prioritized Support, Enhanced Security Features, Custom SSL | $200 |
By harnessing the power of Cloudflare, not only can you optimize your WordPress site for speed and performance, but you also gain peace of mind with heightened security measures. This combination of benefits creates a solid foundation for your online endeavors, allowing you to focus on content creation and business growth without the worries of downtime or security breaches.

Getting Started: Creating Your Cloudflare Account Made Easy
Getting your Cloudflare account up and running is a breeze, and once you’re set, you’ll unlock a world of performance and security enhancements for your WordPress site. Here’s how to navigate the signup process effortlessly:
- Visit the Cloudflare website: Head over to Cloudflare.com and click on the “Sign Up” button prominently displayed on the homepage.
- Provide your email and password: Fill in your email address and create a strong password. It’s wise to use a unique combination that incorporates letters, numbers, and symbols to keep your account secure.
- Confirm your email: After submitting your details, check your inbox for a confirmation email from Cloudflare. Click the provided link to verify your account.
Once your account is verified, you’ll be taken to the Cloudflare dashboard. Here, you can manage multiple websites with ease. But before you dive into settings, it’s crucial to choose the right plan that suits your needs. Cloudflare offers a range of plans, from free options to comprehensive business solutions. Take a moment to consider:
| Plan Type | Features | Price |
|---|---|---|
| Free | Basic security, CDN | $0 |
| Pro | Enhanced security, image optimization | $20/month |
| Business | Advanced features, web application firewall | $200/month |
As you navigate the dashboard, familiarize yourself with the layout. You’ll find sections for DNS management, SSL settings, and firewall rules. Make sure to explore the Getting Started guide available in the dashboard. It offers tailored tips and tricks that can significantly simplify your setup process.
By taking just a few minutes to set up your Cloudflare account properly, you’ll lay a strong foundation for ensuring your WordPress site runs smoothly and securely. It’s a small but vital step towards optimizing your online presence!
Connecting Your Domain to Cloudflare Without the Hassle
Getting your domain connected to Cloudflare can feel daunting, but it doesn’t have to be. By following a few straightforward steps, you can enhance your website’s performance and security without breaking a sweat. Here’s how you can breeze through the process and get your domain linked to Cloudflare in no time.
First things first, you’ll need to create a Cloudflare account. Simply head over to the Cloudflare website and sign up. Once you’re in, you can start adding your domain. Just enter your website’s URL, and Cloudflare will scan your current DNS records automatically.
After the scan is complete, you’ll be presented with your existing DNS records. Here’s what you should do next:
- Review the records: Ensure all current DNS records are correctly listed.
- Add any missing records: If you notice anything is missing, now is the time to add it.
- Enable proxying: For enhanced performance, enable the Cloudflare proxy on the records you want to protect.
Once you’ve finalized your DNS settings, Cloudflare will provide you with two nameservers. This is where the magic happens! You’ll need to log in to your domain registrar’s account and replace your current nameservers with the ones provided by Cloudflare. This change can take a few hours to propagate, but don’t worry; your site will remain online during this period.
To ensure everything is working smoothly, you can check the status of your domain within your Cloudflare dashboard. Keep an eye out for any issues and refer to Cloudflare’s extensive documentation for troubleshooting tips. With just a few clicks, you’ve now connected your domain to Cloudflare, and you’re well on your way to enjoying faster loading times and enhanced security features!
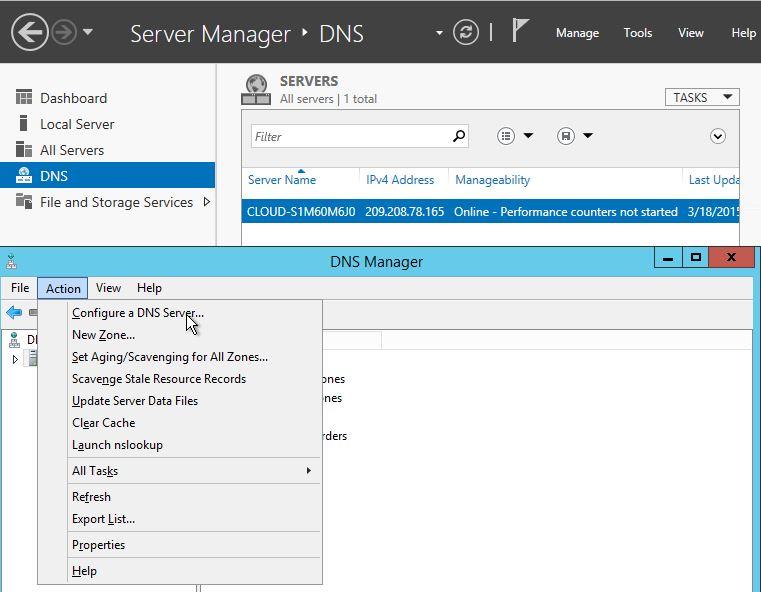
Configuring DNS Settings for Optimal Performance
Optimizing your DNS settings is crucial for improving the speed and reliability of your WordPress site. By leveraging Cloudflare’s powerful DNS features, you can ensure that your website loads quickly for visitors, regardless of their location. Here’s how to configure your DNS settings effectively:
First, log into your Cloudflare account and select your domain. Navigate to the DNS management section, where you’ll be able to add or modify DNS records. It’s essential to ensure the following records are correctly configured:
- A Record: Points your domain to your server’s IP address.
- CNAME Record: Useful for subdomains, directing them to the main domain.
- MX Records: Ensure your email services are functional by configuring these correctly.
Next, consider enabling Cloudflare’s DNS proxy feature. This masks your server’s IP address and adds an extra layer of security while improving performance. Simply toggle the cloud icon next to your DNS records to orange, indicating that Cloudflare is active. Additionally, make sure to set your TTL (Time to Live) values wisely. A lower TTL means changes propagate faster but can increase the load on your DNS servers.
For sites with a global audience, activating Cloudflare’s content delivery network (CDN) will significantly enhance loading speeds. This feature caches your website’s static content on servers around the world, so visitors can access data from a location that’s physically closer to them. To enable this, go to the “Caching” section and adjust the settings as necessary.
monitor the performance of your DNS settings through Cloudflare’s analytics dashboard. This tool provides valuable insights into how your changes are affecting site speed and reliability. Consider implementing DNSSEC for added security, which prevents DNS spoofing and ensures that visitors connect to your authentic site.
Enabling SSL for Enhanced Security and Trustworthiness
When it comes to securing your website, enabling SSL (Secure Socket Layer) is a crucial step that every WordPress site owner should prioritize. SSL encrypts the data transferred between your server and your visitors, protecting sensitive information from potential cyber threats. With Cloudflare, setting up SSL becomes a straightforward process that not only enhances your site’s security but also improves its overall trustworthiness in the eyes of your visitors.
To get started, you first need to ensure that you have a Cloudflare account and your WordPress site is properly configured to use Cloudflare’s CDN. Once that’s set, follow these steps to enable SSL:
- Log in to your Cloudflare account: Select the domain you want to secure.
- Go to the ‘SSL/TLS’ section: Here, you will find various SSL settings to choose from.
- Select ‘Full’ or ‘Full (strict)’ SSL: This ensures that your site is encrypted end-to-end. ‘Full (strict)’ is recommended for the highest level of security.
- Enable ‘Always Use HTTPS’: This automatically redirects all HTTP traffic to HTTPS, ensuring all visitors access your site securely.
- Update your WordPress address: Make sure your WordPress Address (URL) and Site Address (URL) in the General Settings are updated to use HTTPS.
After you’ve enabled SSL on Cloudflare, it’s essential to check your website for mixed content issues. These arise when some resources (like images or scripts) are still being loaded over HTTP. To troubleshoot this:
- Use Cloudflare’s Automatic HTTPS Rewrites: This feature helps in correcting HTTP URLs to HTTPS.
- Install a plugin: Consider using a plugin like Really Simple SSL that automatically handles mixed content issues for you.
- Manually update resources: Review your theme and content for any hardcoded HTTP links and update them to HTTPS.
Additionally, it’s wise to test your site after implementing these changes. Use online tools like Why No Padlock to identify any remaining mixed content issues. A clean SSL setup not only boosts security but also enhances your site’s SEO rankings, making it more attractive to visitors and search engines alike.
By taking these steps, you establish a secure environment that fosters trust, encouraging users to engage more with your content. With Cloudflare’s SSL capabilities, you’re not just protecting data; you’re building a reputable brand that users can rely on. The transition to HTTPS is more than a technical upgrade—it’s a commitment to your users’ safety and experience.

Setting Up Page Rules for Tailored Caching and Performance
When it comes to optimizing your WordPress site’s performance through Cloudflare, setting up Page Rules can significantly enhance your caching strategy. These rules allow you to customize how Cloudflare handles specific URLs, providing you with the flexibility to tailor caching settings based on your site’s needs. By specifying different behaviors for different types of content, you can ensure that your visitors receive the best possible experience.
To begin, access your Cloudflare dashboard and navigate to the Page Rules section. Here, you can create rules based on the URL patterns that match your WordPress site. Some common scenarios include:
- Static Assets: Set rules for CSS, JavaScript, and image files to cache them effectively and reduce load times.
- Dynamic Content: For pages like your shopping cart or user profiles, consider setting cache levels to “Bypass” to ensure users always see the latest information.
- Landing Pages: Use “Cache Everything” for high-traffic landing pages while excluding cookies or other session variables that might cause cached content to become stale.
Here’s a quick reference table to illustrate how different rules can be set up based on your site’s content:
| URL Pattern | Cache Level | Edge Cache TTL |
|---|---|---|
| .yourwebsite.com/wp-content/ | Cache Everything | 1 Month |
| .yourwebsite.com/cart/ | Bypass | Respect Existing Headers |
| .yourwebsite.com/landing-page/ | Cache Everything | 1 Week |
After defining your rules, don’t forget to test them to ensure they work as expected. Tools like Google PageSpeed Insights or GTmetrix can help you see the performance improvements. Keep in mind that while caching can enhance speed, it’s crucial to strike a balance to avoid delivering outdated content to your visitors. Regularly review and tweak your Page Rules as your site evolves to keep optimal performance and user satisfaction.
Optimizing Cloudflare Settings Specifically for WordPress
When it comes to enhancing your WordPress site’s performance, Cloudflare provides a powerful suite of tools that can be tailored for your specific needs. To get the most out of Cloudflare, it’s essential to optimize its settings to work seamlessly with WordPress. This not only boosts your site’s speed but also enhances security and overall user experience.
First, focus on enabling Automatic HTTPS Rewrites and Always Use HTTPS options in the Crypto settings. This ensures that all traffic to your site is secure, which is critical for both SEO and user trust. Additionally, consider using the Full (strict) SSL mode to maximize security by requiring a valid SSL certificate installed on your server.
Another essential aspect is the Page Rules. Utilize them to create specific rules that enhance caching for WordPress. For instance, you might want to set up a rule that caches everything for static assets like images, CSS, and JavaScript files, while ensuring that dynamic content, such as admin pages, remains uncached. Here’s a simple way to structure your Page Rules:
| URL Pattern | Setting | Notes |
|---|---|---|
| example.com/wp-admin/* | Cache Level: Bypass | Keep admin pages dynamic |
| example.com/wp-content/* | Cache Level: Cache Everything | Speed up static assets |
| example.com/* | Browser Cache TTL: 1 Month | Enhance returning visitor load times |
Furthermore, adjust your Browser Cache Expiration settings to ensure your visitors receive the fastest loading times possible. Setting a longer expiration time for static files can significantly reduce load times for repeat visitors. Aim for a period between 1 month to 1 year for static resources.
make the most of Cloudflare’s Rocket Loader feature. This tool optimizes the loading of JavaScript files and can provide a noticeable speed boost for your pages. However, be sure to test your site thoroughly after activation, as it may affect how certain scripts load on your WordPress site. By carefully selecting and optimizing these settings, you’ll ensure that your WordPress site runs faster and more securely, providing a better experience for your visitors.
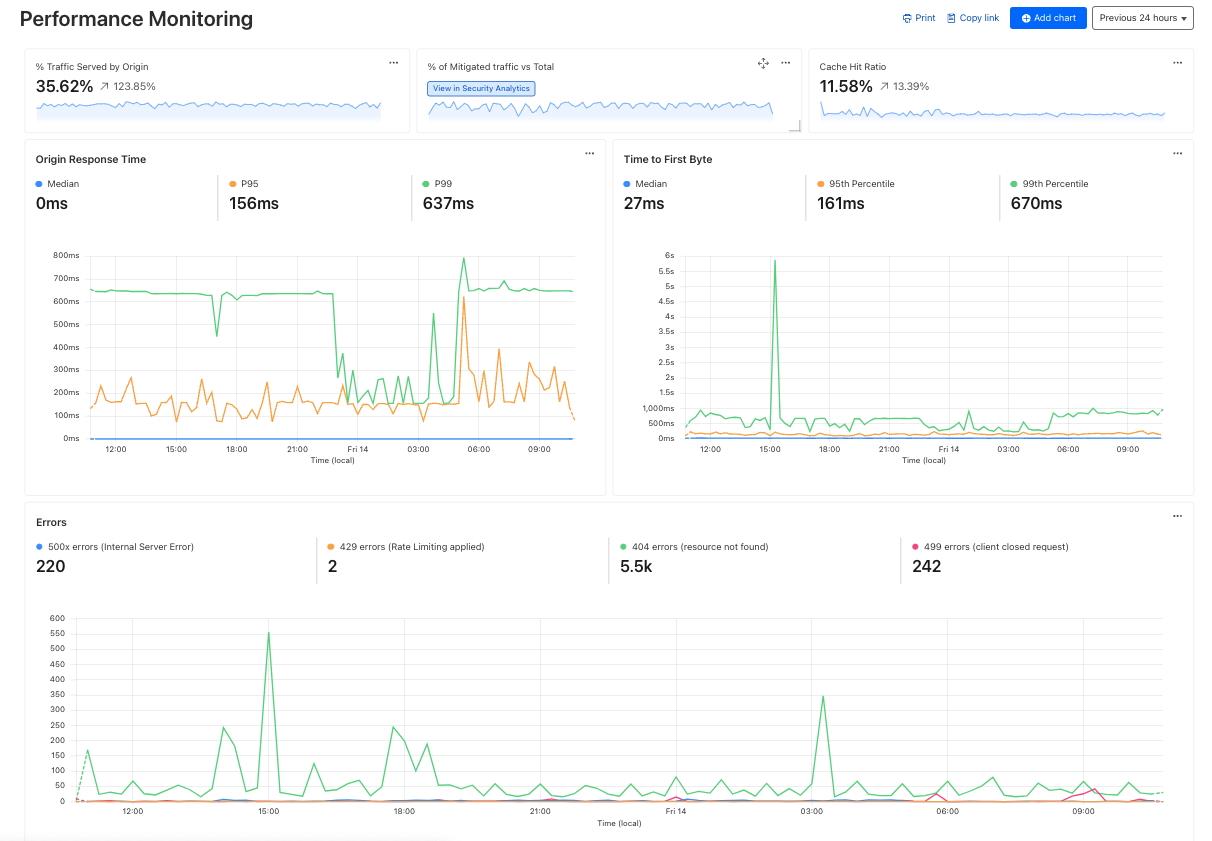
Monitoring Your Sites Performance Post-Setup
Once you have set up Cloudflare for your WordPress site, it’s crucial to keep a close eye on its performance. Monitoring your site’s performance ensures you can quickly spot any issues and make necessary adjustments to maintain optimal speed and reliability. Here are some effective methods to monitor your site’s performance post-setup:
- Utilize Cloudflare Analytics: Dive into the analytics dashboard provided by Cloudflare. This tool provides valuable insights into traffic patterns, bandwidth usage, and threats mitigated. Understanding this data can help you identify spikes in traffic or potential security issues.
- Implement Performance Testing Tools: Use external tools such as Google PageSpeed Insights or GTmetrix. These tools allow you to run periodic checks on your site’s load speed and performance metrics. Regular testing will help you understand how changes impact performance.
- Monitor Uptime: Keeping track of your site’s uptime is essential. Utilize services like UptimeRobot or Pingdom to receive alerts if your site goes down. Ensuring high availability is key to maintaining user trust and SEO rankings.
As you monitor your performance, pay attention to the following metrics:
| Metric | Description |
|---|---|
| Page Load Time | The amount of time it takes for your website to fully load. |
| Time to First Byte (TTFB) | The duration from when a user requests a page to the first byte of data received. |
| Cache Hit Ratio | Percentage of requests served from the cache versus those that require a fresh fetch. |
Another critical aspect is to regularly review your Cloudflare settings. You may need to tweak features like minification or rocket loader based on your site’s content updates or performance changes. Always keep an eye on how these settings impact your site, and don’t hesitate to adjust them as required.
Lastly, engage with your users. Solicit feedback regarding load times or any technical issues they might encounter. User experience is paramount, and insights from real visitors can guide further optimizations. By combining analytics with user feedback, you can create a responsive strategy that keeps your WordPress site running smoothly.

Troubleshooting Common Issues You Might Encounter
Setting up Cloudflare for your WordPress site can greatly enhance performance and security, but it’s not uncommon to face a few hiccups along the way. Here are some common issues you might encounter and how to resolve them:
- DNS Propagation Delays: After changing your DNS settings to point to Cloudflare, it may take up to 48 hours for the changes to fully propagate. During this time, users may experience intermittent connectivity issues. You can check the status of your DNS changes using tools like DNS Checker.
- Mixed Content Warnings: If your site previously used HTTP and you’ve switched to HTTPS via Cloudflare, you might see mixed content warnings. This happens when some resources are still loaded over HTTP. To fix this, ensure all links and resources are requested using HTTPS. You can also enable Cloudflare’s Automatic HTTPS Rewrites feature to help with this.
- Caching Issues: Cloudflare caches your website, which can sometimes lead to outdated content being displayed. If you’ve made recent changes to your site and don’t see them reflected, try purging the cache in your Cloudflare dashboard. A simple cache clear often does the trick!
- Firewall and Security Settings: Sometimes, Cloudflare’s security settings may inadvertently block legitimate traffic to your site. If you notice a drop in traffic or are unable to access your site, check your Firewall settings in Cloudflare. Adjust the security level or create rules to allow certain IP addresses.
| Issue | Solution |
|---|---|
| DNS Propagation Delays | Wait up to 48 hours; use DNS Checker. |
| Mixed Content Warnings | Update links to HTTPS; enable Automatic HTTPS Rewrites. |
| Caching Issues | Purge cache from Cloudflare dashboard. |
| Firewall Blocks | Adjust security settings in Cloudflare. |
By being proactive and aware of these potential issues, you can ensure a smoother transition to Cloudflare and keep your WordPress site running optimally. Don’t hesitate to reach out to Cloudflare support if you encounter problems beyond your expertise!

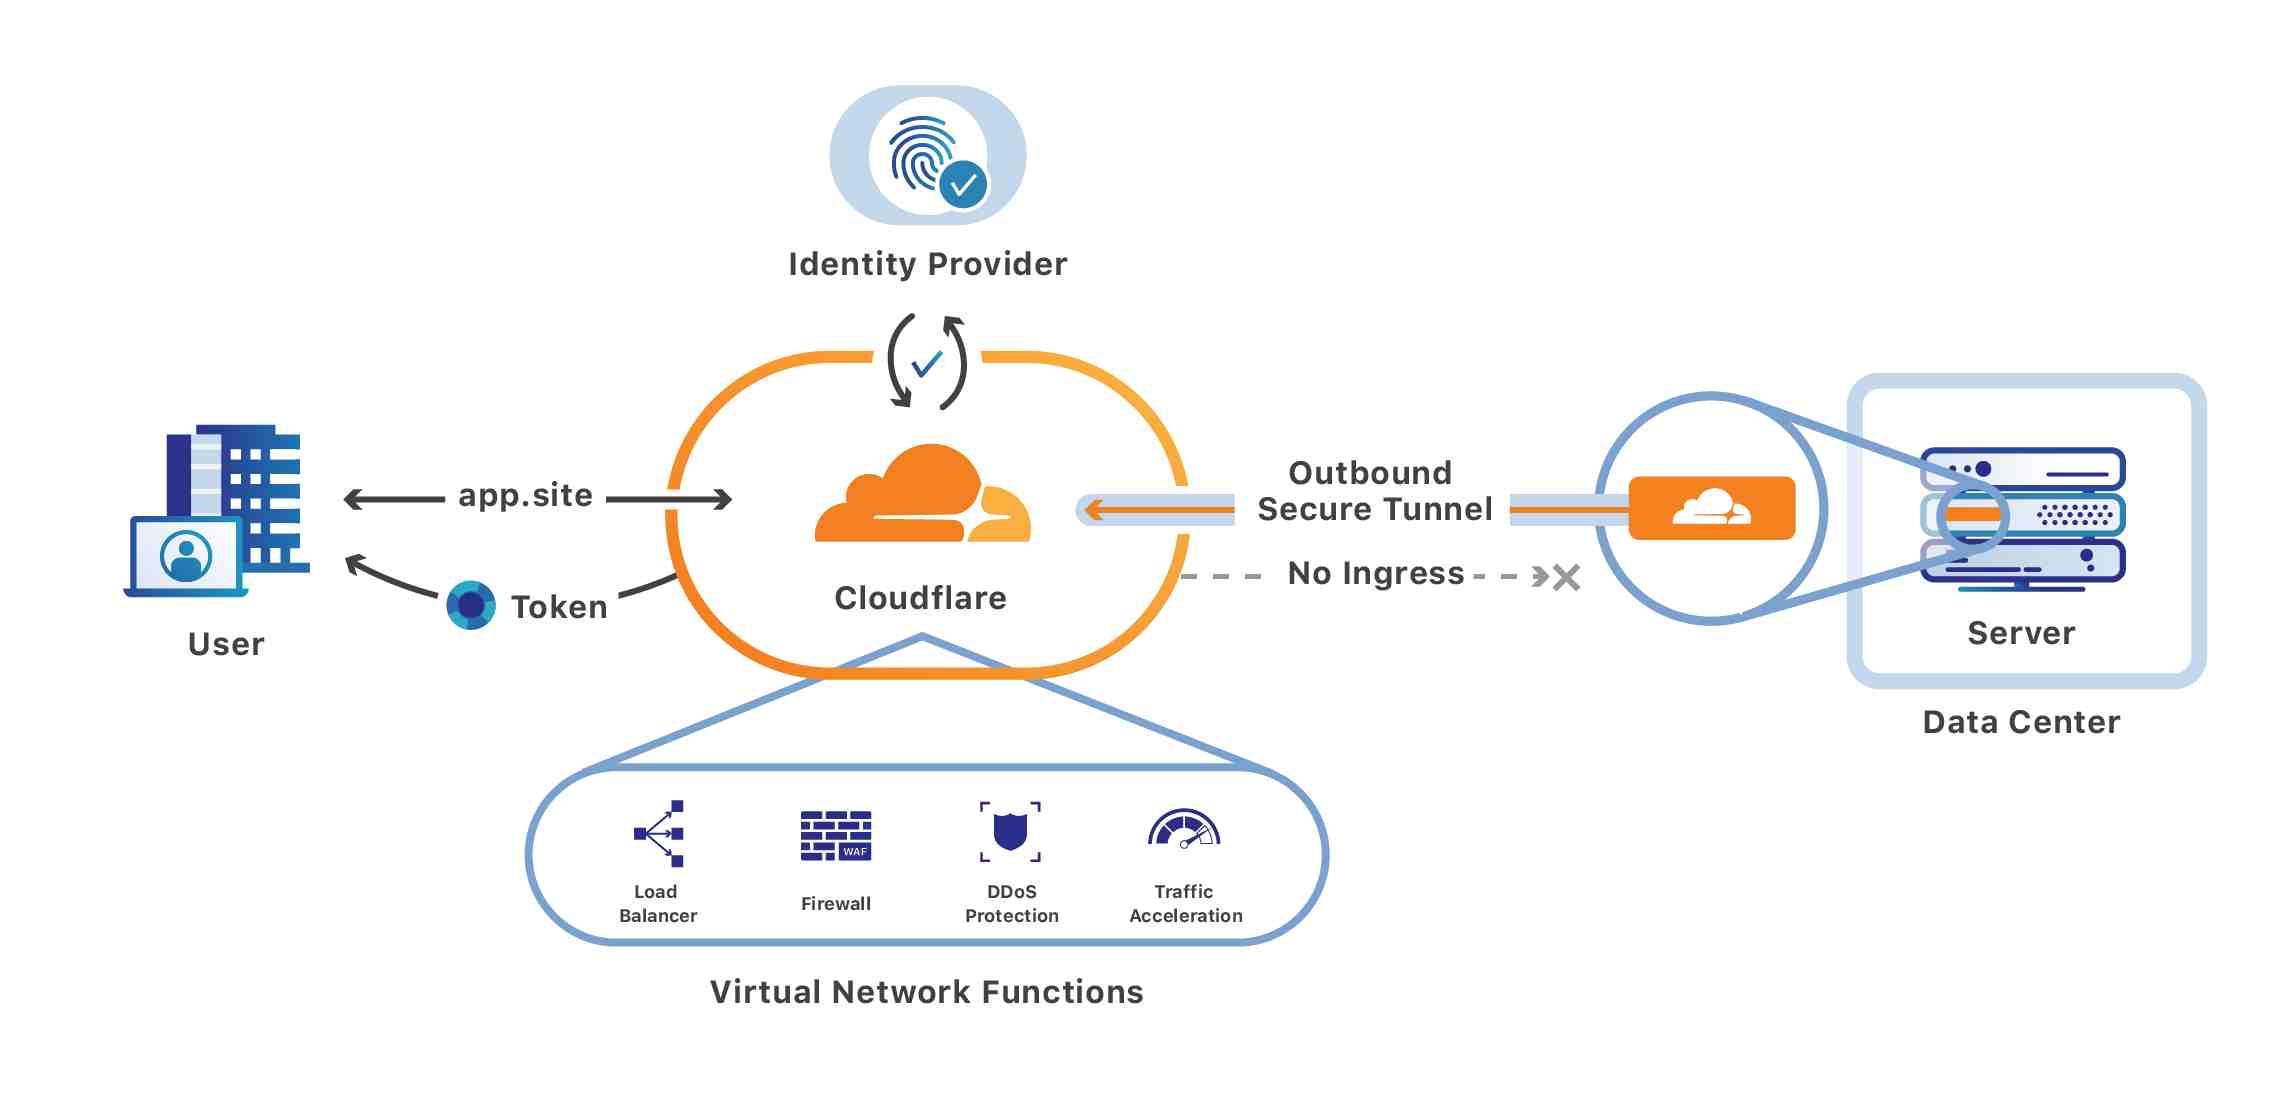
Maximizing Your WordPress Sites Security with Cloudflare Features
Securing your WordPress site is crucial, and leveraging the powerful features of Cloudflare can significantly enhance your security posture. Cloudflare offers a range of services that help protect your site from various threats while boosting performance. By integrating Cloudflare, you can use its firewall, DDoS protection, and SSL features to create a robust security ecosystem.
One of the most effective ways to bolster your site’s security is by utilizing the Web Application Firewall (WAF) that Cloudflare provides. This tool helps filter and monitor HTTP traffic between your site and the Internet, blocking malicious requests before they reach your WordPress installation. You can enable the WAF and configure it to your specific needs by:
- Accessing the Cloudflare dashboard.
- Going to the Firewall settings.
- Enabling the WAF and selecting the appropriate security level.
In addition to the WAF, DDoS protection is another critical feature that Cloudflare offers. It automatically detects and mitigates distributed denial-of-service attacks, ensuring your site remains accessible even under threat. To set this up, make sure you:
- Enable “I’m Under Attack Mode” for immediate protection during an active DDoS attack.
- Configure rate limiting to manage traffic spikes effectively.
Implementing SSL encryption is also essential for securing data between your users and your site. Cloudflare provides free SSL certificates, making it easy to encrypt connections. Follow these simple steps to set it up:
- Select the SSL/TLS tab in your Cloudflare dashboard.
- Choose the SSL option (Full or Flexible, depending on your server configuration).
- Enable “Always Use HTTPS” to redirect all traffic securely.
consider using Cloudflare’s Security Headers to add an extra layer of protection to your WordPress site. Security headers can protect your site from various attacks, including cross-site scripting (XSS) and clickjacking. You can easily configure these headers in the Cloudflare dashboard or through your WordPress setup. Here’s a quick overview of commonly used security headers:
| Header | Description |
|---|---|
| Content-Security-Policy | Helps mitigate XSS attacks by specifying which sources of content are safe. |
| X-Frame-Options | Prevents clickjacking by controlling whether your content can be rendered in a frame. |
| X-XSS-Protection | Enables the browser’s built-in protection against XSS attacks. |
| Strict-Transport-Security | Forces browsers to connect to your site using HTTPS. |
Frequently Asked Questions (FAQ)
Q1: What is Cloudflare and why should I use it for my WordPress site?
A1: Great question! Cloudflare is a powerful content delivery network (CDN) and security service that helps enhance your website’s performance and protect it from various online threats. By using Cloudflare, you can improve your site’s loading speed, enhance its security, and even optimize your SEO. In 2025, these factors are more crucial than ever, as online competition intensifies. Who wouldn’t want their site to run faster and be safer?
Q2: Is it difficult to set up Cloudflare for my WordPress site?
A2: Not at all! Setting up Cloudflare for your WordPress site is a straightforward process, especially with our step-by-step tutorial. Even if you’re not tech-savvy, you’ll find that the user-friendly interface of Cloudflare and WordPress makes it easy. Plus, we’ll guide you through every single step, so you’ll feel like a pro in no time!
Q3: Do I need to pay for Cloudflare, or is there a free option?
A3: You’ll be delighted to know that Cloudflare offers a robust free plan that’s perfect for most WordPress users! This plan includes essential features like CDN services, DDoS protection, and basic security measures. As your site grows, you can always explore paid plans for additional features, but the free option is a fantastic starting point!
Q4: What are the benefits of using Cloudflare with WordPress?
A4: The benefits are plentiful! First off, using Cloudflare can significantly speed up your site by caching your content and serving it from a location closer to your visitors. Additionally, it provides top-notch security measures that keep malicious attacks at bay. This means less downtime and a better user experience. And we all know that a happy visitor is a returning visitor!
Q5: Will using Cloudflare affect my website’s SEO?
A5: Absolutely, in a positive way! Fast-loading websites tend to rank higher on search engines, and with Cloudflare, you’ll be improving your site’s speed. Moreover, the added security measures can help prevent your site from being blacklisted by search engines due to malicious activity. So yes, Cloudflare is an SEO-friendly choice!
Q6: I’ve heard about SSL certificates. Does Cloudflare provide one for my WordPress site?
A6: Yes, it does! Cloudflare offers free SSL certificates, which encrypt the data transferred between your server and your users. This is crucial for protecting sensitive information and gaining your visitors’ trust. Plus, having SSL is a ranking factor for Google, so you’ll not only be securing your site but also boosting your SEO!
Q7: What if I encounter issues while setting up Cloudflare?
A7: No need to worry! Our tutorial is designed to anticipate common pitfalls and provide solutions. Plus, Cloudflare has a fantastic support community and comprehensive documentation. If you ever hit a roadblock, there’s always help available, so you can get back on track quickly!
Q8: Can I still use my existing hosting provider with Cloudflare?
A8: Definitely! Cloudflare works seamlessly with any hosting provider. You don’t need to switch anything; simply integrate it with your existing setup. This flexibility is one of the reasons why so many WordPress users love Cloudflare!
Q9: How long does it take to see the benefits of Cloudflare on my WordPress site?
A9: Most users start noticing improvements almost immediately after setting up Cloudflare. Whether it’s faster loading times or enhanced security, you’ll feel the difference right away. Who wouldn’t love to see instant results?
Q10: What’s the first step I should take to get started with this setup?
A10: The very first step is to create a Cloudflare account, which is quick and easy! Once you’re in, follow our detailed tutorial to link your WordPress site to Cloudflare. We promise it’ll be a rewarding journey, and you’ll be thrilled with the results!
By addressing these questions, you’ll not only be well-informed but also motivated to take action to enhance your WordPress site with Cloudflare. Let’s get started and make your website better than ever!
To Conclude
Conclusion: Elevate Your WordPress Site with Cloudflare
Congratulations! You’ve successfully navigated the step-by-step process of setting up Cloudflare for your WordPress site. By now, you should be well aware of the incredible benefits that come with this powerful tool – from faster load times to enhanced security, and even improved SEO rankings. But remember, the journey doesn’t end here!
As the digital landscape continues to evolve, staying ahead of the curve is essential for your online presence. By implementing Cloudflare, you’re not just optimizing your site; you’re future-proofing it. So, take a moment to bask in the glow of your hard work, but also keep an eye on your site’s performance and security features. Regularly review your Cloudflare settings and make adjustments as needed to ensure your WordPress site remains at its peak.
If you found this tutorial helpful, why not share it with fellow WordPress enthusiasts? Knowledge is best when shared, and your friends will thank you for it! And don’t hesitate to reach out in the comments below if you have any questions or need further clarification on any of the steps discussed.
Here’s to a faster, safer, and more reliable WordPress experience with Cloudflare. Now go forth and let your website shine in the digital realm!