
Are you eager to enhance your WordPress website but unsure how to get started? Installing a WordPress plugin can seem daunting at first, but it doesn’t have to be! Plugins are like magic wands for your website, providing you with the power to add new features, improve functionality, and customize your site to suit your unique needs. Whether you’re looking to optimize your site for search engines, add contact forms, or boost your security, there’s a plugin out there that can help. In this beginner’s guide, we’ll walk you through the simple steps of installing a WordPress plugin, making the process not only easy but also enjoyable. So grab your favorite beverage, settle in, and let’s unlock the potential of your WordPress site together!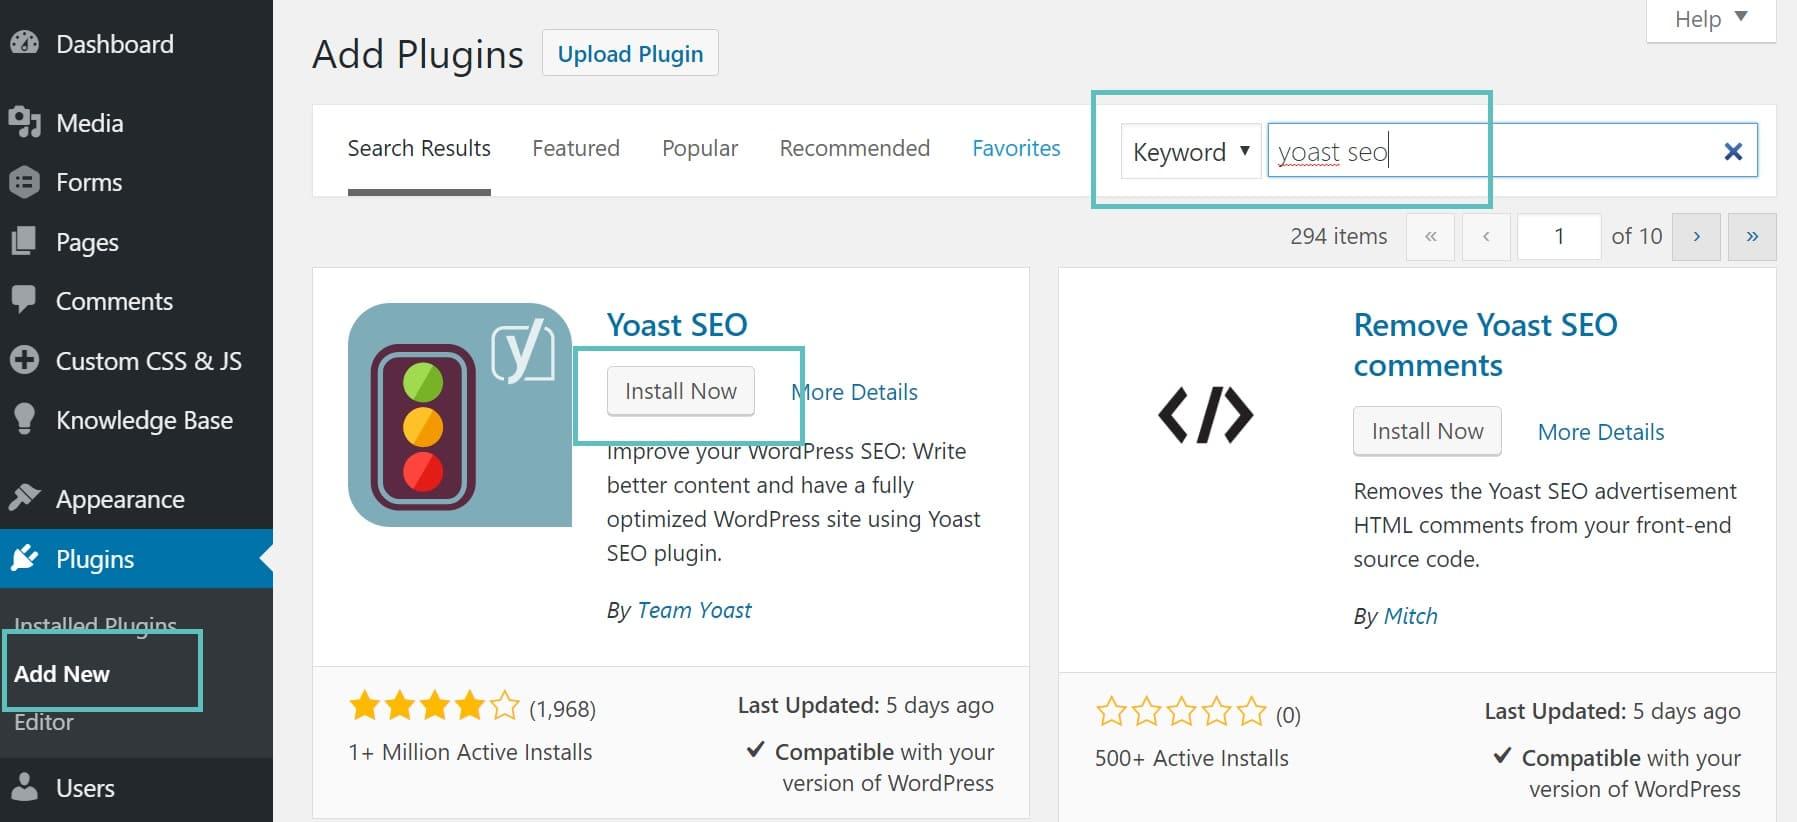
Understanding the Basics of WordPress Plugins
WordPress plugins are essential tools that enhance the functionality of your website. They allow users to add various features, improving performance and user experience without needing extensive coding knowledge. With thousands of plugins available, understanding what they are and how they work is crucial for any WordPress user.
At their core, plugins are like apps for your WordPress site. Each plugin serves a specific purpose, whether that’s improving SEO, enhancing security, or adding social media sharing capabilities. Here are some common types of plugins you might consider:
- SEO Plugins: Help optimize your site for search engines.
- Security Plugins: Protect your site from malicious attacks.
- Backup Plugins: Automatically back up your website data.
- Performance Plugins: Speed up your site’s loading time.
- Page Builders: Allow for custom layouts and design without coding.
When choosing a plugin, consider compatibility with your WordPress version and other installed plugins. It’s also wise to check user reviews and ratings, as this will give you insight into the plugin’s reliability and support. A well-supported plugin can save you headaches down the road, ensuring your site runs smoothly.
To give you a clearer picture of the plugin landscape, here’s a simple comparison table illustrating a few popular plugins:
| Plugin | Purpose | User Rating |
|---|---|---|
| Yoast SEO | SEO Optimization | 4.9/5 |
| Wordfence Security | Website Security | 4.8/5 |
| UpdraftPlus | Backup Solutions | 4.8/5 |
| WP Super Cache | Performance Enhancement | 4.7/5 |
Ultimately, the right plugins can significantly elevate your WordPress experience, making your site more functional, secure, and user-friendly. As you explore the vast array of options available, keep your site’s specific needs in mind, and don’t hesitate to experiment with different plugins to find the perfect fit for your goals.
Choosing the Right Plugin for Your Needs
When it comes to enhancing your WordPress site, selecting the right plugin can make all the difference. With thousands of plugins available, it’s easy to get overwhelmed. However, understanding your specific needs can help narrow down your options considerably.
Start by identifying the main goal of your website. Are you looking to improve SEO, add social media capabilities, or perhaps enhance your site’s performance? Here are a few considerations to keep in mind:
- Functionality: Determine what features are essential for your site. For instance, if you want to create forms, look for plugins that specialize in form creation.
- Compatibility: Ensure the plugin is compatible with your current WordPress version and any other plugins you are using.
- User Reviews: Check user ratings and reviews to gauge reliability and effectiveness. A well-reviewed plugin can save you time and hassle.
Another critical aspect to consider is the plugin’s update frequency. A plugin that is regularly updated is more likely to be secure and compatible with the latest version of WordPress. Additionally, look for plugins with good support options. This can be a lifesaver if you encounter any issues.
To give you a clearer picture, here’s a simple comparison table of popular plugin types:
| Plugin Type | Purpose | Popular Options |
|---|---|---|
| SEO | Enhances search engine visibility | Yoast SEO, All in One SEO |
| Security | Protects your site from threats | Wordfence, Sucuri Security |
| Performance | Improves site speed and efficiency | WP Super Cache, W3 Total Cache |
| Social Media | Integrates social sharing features | Social Warfare, Monarch |
Ultimately, the right plugin will depend on your unique requirements and goals. Investing time in selecting the perfect plugin not only enhances your site’s functionality but can also improve user experience and engagement. So, take a moment to research your options before hitting that install button!
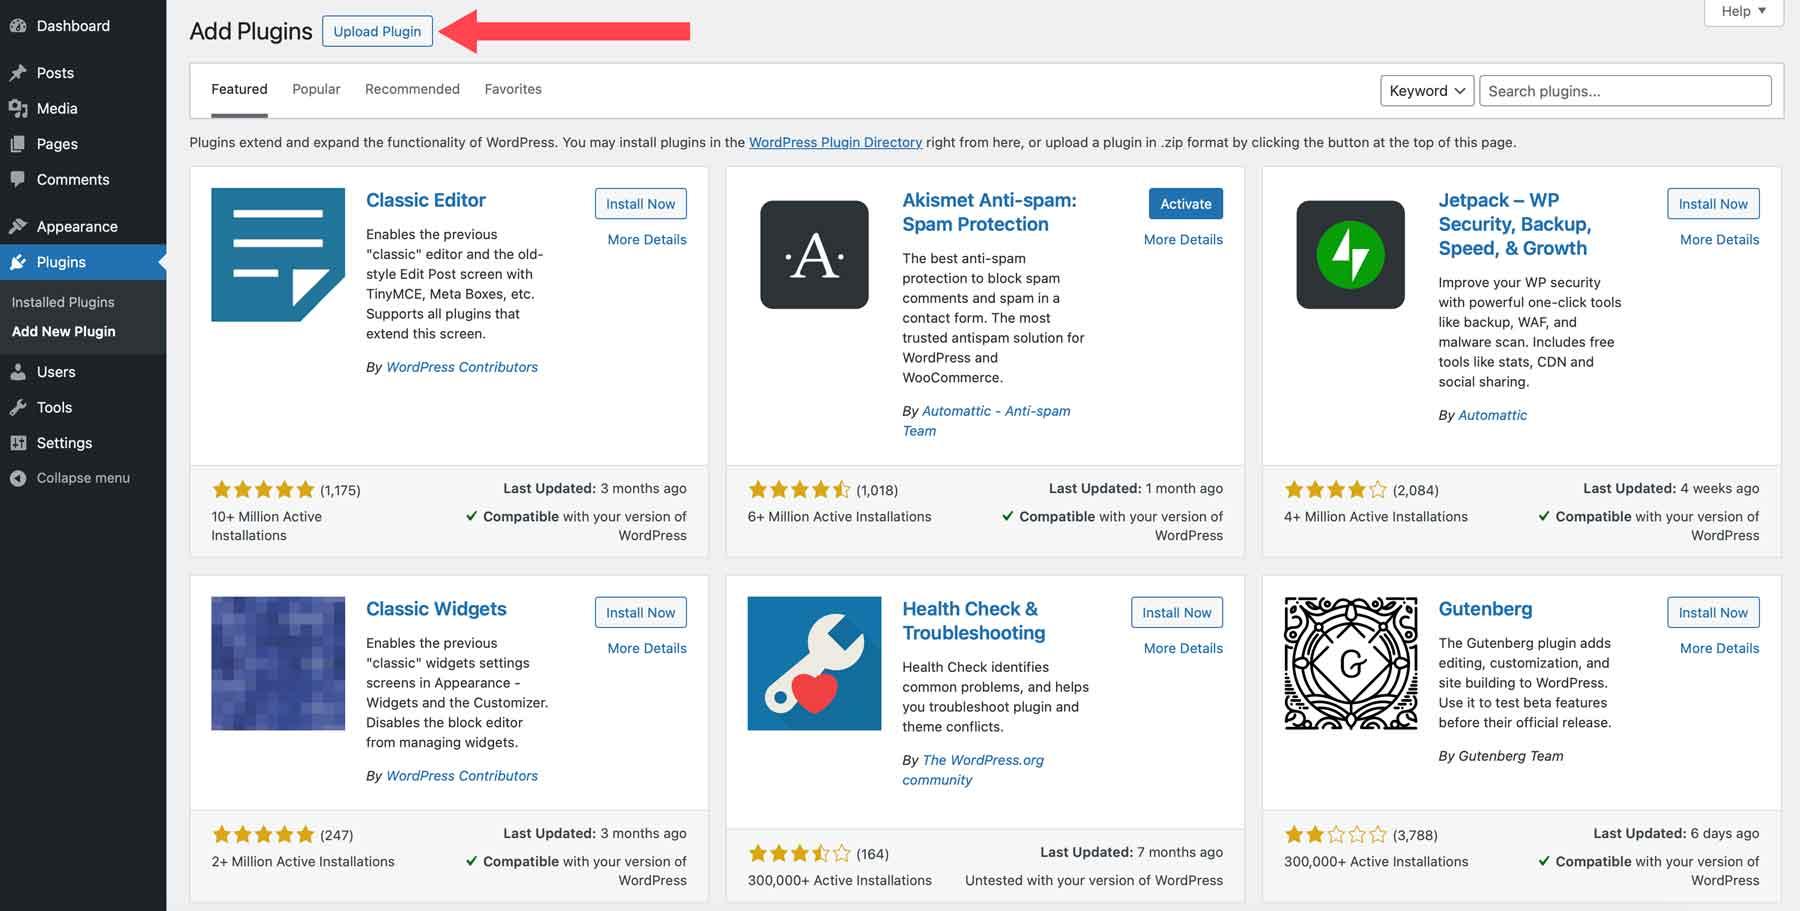
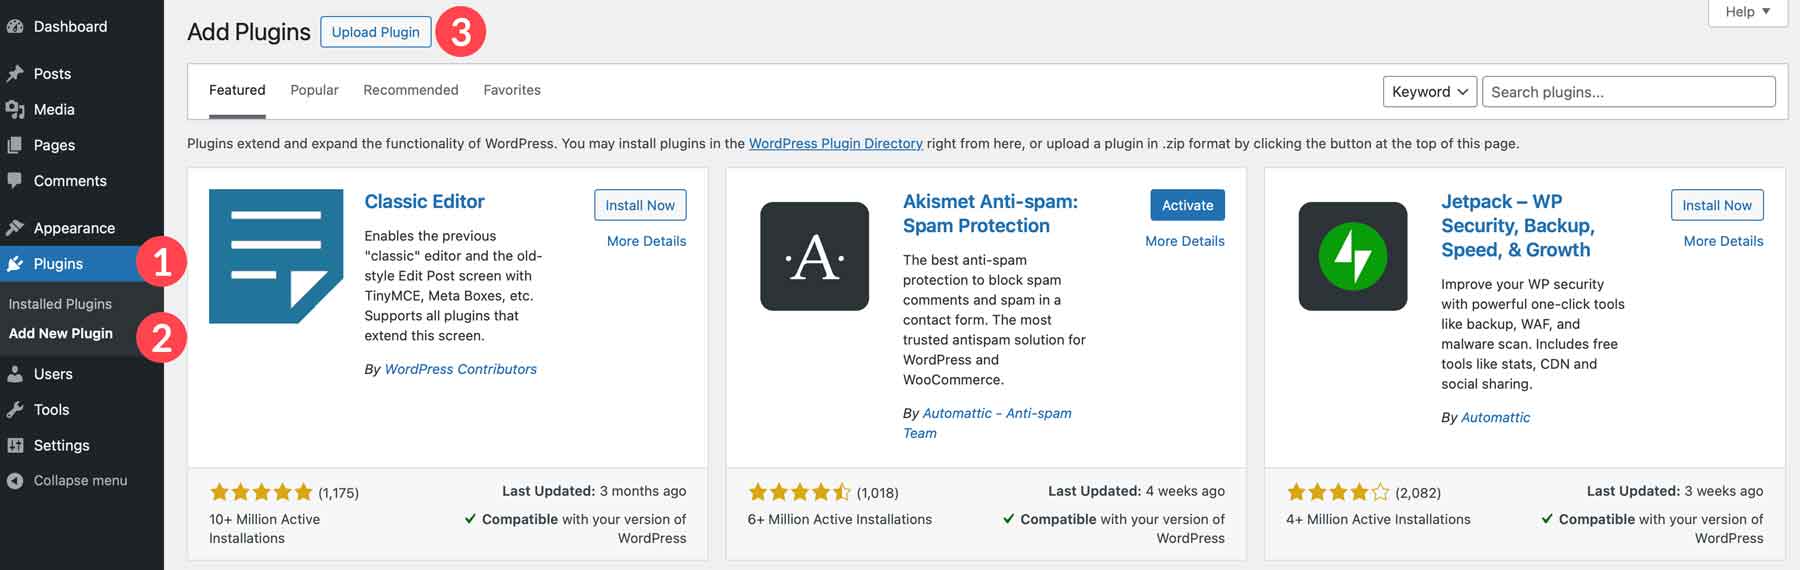
How to Access the WordPress Plugin Directory
Accessing the WordPress Plugin Directory is a straightforward process that opens the door to myriad functionalities for your website. Whether you’re looking to enhance your site’s SEO, improve performance, or add custom features, the Plugin Directory offers thousands of options to choose from. Here’s how you can easily navigate this treasure trove of plugins.
To get started, log into your WordPress dashboard. Once inside, look for the Plugins menu on the left-hand side. Clicking on this will reveal a submenu, and from there, select Add New. This will bring you to the Plugin Directory, where you can search for plugins by name or browse through featured, popular, or recommended options.
Searching for the right plugin can feel overwhelming, but there are handy filters to streamline your experience:
- Search Bar: Type in keywords related to the functionality you need.
- Filter by Features: Use the filters to narrow down options based on categories like “eCommerce,” “SEO,” or “Security.”
- Sort by Popularity: Check out the most popular plugins to find options that others are already using successfully.
As you explore various plugins, pay attention to key details including:
| Plugin Name | Rating | Active Installations |
|---|---|---|
| Yoast SEO | 4.9 | 5+ million |
| WooCommerce | 4.8 | 5+ million |
| Wordfence Security | 4.8 | 4+ million |
Before you decide to install any plugin, it’s wise to read through the user reviews and ratings. This will give you insights into the plugin’s reliability and effectiveness. Additionally, consider the last update date and compatibility with your current version of WordPress to ensure that the plugin will function correctly on your site.
don’t hesitate to explore the plugin’s official page for detailed descriptions, screenshots, and FAQs. This information can be invaluable in helping you make informed decisions. Once you’ve found a plugin that meets your needs, you can install it right from the directory with just a click. Happy plugin hunting!
Step-by-Step Guide to Installing a Plugin
Installing a WordPress plugin is a simple yet powerful way to enhance the functionality of your website. Follow this straightforward process to get your desired plugin up and running in no time.
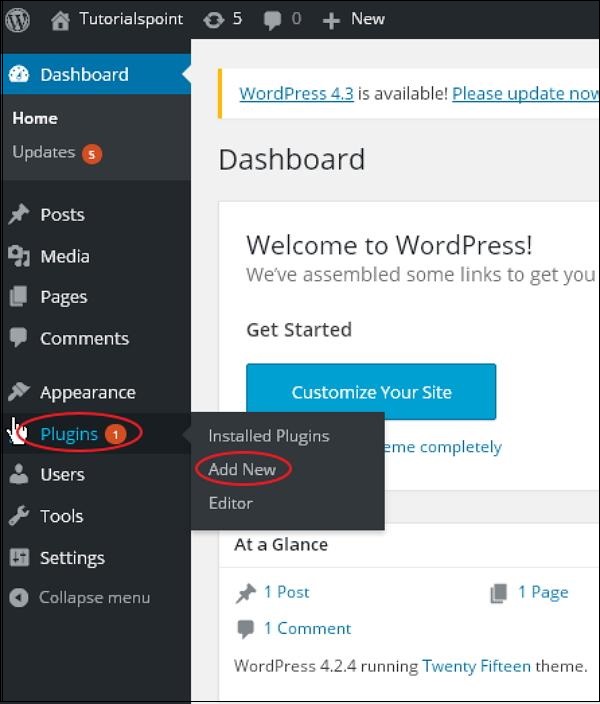
First, you need to access your WordPress dashboard. Log in using your admin credentials and navigate to the Plugins section on the left-hand menu. Once there, you will see a few options.
- Add New: This is where you can browse through the WordPress Plugin Directory.
- Installed Plugins: A list of plugins you’ve already added, where you can manage existing installations.
To add a new plugin, click on Add New. You can use the search bar to find a specific plugin or explore featured, popular, or recommended plugins. Once you find the plugin you want, simply click the Install Now button. This initiates the installation process.
After installation, the button will change to Activate. Click it to enable the plugin on your site. Some plugins might require additional settings or configurations. Look for a new menu item added to your dashboard, or check under the Settings menu to customize it according to your needs.
If you prefer to install plugins from a zip file, you can do so by choosing the Upload Plugin option on the Add New Plugins page. Click Choose File, select your zipped plugin file, and then hit Install Now. Once installed, activate it as before.
| Step | Action |
|---|---|
| 1 | Log into WordPress Dashboard |
| 2 | Navigate to Plugins > Add New |
| 3 | Search for the desired plugin |
| 4 | Click Install Now |
| 5 | Activate the plugin |
Activating Your New Plugin with Ease
Once you’ve installed your new plugin, the next step is to activate it and unleash its potential. Activating a plugin in WordPress is as straightforward as pie, but knowing where to look is key. Here’s how to get that plugin up and running in just a few clicks:
- Navigate to the Plugins Menu: Log into your WordPress dashboard and click on the Plugins menu on the left sidebar. This is where all your installed plugins will be listed.
- Find Your Plugin: Scan through the list or use the search bar for faster navigation to locate your newly installed plugin.
- Click Activate: Once you find it, simply click the Activate link located under the plugin’s name. Voila! Your plugin is now live.
After activation, many plugins will require additional setup or configuration. This is where the real magic happens, as you customize the settings to fit your site’s needs. Here are a few common next steps:
- Explore the plugin’s settings page, usually found under the Settings menu or directly in the Plugins list.
- Refer to the plugin documentation for a comprehensive guide on making the most out of its features.
- Don’t shy away from experimenting with different settings; many plugins allow you to preview changes before going live.
Some plugins also offer a dashboard widget or a dedicated menu item. If you don’t see any immediate options, it might be hidden under a new submenu or settings tab. Keep an eye out for:
| Plugin Type | Activation Location |
|---|---|
| SEO Plugins | Settings > SEO |
| Security Plugins | Dashboard > Security |
| E-commerce Plugins | Settings > WooCommerce |
Congratulations on activating your plugin! You’re now ready to take advantage of its features and enhance your WordPress site. Remember, a little exploration can lead to discovering powerful tools that can streamline your workflow and improve user experience. Don’t hesitate to dive in and see what your new plugin can really do!
Configuring Plugin Settings for Optimal Performance
Once you’ve successfully installed your WordPress plugin, the next crucial step is to configure its settings to ensure optimal performance. Many plugins come with a variety of options that can significantly impact how they function on your site. By taking the time to tweak these settings, you can enhance not only the plugin’s functionality but also your site’s overall speed and user experience.
Start by navigating to the plugin’s settings page, typically found under the Settings or Tools menu in your WordPress dashboard. Here are some essential considerations that can help you make informed decisions:
- Understand the Features: Familiarize yourself with all the features the plugin offers. Read the documentation or help section to know what each option does.
- Adjust Performance Settings: Many plugins include performance settings that can be enabled or disabled based on your needs. For example, caching plugins often allow you to choose the level of caching that best suits your website’s traffic.
- Set User Preferences: If your plugin has user-related functionalities, customize settings that allow users to enjoy a personalized experience.
Don’t forget to check compatibility settings, especially if your theme or other plugins may conflict with the one you’ve installed. Use the following table to ensure you are on the right path:
| Setting | Description | Recommended Action |
|---|---|---|
| Cache Settings | Controls how and when data is cached for faster loading. | Enable caching and adjust the time interval based on user traffic. |
| Load Scripts | Determines when and how scripts are loaded on your site. | Defer non-critical scripts to improve page load times. |
| Optimization Options | Settings for optimizing images, minifying CSS/JS. | Turn on optimization features to speed up loading times. |
Lastly, after making adjustments, always test your site’s performance. Use tools like Google PageSpeed Insights or GTmetrix to see how your changes affect loading times. This step is vital—not just for your plugin settings, but for your entire website’s user experience. Fine-tuning your plugin configurations will go a long way in ensuring your site runs like a well-oiled machine.

Keeping Your Plugins Updated for Security and Functionality
Staying on top of your plugins is essential for ensuring that your WordPress site remains secure and runs smoothly. Outdated plugins can be a gateway for hackers, exposing your site to vulnerabilities. Moreover, regular updates often come with new features and improved functionality that can enhance your user experience.
Here are some key reasons why keeping your plugins updated is crucial:
- Security Enhancements: Developers frequently release updates to patch security vulnerabilities. By neglecting to update, you might be leaving your site open to attacks.
- Improved Performance: New versions often include performance optimizations, which can lead to faster loading times and a better overall experience for your visitors.
- Compatibility Fixes: As WordPress evolves, plugins must adapt to ensure compatibility with the latest version. Staying updated helps prevent conflicts between plugins and WordPress.
- New Features: Updates frequently introduce new features that can add value to your site. Keeping your plugins current allows you to take advantage of these enhancements.
To effectively manage your plugin updates, consider implementing a regular schedule. Setting aside time weekly or bi-weekly can help you stay ahead of updates without feeling overwhelmed. Don’t forget to back up your site before making any changes; this ensures that you can quickly restore your site if anything goes wrong during an update.
| Update Frequency | Recommended Action |
|---|---|
| Daily | Check for updates and apply security patches. |
| Weekly | Review plugin performance and user feedback. |
| Monthly | Conduct a comprehensive review of all plugins. |
your site’s security and functionality are directly tied to how well you manage your plugins. By prioritizing updates, not only do you protect your site, but you also enhance its capabilities, giving your users a seamless experience. Make plugin management a priority, and your WordPress site will thank you for it!
Troubleshooting Common Plugin Installation Issues
Installing a plugin in WordPress should be a straightforward process, but sometimes things don’t go as planned. If you encounter issues during installation, don’t worry—many common problems can be resolved with a few simple steps. Here’s a quick guide to help you troubleshoot these pesky installation headaches.
First and foremost, check your WordPress version. Some plugins require a specific minimum version of WordPress to function properly. To see your current version, go to Dashboard > Updates. If your version is outdated, update it to the latest release. This might solve the compatibility issue right away!
Another frequent culprit is the file permissions on your server. If the permissions are too restrictive, WordPress may not be able to install the plugin properly. Ensure the following settings are in place:
- Directories: 755
- Files: 644
You can modify these settings via your FTP client or through your hosting control panel. If you’re uncertain, reach out to your hosting provider for assistance.
If you receive a “fatal error” or “installation failed” message, it may indicate that the plugin is incompatible with your theme or another plugin. To diagnose the issue, try deactivating all other plugins temporarily. If the installation succeeds, reactivate them one by one to identify the conflicting plugin.
| Common Error Messages | Potential Solutions |
|---|---|
| Installation Failed | Check file permissions and server settings. |
| Fatal Error | Deactivate all plugins and reactivate one by one. |
| Plugin Not Found | Ensure the plugin name is spelled correctly. |
Lastly, if you’re still facing issues, consider the PHP memory limit. Insufficient memory can prevent installations from completing. You can increase the memory limit by adding the following line to your wp-config.php file:
define('WPMEMORYLIMIT', '256M');Remember to back up your site before making changes! With these troubleshooting tips in hand, you’ll be well on your way to a smoother plugin installation experience.

Exploring Must-Have Plugins for Every WordPress Site
When diving into the world of WordPress, the right plugins can make a significant difference in your site’s functionality and user experience. These essential tools not only enhance your site’s capabilities but also streamline your workflow, allowing you to focus on what really matters—creating great content. Here are some must-have plugins that every WordPress site should consider:
- Yoast SEO – This powerful plugin helps you optimize your content for search engines, making sure your site is easily discoverable.
- WooCommerce – Perfect for those looking to sell products online, this plugin turns your WordPress site into a fully functional eCommerce store.
- WPForms – Create beautiful contact forms in minutes, enabling effective communication with your visitors.
- Akismet – Protect your site from spam comments with this essential plugin, keeping your community clean and engaging.
- Elementor – A drag-and-drop page builder that allows you to design stunning layouts without needing to touch a line of code.
Understanding how to effectively utilize these plugins can elevate your site’s performance and user satisfaction. For example, by integrating Yoast SEO, you can gain insights into your content’s readability and keyword usage, helping you craft posts that rank better in search results. Additionally, WooCommerce offers a wide array of features, from inventory management to payment gateways, making it easier for you to manage your online store.
To give you a clearer picture of how these plugins stack up, here’s a quick comparison table:
| Plugin | Functionality | Best For |
|---|---|---|
| Yoast SEO | SEO Optimization | Content Creators |
| WooCommerce | eCommerce Solutions | Online Store Owners |
| WPForms | Form Building | Website Owners |
| Akismet | Spam Protection | Bloggers |
| Elementor | Page Building | Design Enthusiasts |
Each of these plugins adds unique value to your WordPress site, making it easier to engage with your audience, improve your online visibility, and streamline your daily operations. Remember, the right selection of plugins will not only enhance your site’s functionality but also keep your visitors coming back for more!
Best Practices for Managing Your WordPress Plugins
Managing your WordPress plugins effectively is crucial for maintaining a healthy and efficient website. Here are some best practices to consider:
- Regular Updates: Always keep your plugins up-to-date. Developers frequently release updates to fix bugs, enhance security, and add new features. Ignoring updates can leave your site vulnerable to attacks.
- Limit the Number of Plugins: Fewer plugins mean better performance. Aim to use only the essential plugins that serve a specific purpose. Deactivate and delete any plugins that you no longer need.
- Quality Over Quantity: Choose well-reviewed and regularly updated plugins from reputable sources. Poorly coded plugins can lead to security risks and site performance issues.
Another important aspect of plugin management is to regularly monitor the performance of your site. You can do this by:
- Using Performance Testing Tools: Tools like GTmetrix or Pingdom can help you assess how plugins impact load times.
- Checking for Conflicts: If you notice site issues, try deactivating plugins one by one to identify any conflicts.
Documenting your plugin usage is also beneficial. Consider maintaining a simple table that includes:
| Plugin Name | Purpose | Last Updated |
|---|---|---|
| Yoast SEO | SEO Optimization | October 2023 |
| WooCommerce | E-commerce Functionality | September 2023 |
| Wordfence | Security | October 2023 |
By following these practices, you can ensure that your WordPress plugins enhance your site without compromising its performance or security. A proactive approach to plugin management will not only improve user experience but also support the long-term success of your website.
Frequently Asked Questions (FAQ)
Q: What is a WordPress plugin, and why should I use one?
A: Great question! A WordPress plugin is like an app for your website. It adds new features or enhances functionality without the need for coding. Whether you want to improve your site’s SEO, add a contact form, or integrate social media, there’s a plugin for that! By using the right plugins, you can make your site more user-friendly, attractive, and functional, which ultimately helps you achieve your goals—be it a blog, an online store, or a portfolio.
Q: How do I find the right plugin for my needs?
A: Finding the perfect plugin is easier than you might think! Start by identifying what you want to achieve with your website. Then, head over to the WordPress Plugin Directory or search within your WordPress dashboard. You can browse categories or use the search bar to find specific functionalities. Look for plugins with good ratings, recent updates, and positive reviews. Remember, a well-supported plugin is crucial for your site’s security and compatibility!
Q: How do I install a WordPress plugin? Is it complicated?
A: Not at all! Installing a WordPress plugin is super simple. There are two main methods:
- Through the Dashboard: Go to your WordPress admin panel, click on “Plugins,” then “Add New.” Search for your desired plugin, and once you find it, click “Install Now” and then “Activate.” It’s like flipping a switch!
- Manually Uploading: If you’ve downloaded a plugin in a ZIP file, go back to the “Plugins” section, click “Add New,” and then select “Upload Plugin.” Choose the ZIP file, click “Install Now,” and activate it afterward.
Just like that, you’re good to go!
Q: Are plugins safe to use? How can I ensure they won’t harm my website?
A: Your concern is valid! While many plugins are safe and secure, some can pose risks. To keep your site safe, only download plugins from trusted sources, check for regular updates, and read reviews. Additionally, make sure to keep your plugins updated to the latest version. Having a backup solution in place is also a smart move—just in case something goes awry.
Q: How do I manage and update my plugins once they’re installed?
A: Managing your plugins is just as easy as installing them! In your WordPress admin panel, go to “Plugins” to see a list of all your installed plugins. From there, you can activate, deactivate, or delete any plugin. Updates will be indicated with a notification, and you can simply click “Update Now” to keep everything running smoothly. Regularly checking for updates ensures your site stays secure and performs at its best!
Q: What if I experience problems after installing a plugin?
A: No need to panic! If you run into issues, first try deactivating the plugin to see if that resolves the problem. If it does, you can look for alternatives or reach out to the plugin’s support forum for help. Always make sure to test new plugins on a staging site if possible, so your live website remains unaffected.
Q: Can I use multiple plugins, or will that slow down my website?
A: You can absolutely use multiple plugins! However, it’s essential to choose wisely. A few well-coded plugins can work wonders, but too many poorly optimized ones might slow down your site. Regularly audit your plugins and deactivate any that you aren’t using or find redundant. This helps maintain your site’s speed and performance!
Q: What are some must-have plugins for beginners?
A: Awesome question! Here are a few essentials for any beginner:
- Yoast SEO or Rank Math – for optimizing your content for search engines.
- Elementor or Gutenberg – for intuitive page building.
- WPForms or Contact Form 7 – to create easy contact forms.
- WooCommerce – if you plan on selling products or services.
- UpdraftPlus – for backing up your site.
These plugins will help you get off to a fantastic start!
With this guide, you’re ready to dive in and enhance your WordPress site with plugins! Remember, the right tools can help you build the site of your dreams. Happy plugging!
To Wrap It Up
Wrapping It Up: Your WordPress Journey Awaits!
Congratulations! You’ve now mastered the art of installing a WordPress plugin, and that’s no small feat. By following this beginner’s guide, you’re not just adding tools to your website; you’re unlocking a world of possibilities to enhance your online presence. Whether you’re looking to optimize your site’s performance, improve security, or boost user engagement, the right plugins can be game-changers.
Remember, the beauty of WordPress lies in its flexibility and the vibrant community that supports it. So don’t hesitate to explore, experiment, and, most importantly, enjoy the process! If you encounter any bumps along the way, you’ve got a wealth of resources at your fingertips—from forums to tutorials.
Now it’s your turn to take action! Dive into the plugin repository, find the tools that resonate with your vision, and start transforming your website into the digital space you’ve always dreamed of. Your journey doesn’t end here; it’s just the beginning. Happy blogging, and may your website thrive!