Unlock the Power of Shipping Classes in WooCommerce: A Beginner’s Guide
Are you ready to take your WooCommerce store to the next level? If you’ve ever found yourself scratching your head over shipping options or struggling to set up a seamless checkout experience for your customers, you’re not alone. Shipping can be one of the most complex aspects of running an online business, but it doesn’t have to be! Enter shipping classes—your secret weapon for mastering shipping logistics.
Whether you’re selling bulky furniture, delicate jewelry, or anything in between, understanding how to effectively use shipping classes can save you time, reduce costs, and enhance customer satisfaction. In this beginner-friendly guide, we’ll walk you through the ins and outs of shipping classes in WooCommerce, empowering you to create tailored shipping solutions that meet the unique needs of your products and customers. So, grab a cup of coffee and let’s dive in—your path to streamlined shipping starts here!
Understanding Shipping Classes in WooCommerce
Shipping classes in WooCommerce are indispensable tools that enable you to streamline your shipping process. By categorizing products into different shipping classes, you can manage shipping rates more effectively and cater to the diverse needs of your customers. Understanding how to use these classes can significantly enhance your online store’s efficiency and customer satisfaction.
When setting up shipping classes, you can group products based on factors such as:
- Weight: Heavier items may require different shipping rates compared to lighter products.
- Size: Bulky items could necessitate special handling or pricing.
- Type: Fragile items might need extra care during transit.
- Destination: Shipping rates could vary based on the delivery location.
To create a shipping class, navigate to the WooCommerce settings in your WordPress dashboard. Here’s a quick overview of the process:
- Go to WooCommerce > Settings > Shipping.
- Select the Shipping Classes tab.
- Click on Add Shipping Class and define your class name.
- Assign a cost for each class, which will be calculated at checkout.
Once your shipping classes are set up, assigning them to products is a breeze. During product creation or editing, you can assign a shipping class from a dropdown menu. This enables WooCommerce to automatically apply the correct shipping rate at checkout.
For a clearer understanding, consider the following example of a shipping class table:
| Shipping Class | Description | Rate |
|---|---|---|
| Standard Shipping | Regular items with standard delivery. | $5.00 |
| Heavy Items | For items weighing over 10 lbs. | $15.00 |
| Fragile Items | Special handling for delicate products. | $10.00 |
Leveraging shipping classes not only helps you manage logistics more effectively but also provides transparency to your customers. By clearly communicating shipping costs based on product categories, you can enhance their shopping experience and potentially boost sales. So, take advantage of this powerful feature in WooCommerce and watch your eCommerce business thrive!
Why Shipping Classes Matter for Your Online Store
Shipping classes play a crucial role in the success of your online store, especially when using WooCommerce. They allow you to categorize your products based on various shipping requirements, making it easier to manage costs and delivery methods. By understanding how to use shipping classes effectively, you can enhance customer satisfaction and improve your bottom line.
One of the most significant benefits of implementing shipping classes is the ability to:
- Differentiate Shipping Costs: Not all products weigh the same or require the same shipping methods. By assigning different shipping classes, you can set unique shipping rates based on the product type or destination, ensuring that customers only pay for the shipping they need.
- Streamline Shipping Options: Shipping classes enable you to offer specific options for certain products. For instance, you can provide express shipping for fragile items while offering standard shipping for bulkier goods.
- Enhance Customer Experience: Clear and accurate shipping costs displayed at checkout help build trust with your customers. When they see fair pricing based on their selected products, they’re more likely to complete their purchase.
To illustrate the impact of using shipping classes, consider the following table on potential shipping classes you might implement:
| Shipping Class | Description | Example Products |
|---|---|---|
| Standard | Regular shipping for non-fragile items | T-shirts, Books |
| Fragile | Careful handling with higher fees | Glassware, Electronics |
| Heavy | For heavy items that require special shipping | Furniture, Appliances |
By custom-tailoring your shipping options using these classes, you can effectively cater to the diverse needs of your customer base. This not only promotes better purchasing decisions but also minimizes the risk of returns due to shipping-related issues. Remember, the goal is to make shipping as seamless as possible for your customers while ensuring that it aligns with your operational costs.
Ultimately, investing time in configuring shipping classes in WooCommerce is a strategic move that pays off. It empowers you to maintain control over your shipping processes while giving your customers a transparent and reliable experience. By mastering shipping classes, you position your online store for growth and customer loyalty.
Setting Up Your First Shipping Class: A Step-by-Step Guide
Setting up your first shipping class in WooCommerce is a straightforward process that can significantly enhance your online store’s shipping capabilities. With just a few steps, you can create a tailored shipping experience for your customers, ensuring they only pay for shipping that reflects the products they order. Here’s how to get started:
Create a New Shipping Class
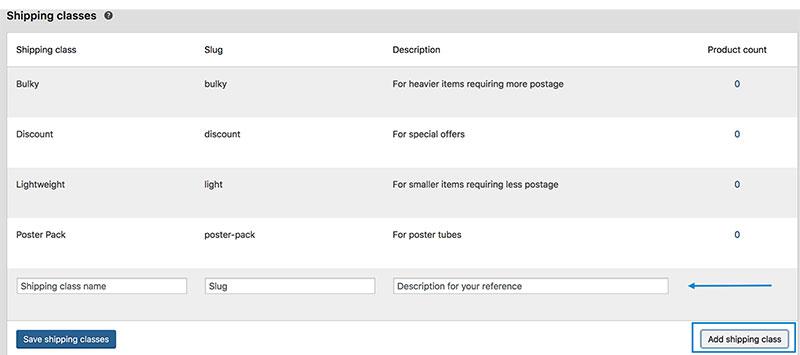
To set up a shipping class, navigate to WooCommerce > Settings > Shipping. From there, you’ll want to click on the Shipping Classes tab. Here’s what to do:
- Click on the Add Shipping Class button.
- Enter the name of your shipping class (e.g., Heavy Items).
- Provide a description to help understand what this class is for.
- Press Save Shipping Classes to finalize the addition.
Assign Products to Your Shipping Class
Now that you have created your shipping class, it’s time to assign it to relevant products. Here’s how:
- Go to Products in your WooCommerce dashboard.
- Edit the product you want to assign to the shipping class.
- In the Product Data section, find the Shipping tab.
- Select your newly created shipping class from the dropdown menu.
- Update the product to save the changes.
Configure Shipping Rates
With your products assigned to shipping classes, it’s time to set your shipping rates. This can be tailored based on the shipping class you just created:
- Navigate back to WooCommerce > Settings > Shipping.
- Select the Shipping Zone you wish to edit.
- Click on Add Shipping Method and choose Flat Rate.
- Edit the Flat Rate settings and add a cost for the specific shipping class under the Cost section.
Review Your Setup
it’s always a good idea to test your new shipping class to ensure everything is functioning correctly. Consider placing a test order with products assigned to the new shipping class to see how the shipping rates apply at checkout. If something seems off, double-check your settings to ensure they reflect your intentions.
Assigning Shipping Classes to Products Made Easy
Assigning shipping classes to your products in WooCommerce can seem daunting at first, but with a few simple steps, you can streamline the shipping process and enhance customer satisfaction. Shipping classes allow you to categorize your products based on similar shipping requirements, making it easier to apply specific shipping rates to different product types.
To get started, navigate to your WooCommerce settings and select the Shipping tab. Here, you’ll find the option to manage shipping zones. Once you have your shipping zones set up, you can start creating shipping classes:
- Click on “Shipping Classes”: This is where you can add new shipping classes.
- Add a New Shipping Class: Give it a descriptive name that reflects the category of products, like “Heavy Items” or “Fragile Goods.”
- Set Costs: Define the shipping cost for each class, which can differ depending on the shipping method selected.
Once your shipping classes are set up, it’s time to assign them to your products. Go to your product listings and edit the items you want to categorize:
- Locate the Product Data Section: Scroll down to find the “Shipping” tab.
- Select Shipping Class: From the dropdown menu, choose the appropriate shipping class you created earlier.
- Update the Product: Save your changes to apply the shipping class.
Using shipping classes not only makes it easier to manage shipping rates but also provides transparency for your customers. They can see the shipping fees associated with the items in their cart, which reduces confusion and increases trust in your store. Furthermore, you can easily adjust shipping rates based on seasonal changes or special promotions by modifying the shipping class settings.
| Shipping Class | Shipping Cost |
|---|---|
| Standard Items | $5.00 |
| Heavy Items | $15.00 |
| Express Shipping | $20.00 |
By efficiently categorizing your products with shipping classes, you’ll not only simplify your logistics but also enhance the shopping experience for your customers. Take advantage of this feature to optimize your store’s operations and ensure timely deliveries!
Tailoring Shipping Rates: How to Optimize for Customer Satisfaction
To get started, you’ll want to define your shipping classes clearly. Consider the different products you offer and how their sizes, weights, and categories affect shipping costs. For instance:
- Heavy Items: Charge higher rates due to increased shipping expenses.
- Lightweight Products: Offer lower rates to encourage purchases.
- Local Deliveries: Consider flat rates or free shipping for nearby customers to foster community loyalty.
| Shipping Class | Rate Type | Description |
|---|---|---|
| Standard Shipping | Flat Rate | General rate for most products. |
| Express Shipping | Variable Rate | For urgent deliveries with higher costs. |
| Free Shipping | Free | On orders over a certain amount. |
Once you’ve set your shipping classes, it’s crucial to communicate these rates clearly on your website. Use simple language and highlight any free shipping thresholds to encourage larger orders. Customers appreciate transparency; knowing exactly how much they’ll pay for shipping helps them feel more confident in their purchasing decision.
don’t forget to monitor and adjust your shipping classes based on customer feedback and sales data. Are customers frequently abandoning their carts at checkout due to shipping costs? If so, it might be time to reconsider your strategy. Regularly reviewing shipping costs and customer preferences can lead to innovative solutions that boost satisfaction and drive sales.
Common Mistakes to Avoid When Using Shipping Classes
When managing shipping classes in WooCommerce, it’s easy to fall into certain traps that can lead to confusion and a poor customer experience. Here are some common pitfalls to avoid:
- Overcomplicating Shipping Classes: One of the biggest mistakes is creating too many shipping classes. While it may seem beneficial to offer a wide variety of options, excessive classes can confuse both you and your customers. Aim for clarity and simplicity.
- Neglecting Weight and Dimensions: Many users forget to accurately input product weights and dimensions, which can lead to incorrect shipping calculations. Always double-check these details to ensure your shipping rates are fair and accurate.
- Ignoring Local and International Options: Failing to differentiate between local and international shipping can result in unexpected costs for your customers. Set clear shipping classes that reflect the different pricing and delivery times associated with each region.
- Not Testing Your Settings: After setting up your shipping classes, it’s vital to test them thoroughly. Place test orders to ensure that the right shipping options and costs appear at checkout. This step helps catch any errors before real customers encounter them.
To further illustrate these points, consider the following table that outlines effective shipping class strategies:
| Common Mistake | Alternative Action |
|---|---|
| Too Many Shipping Classes | Simplify to 3-5 classes based on product types. |
| Incorrect Weights/Dims | Verify all product weights and dimensions. |
| One Size Fits All | Create distinct classes for local vs. international. |
| Lack of Testing | Run multiple test transactions before going live. |
By steering clear of these common mistakes, you’ll not only enhance your store’s efficiency but also improve the overall shopping experience for your customers. A well-structured and thoughtfully managed shipping class system can lead to higher satisfaction rates and increased sales.
Using Shipping Classes to Boost Your Stores Flexibility
Shipping classes in WooCommerce serve as a powerful tool to enhance the flexibility of your online store, allowing you to customize shipping rates based on the specific needs of your products. By grouping similar items together, you can ensure that your customers are charged accurately, improving their shopping experience and increasing the likelihood of completing a purchase.
When setting up shipping classes, consider the following benefits:
- Custom Pricing: Assign different shipping rates to products based on size, weight, or category. For instance, you might want to charge less for lightweight items while charging more for heavy or bulky products.
- Targeted Promotions: Offer free shipping or discounted rates for specific product classes during seasonal sales or special promotions to entice buyers.
- Streamlined Management: Easily manage shipping options for large inventories by categorizing products into relevant shipping classes, simplifying your shipping strategy.
To implement shipping classes effectively, you will need to:
- Navigate to WooCommerce > Settings > Shipping.
- Select the Shipping Classes tab and create new classes based on your product categories.
- Assign these classes to individual products in the product data section.
Here’s a simple example of how you might categorize products:
| Shipping Class | Description | Shipping Rate |
|---|---|---|
| Standard | Regular-sized items | $5.00 |
| Heavy | Items over 5kg | $15.00 |
| Bulky | Oversized items | $25.00 |
Utilizing shipping classes can also aid in reducing cart abandonment rates. Customers often hesitate to complete their orders if they perceive shipping costs as unclear or inconsistent. By clearly defining your shipping classes, you cultivate trust and transparency, which can lead to higher conversion rates. So, don’t underestimate the power of a well-structured shipping strategy in wooing your customers.
Advanced Tips for Mastering Shipping Classes in WooCommerce
When it comes to optimizing your shipping strategy in WooCommerce, understanding the nuances of shipping classes can make a world of difference. Shipping classes allow you to group products based on their shipping requirements, enabling you to set specific rates and rules that cater to different categories of items. This level of customization not only enhances your customer experience but also increases your operational efficiency.
- Create Clear Categories: Organize your products into meaningful shipping classes. For example, you might have classes for “Heavy Items,” “Fragile Goods,” and “Express Shipping.” This clarity helps in applying accurate shipping rates tailored to each category.
- Utilize Conditional Shipping: Take advantage of conditional shipping rules to apply specific rates based on the customer’s location, total cart weight, or even the types of items in the cart. This can be done through plugins that enhance WooCommerce’s native shipping capabilities.
- Test Different Rates: Regularly review and test your shipping rates. What works well at one time may not be effective later as your product range and customer base evolve. Use A/B testing to find the optimal pricing strategy that maximizes conversions.
Another effective strategy is to leverage shipping class-specific promotions. Customers love a good deal, and by offering promotional shipping rates for certain classes, you can encourage purchases of items that may not typically fly off the shelves. For instance, try offering free shipping on “Heavy Items” during a promotional period; it might just turn a lagging product into a best-seller!
| Shipping Class | Standard Rate | Discounted Rate |
|---|---|---|
| Heavy Items | $10.00 | $5.00 |
| Fragile Goods | $15.00 | $12.00 |
| Standard Items | $6.00 | $0.00 |
Lastly, don’t forget about the importance of communication. Make sure to clearly display shipping costs and options at every stage of the purchasing process. A well-placed note on your product pages about shipping classes can help set expectations and reduce cart abandonment. Transparency builds trust, and when customers know exactly what they’re paying for, they are more likely to complete their purchase.
Troubleshooting Shipping Class Issues: Solutions for Beginners
When using shipping classes in WooCommerce, you may encounter a few common pitfalls that can disrupt your shipping calculations. Whether it’s a misconfigured shipping class or an issue with how products are associated with classes, these problems can lead to frustration. Here’s how to diagnose and fix these issues effectively.
1. Verify Shipping Class Assignments
First and foremost, check if your products are assigned the correct shipping classes. Navigate to the product edit page and look for the “Shipping” tab. Ensure that the right shipping class is selected for each product. If you’re not seeing the expected rates, this could be the culprit.
2. Review Shipping Class Settings
Next, it’s essential to inspect your shipping class settings. Go to WooCommerce > Settings > Shipping and click on the relevant shipping zone. Make sure that the shipping methods and classes are properly configured. Sometimes rates might not display because no shipping method is available for the chosen class.
3. Check for Conflicting Plugins
Plugins can sometimes clash, causing unexpected behaviors. Temporarily disable any recently added plugins to see if they are interfering with your shipping class functionality. If the issue resolves, re-enable each plugin one at a time to identify the culprit.
4. Clear Caches
If you’re using caching plugins or a CDN, make sure to clear your cache after making changes to shipping settings. Cached data can result in outdated shipping rates being displayed to your customers.
5. Use Debugging Tools
Take advantage of WooCommerce’s built-in debugging tools. Enable the Shipping Debug Log to track shipping calculations and identify any errors that may arise during the process. This feature can provide valuable insights into what’s going wrong.
| Common Issues | Quick Fixes |
|---|---|
| Product not showing shipping class | Check product settings for correct assignment |
| Incorrect shipping rates | Review shipping zone settings |
| Shipping options missing | Ensure shipping methods are enabled |
Unlocking the Full Potential of Shipping Classes for Increased Sales
Understanding and utilizing shipping classes can significantly enhance your WooCommerce store’s effectiveness. By categorizing your products into different shipping classes, you can tailor shipping rates based on the specific needs of each product type, ultimately leading to increased sales. Here’s how you can unlock the full potential of shipping classes:
First and foremost, define your shipping classes. Consider the various types of products you sell and the shipping methods that may apply to them. Here are a few examples of how you might categorize your items:
- Heavy Items: Products that require special handling or incur higher shipping costs.
- Fragile Goods: Items that need careful packaging and handling.
- Digital Products: Items that do not require shipping but could benefit from specific delivery considerations.
Next, set competitive shipping rates for each class. To ensure you’re not overcharging or undercharging, consider your competitors’ shipping fees and analyze your costs. Here’s a simple breakdown of potential rates for different classes:
| Shipping Class | Flat Rate | Free Shipping Threshold |
|---|---|---|
| Heavy Items | $15.00 | $200.00 |
| Fragile Goods | $10.00 | $150.00 |
| Digital Products | Free | N/A |
Furthermore, don’t forget to promote your shipping offers effectively. Customers are often drawn to stores that offer free shipping or discounted rates. Ensure that your shipping classes are clearly communicated on your product pages, in your marketing materials, and during the checkout process. Consider using bold calls to action, like:
- “Free shipping on orders over $150!”
- “Get your fragile items safely with our special handling class!”
analyze your shipping performance regularly. Look for trends in what classes are most popular and which shipping methods result in the highest customer satisfaction. By continually refining your approach, you can maximize your shipping strategy and, in turn, your sales. The key takeaway is that leveraging shipping classes is not just about logistics; it’s about creating an exceptional shopping experience that resonates with your customers.
Frequently Asked Questions (FAQ)
Q&A: How to Use Shipping Classes in WooCommerce: For Beginners
Q1: What are shipping classes in WooCommerce?
A1: Shipping classes in WooCommerce are a fantastic way to categorize your products based on their shipping needs. Think of them as labels for your products—like “heavy,” “fragile,” or “digital.” By using shipping classes, you can apply different shipping rates or methods to different types of products, ensuring your customers are charged appropriately for delivery. This helps streamline your shipping process and enhances user experience.
Q2: Why should I use shipping classes for my WooCommerce store?
A2: Using shipping classes is essential if you want to provide a tailored and efficient shopping experience. They allow you to:
- Optimize Costs: Different products have varying shipping costs. By categorizing them, you can charge your customers accurately, preventing unexpected expenses for both parties.
- Enhance Flexibility: Shipping classes give you the power to set specific shipping methods for different product types. For example, you can offer free shipping on lighter items while charging a flat rate for bulkier goods.
- Improve Customer Satisfaction: When customers see transparent shipping costs that reflect the product they’re purchasing, it builds trust and encourages them to complete their purchase.
Q3: How do I set up shipping classes in WooCommerce?
A3: Setting up shipping classes is a breeze! Just follow these simple steps:
- Navigate to Settings: Go to your WordPress dashboard, click on ‘WooCommerce’ and then select ‘Settings.’
- Choose Shipping: Click on the ‘Shipping’ tab, and you’ll see the option for ‘Shipping Classes.’
- Add Your Classes: Here, you can create new shipping classes by naming them (like “Standard,” “Express,” or “International”) and adding a description if you like.
- Assign Shipping Classes to Products: Once your classes are created, you’ll need to assign them to individual products. This is done in the product editing section under the ‘Shipping’ tab.
- Configure Rates: go back to the ‘Shipping Zones’ in the shipping settings to set specific rates for each class.
And voilà! You’re ready to go.
Q4: Can I offer free shipping using shipping classes?
A4: Absolutely! Offering free shipping is one of the most effective ways to boost sales, and shipping classes can help you achieve that. You can assign a shipping class for free shipping and then set the rates accordingly in your shipping zone settings. Just select “Free Shipping” as the method for that class. This means, for example, you could offer free shipping on specific products while keeping standard rates for others. It’s a win-win for both you and your customers!
Q5: What if I have different shipping requirements for international customers?
A5: Great question! Shipping classes can also cater to international shipping needs. You can create specific shipping classes for international products and configure different rates for these classes. This ensures that whether your customer is nearby or halfway across the globe, they will receive accurate shipping costs based on their location. By segmenting your shipping classes in this way, you can enhance your global reach without complicating your logistics.
Q6: Is it worth the time to implement shipping classes in my store?
A6: Absolutely! Investing time in setting up shipping classes pays off in the long run. Not only does it streamline your shipping process, but it also enhances customer satisfaction, reduces cart abandonment, and can even increase your sales. When customers feel confident in their total costs and understand their shipping options, they’re more likely to complete their purchases. So why not take the plunge and set up shipping classes today? You’ll be glad you did!
Q7: Can I change shipping classes later on?
A7: Yes, you can! WooCommerce makes it easy to modify your shipping classes as your business evolves. Whether you want to add new classes, remove existing ones, or adjust rates, just go back to your shipping settings and make the necessary changes. Flexibility is key in eCommerce, and WooCommerce allows you to adapt your shipping strategy as needed.
By using shipping classes effectively, you can create a seamless experience for your customers while optimizing your shipping processes. It’s a simple yet powerful tool that every WooCommerce store owner should embrace! So, what are you waiting for? Get started today!
Insights and Conclusions
mastering shipping classes in WooCommerce is an essential step for any online store owner looking to enhance their customers’ shopping experience. By organizing your products effectively and customizing shipping rates, you can not only streamline your operations but also build customer loyalty and boost your sales. Remember, a well-structured shipping strategy can make all the difference in converting a casual browser into a satisfied buyer.
So why wait? Dive into your WooCommerce settings today and start exploring the power of shipping classes! With a little bit of time and creativity, you’ll be well on your way to providing a seamless checkout experience that keeps your customers coming back for more. If you have questions or need further assistance, don’t hesitate to reach out to the WooCommerce community or consult additional resources. Happy selling!

